LinkBack URL
 About LinkBacks

Part 2.
A Fully Updated and Supported Version Of This Guide Is Available At Clunk.org.uk
In Part 2, we will be looking at tweaking voltages and tightening memory timings, and generally optimising your PC, now it is overclocked.
At this point, as we are going a little bit more advanced, I will assume that you have read the other parts of the guide, and you have got to grips with how things work, and how to recover if you stuff it up (a bad overclock, see the troubleshooting guide).
Disclaimer.
Please read this bit, it is very important!
RAM is potentially the easiest thing to kill in a PC. Overvolting any component carries a high risk of damage and/or failure. I take no responsibility for any loss or damage to your components as a result of using this guide. All overclocking is done at your own risk.
A lot of RAM, just will not overclock much, no matter how much voltage you feed it, so if things aren't working out for you in this part of the guide, leave it right there, and seek help on the forums, rather than throwing more voltage at it.
Tightening up those timings.
Now you have a nice, stable, fairly large overclock, we can look at tightening the RAM timings.
At this stage, be prepared for some CMOS clearing, BSODs, and general odd behaviour from your PC to start with, but it will be worth it
If your RAM is already running tight timings, such as 3-4-3-8, then there is no great need for you to follow this part, you can skip to the voltage tweaking part further down.
If you have some RAM that uses Micron D9xxx chips (Check here to see if yours are), you will probably have more success at this point than people that aren't. The Micron D9 chips can often do really insane tight timings at quite high speeds, but often require a good slug of voltage to get there. Some sticks are rated for up to 2.45v, but for this kind of RAM, you need active cooling. Its pretty simple, the higher the voltage, the hotter the sticks will get, and the hotter they get, the more chance you have of getting errors, or even killing the RAM outright, so you need active cooling.
By active cooling, I just mean a fan, directly blowing on the RAM to dissipate the heat that is generated.
I have found that an 80mm or 92mm fan, blowing at a moderate speed from a couple of inches away, is enough to keep most D9 RAM happy (alive), a 120mm fan has too big of a dead spot, in case you wondered.
There are also dedicated RAM coolers that you can buy, from the likes of OCZ and Corsair, which also work well.
My general rule of thumb is that if the RAM is 2.0v or over, blow a fan on it. Better safe than sorry.
So, what I'm getting at, is keep the RAM cool.
OK, back to the timings.
Some applications benefit greatly from tightened timings, other don't, all you need to do, is find a memory hungry program that you use a lot, and try tightening your timings, if you can see a benefit, then great, if not, change them back and forget about them
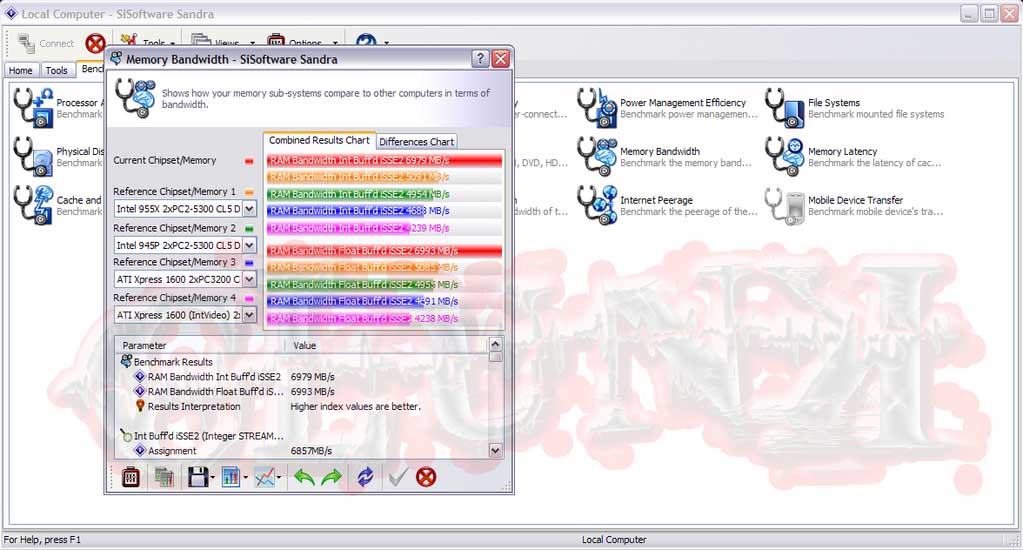
Install Sisoft Sandra 2007. There is a very useful memory bandwidth benchmark in there. Run it now and make a note of your current memory bandwidth.
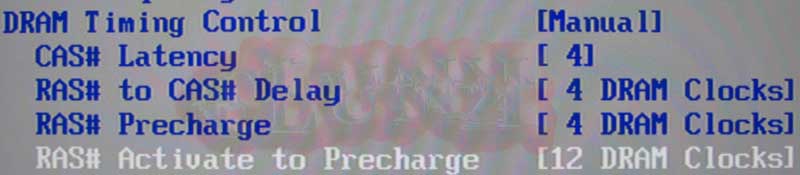
So, my RAM is rated for 5-5-5-12 @ 1066Mhz (PC2-8500)
This will often mean that if I were to run it at less than the rated 1066Mhz, say at 800Mhz, I could then tighten the timings, without having to up the voltage (not always, but more often than not).
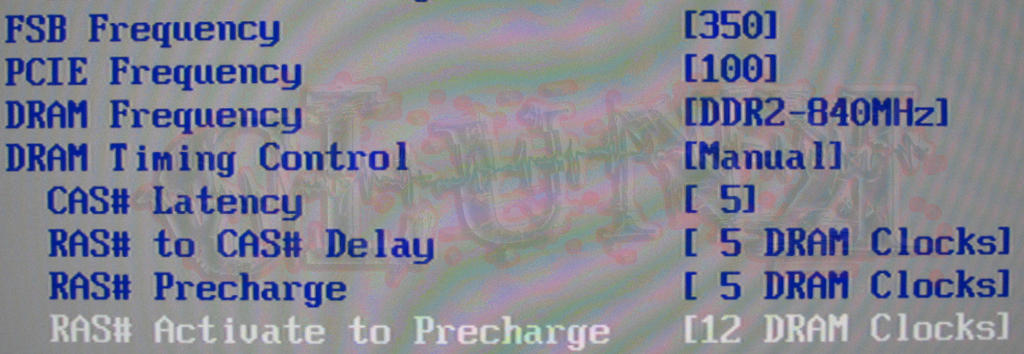
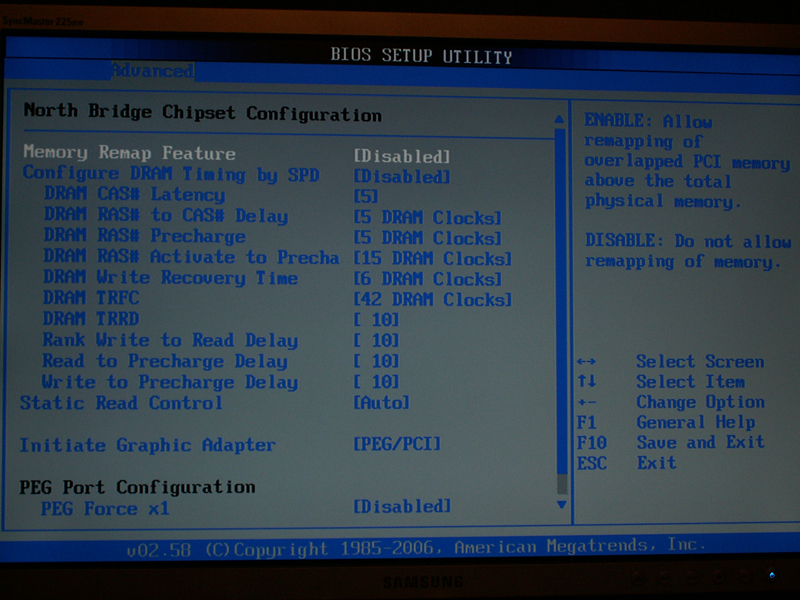
So, if I go into the BIOS, and look at my existing settings, I have an FSB of 380, and the RAM running at 760Mhz with timings of 5-5-5-12.
Now, I know that the RAM will go higher at those timings, so in theory, can go tighter, at a lower MHz, so I will change the 5-5-5-12 timings to 4-4-4-12 and see what happens.
Save and exit the BIOS.
Hold breath.......
If it hangs or doesn't post, don't worry, it is just your Memory's way of telling you that it doesn't like going that fast, and that it needs more voltage (see disclaimer), or looser timings.
If it boots to Windows, run the Sandra memory bandwidth benchmark and record your score again.
Run Orthos/Prime/SP2004 again, if you get errors, you know its the RAM, so you will need to up the voltage by one notch.
Save and exit, boot to windows, and test again.
Is it stable this time?
If not, repeat the above steps and add another notch of voltage to the RAM, but at this stage, if that doesn't work, its probably safe to say that your RAM doesn't overclock well, and to leave it at stock timings/voltages, rather than damage it.
If it IS stable, then that is good news, run the Sandra 2007 memory bandwidth benchmark and record your scores.
Now, if you are feeling adventurous, you can try for even tighter timings, maybe something like 4-4-4-4, or 3-4-4-8.
Run Sandra again.
So, not much of an improvement in bandwidth, but the changes should be noticable in *some* real world applications, that part is up to you to test
Keep a note of all your scores, and if you have a bit of software that you use a lot, try out your new settings on that as well.
At this point, it is just a case of finding out what your RAM is capable of, and if the performance is worth the trade off in heat and voltage.
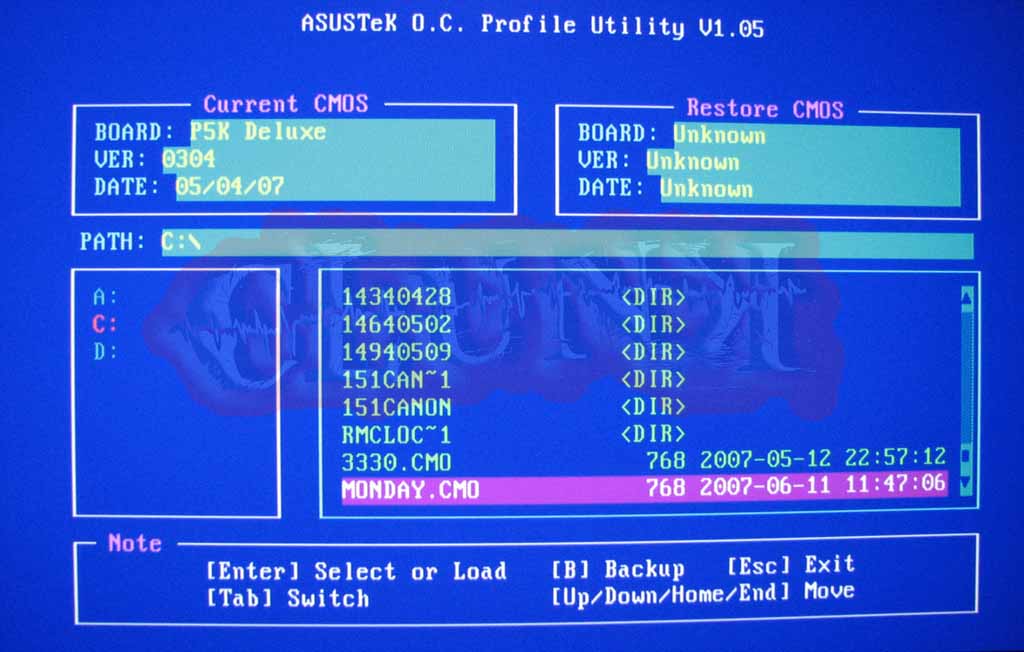
Once you have found a set of timings that you like, and are stable, save these BIOS settings to a USB stick for use later, using the Asus O.C.Profile,
Next, we will see how high your RAM can go using a divider.
If you haven't used a divider before on a C2D board, there isn't much to it really, on Intel chipsets, they only go upwards, in other words, they will only let you run your RAM faster than the CPU.
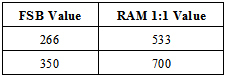
While we have a play with these, we will put the FSB back to 266 for now, so I can explain things a bit easier.
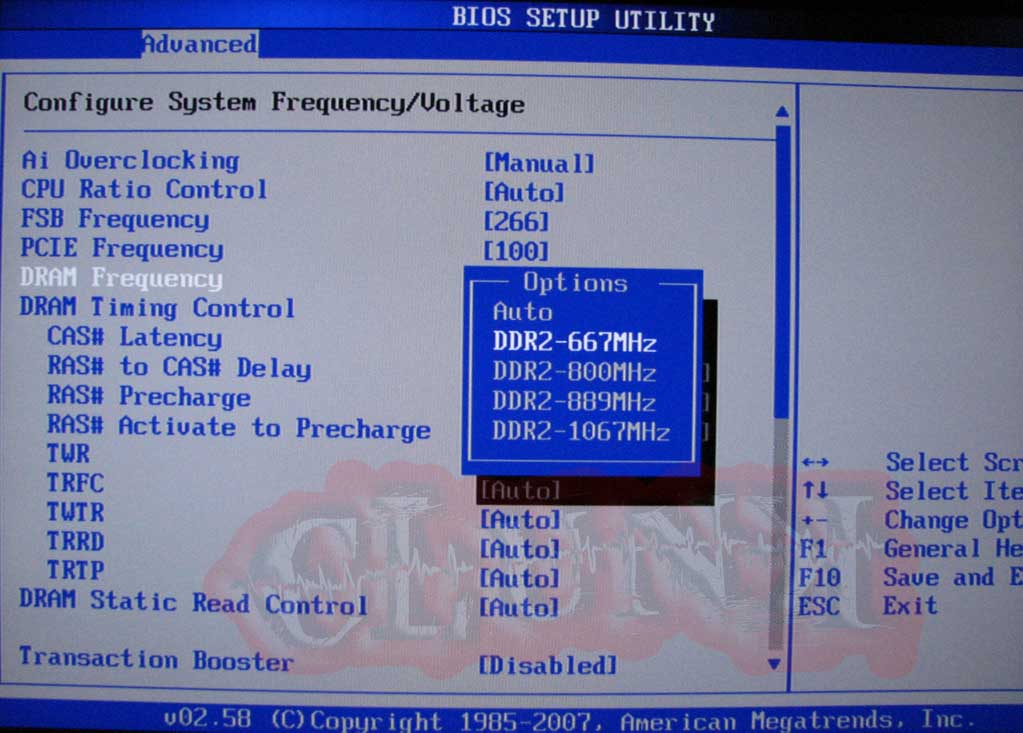
At 266 FSB, we have a set of dividers available to us.
There are dividers to allow you to run your RAM at;
667Mhz
800Mhz
889Mhz
1067Mhz
So, lets say that your RAM is rated at 800Mhz, choose the 800Mhz divider (it can be any within reason), and make sure that your RAM timings and voltages are set to their normal values.
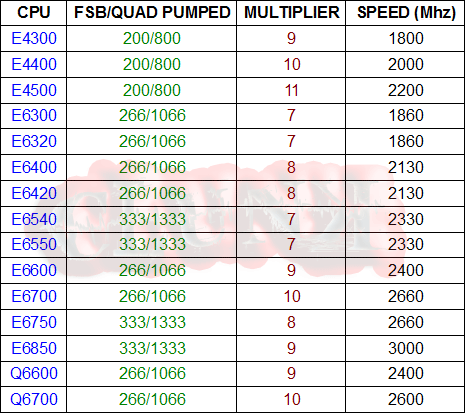
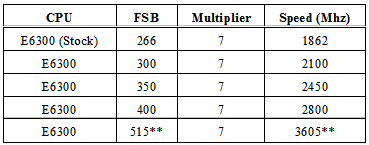
Try upping the FSB a bit to 300, this will now set the RAM to 720Mhz, and we know that your RAM can do at least 800Mhz, so lets go up a bit more, try 333 again (Deja Vu?), this will give you bang on 800Mhz on the RAM, but only 3GHZ on the CPU, so we need to raise the FSB a bit more to say, 350, that gives us 840Mhz on the RAM and 3150Mhz on the CPU. Its not a huge overclock, but it is on the way.
Save and exit, boot to Windows, exactly the same as before, if it boots, all is good, if it doesn't, you have gone too far, so either back off the FSB, or add a notch of voltage to the RAM (see disclaimer).
OK, so we are safely into Windows, run Sandra 2007 memory bandwidth benchmark again and make a note of your results again.
Run Orthos/Prime/SP2004 again, I like to use the blend test for all of these tests, so that everything gets a good stressing.
Remember, this bit, is just an exercise to get you acquainted with dividers.
Have a mess around with some of your regular programs again, see if you can notice any difference.
Of course, it doesn't end there. For those of you with faster RAM, you can go back to the BIOS and choose a higher divider, and see how high you can go.
Next up, we are going to try and find a good balance between your high CPU overclock, A high RAM divider and the tightest timings possible.
At this point, I will assume that you have tested how high your RAM will go, and have made a note of the speed
Same for the timings
Same for the CPU overclock (although, you should have saved the settings in O.C.Profile)
Load up your Best stable CPU overclock from O.C. Profile.
Now choose a divider that is as close to your RAM's max as possible, but without going over.
Keep the RAM timings standard for now.
Set the RAM voltage to whatever you had it at when you found it's max speed.
To aid stability, you can also change the Northbridge setting from AUTO to something like 1.55v. (This isn't always 100% necessary, and you can always change it back later).
Save and exit, and boot to Windows.....
If it doesn't boot, or if it hangs, or you get a BSOD while loading Windows, there are a few things you can try;
A different divider, preferably lower, but sometimes a higher one will work.
A notch more voltage to the Northbridge.
A bit less FSB, try dropping it by 10 at a time.
Try again.
Once it's stable, you can try the tighter timings, but you may need to drop the FSB by say, 30-50 and work your way back up.
All of this is just a balancing act, and, after a while you will definitely get a feel for what will and what wont work.
Don't worry if something doesn't work, just keep experimenting, and you will get there eventually.
Part 3
Voltage Tweaking
This section is for those who want to keep their overclock, but want to lower their heat output (Not by much, but it's better than nothing
This is pretty much, just common sense, and a process of elimination.
So, your PC is rock solid stable, but there's an awful lot of hot air coming from the exhaust fan, what can you do?
Anything voltage related that is set to AUTO, simply set it to its lowest value, manually. Do this one item at a time, test for stability, and then do another. That way, if you adjust a few things and it turns out to be unstable, you don't have to guess at what it was that you changed.
Vcore is probably the biggest source of heat. Unfortunately, when you overclock, you will generate extra heat, even if you don't add extra voltage, but you can try and reduce the amount of Vcore that you use.
Simply drop the Vcore to whatever you think, and then test with Orthos/Prime/SP2004, if it fails, it needs more Vcore, simple as that. Try upping the Vcore in single notches until stable again.
You can always back off the FSB, but that kind of defeats the object of all the hard work we have just done.
Again, its a trade off between temps and performance, the choice is yours
As always, if you think I have missed anything, or if you want to see something included in the guide, please let me know.
P.S. theres more pics to come, and I'll be tidying it up and adding stuff in the coming days
Administrator message: Whilst the images for this thread have been hosted by HEXUS on this occasion we must advised that by following or acting on any of the information contained in this thread is entirely at your own risk. HEXUS Limited is in no way endorsing or recommending the content within this thread nor is it responsible for any loss or damaged caused, whatsoever.