Results 1 to 12 of 12

Thread: Operation Casecom.

  1. #1
    Senior Member Pob255's Avatar
    Join Date
    Apr 2007
    Location
    The land of Brum
    Posts
    10,143
    Thanks
    608
    Thanked
    1,226 times in 1,123 posts
    • Pob255's system
      • Motherboard:
      • Asus M5A99X EVO
      • CPU:
      • FX8350 & CM Hyper 212+
      • Memory:
      • 4 x 2gb Corsair Vengence 1600mhz cas9
      • Storage:
      • 512gb samsung SSD +1tb Samsung HDD
      • Graphics card(s):
      • EGVA GTX970
      • PSU:
      • Seasonic GX 650W
      • Case:
      • HAF 912+
      • Operating System:
      • W7 Pro
      • Monitor(s):
      • iiyama XB3270QS-B1 32" IPS 1440p

    Operation Casecom.

    Yep after much time and verious threads (I'll leave you to find them all) I'm finally in a position to start building in my Casecom 6788 for real (not my eairlier p2 test build but a real useable build)

    I don't think this is really going to be enough for a Project log as there's not much modding involved, so I'm keeping it here for now.

    We'll see how things go, I might revisit the build/case over the summer and do some serious modding to it and maybe try to shoehorn a water loop into it

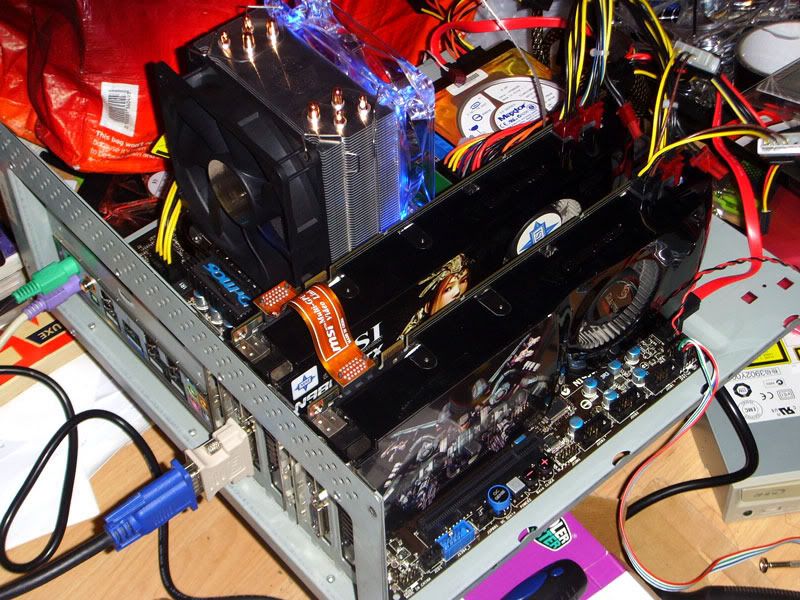
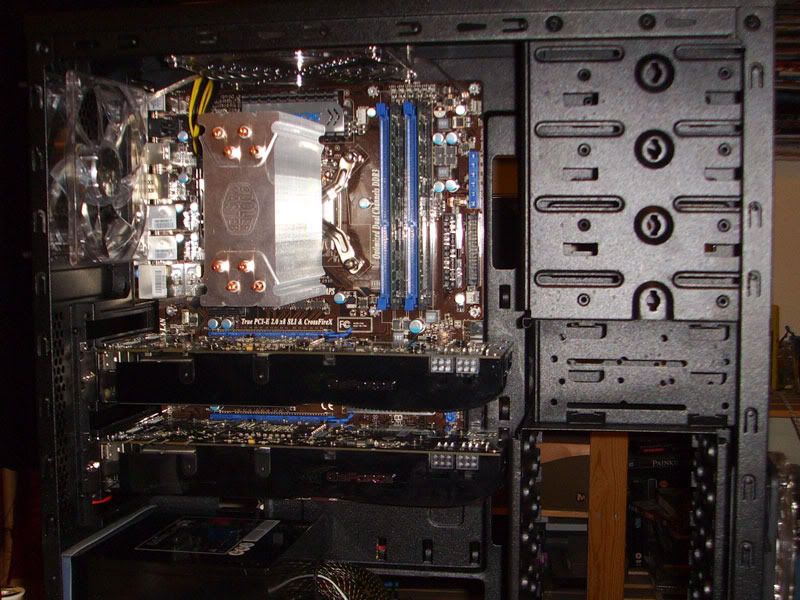
    Here's what I've currently been testing/planning in the way hardware
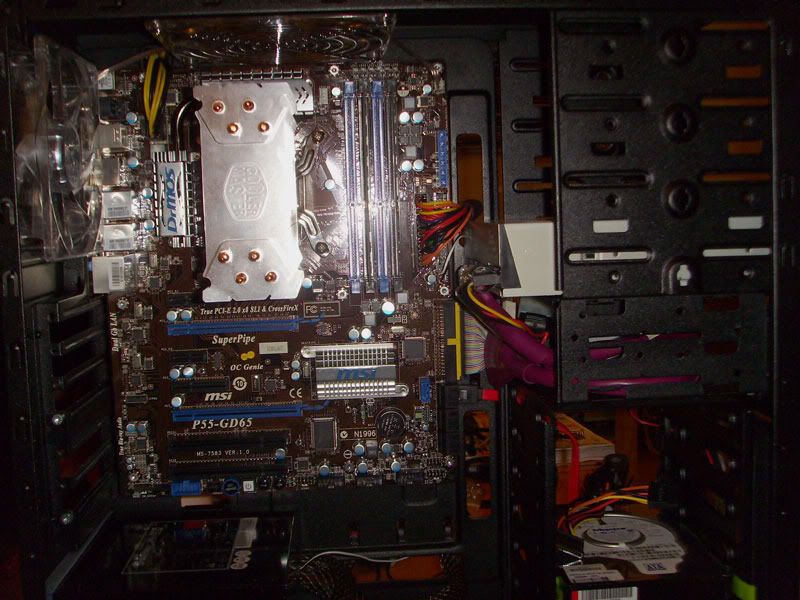
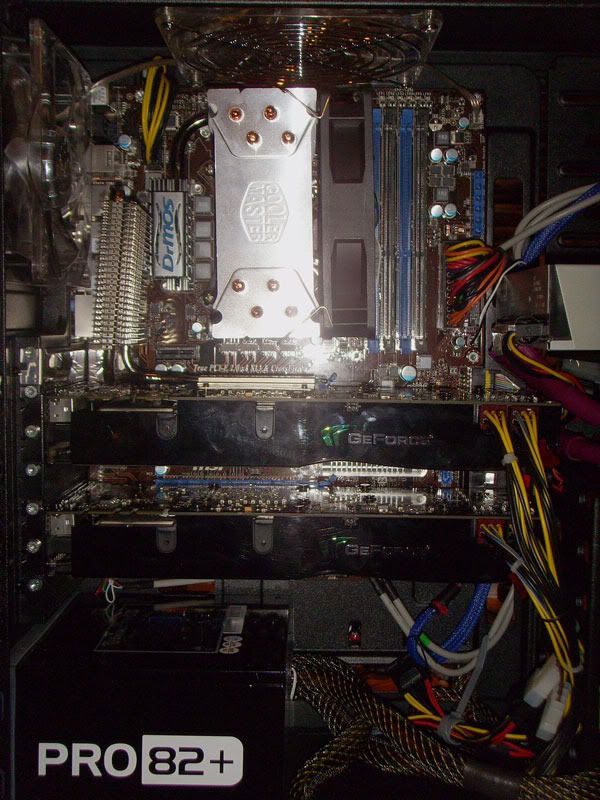
    i5 750 & Coolermaster Hypere 212 plus
    MSi P55-GD65
    DDR3 (2x1gb of pc8500 atm)
    2x 9800gtx in SLi
    Enermax Pro82+ 525w
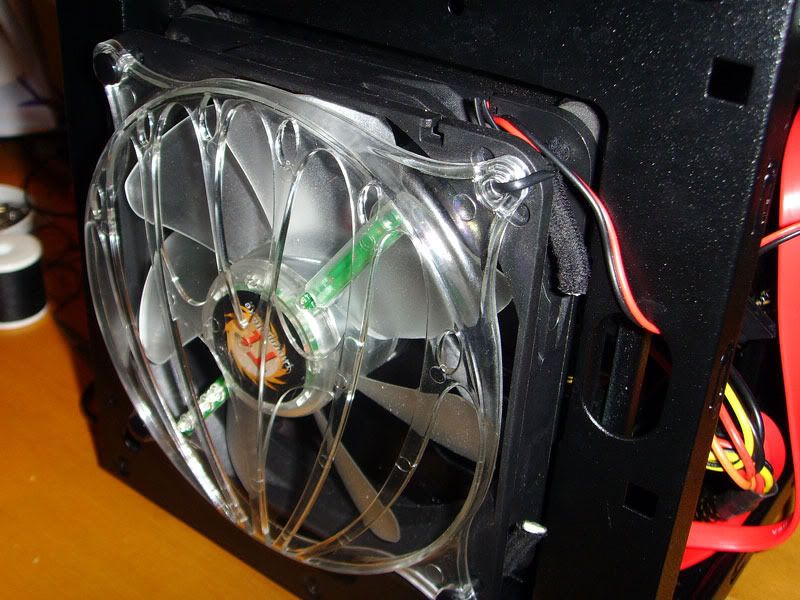
    A bunch of blue LED fans & thermaltake Cyclo pattern fan at the front.

    Step one, the only hard-mod.

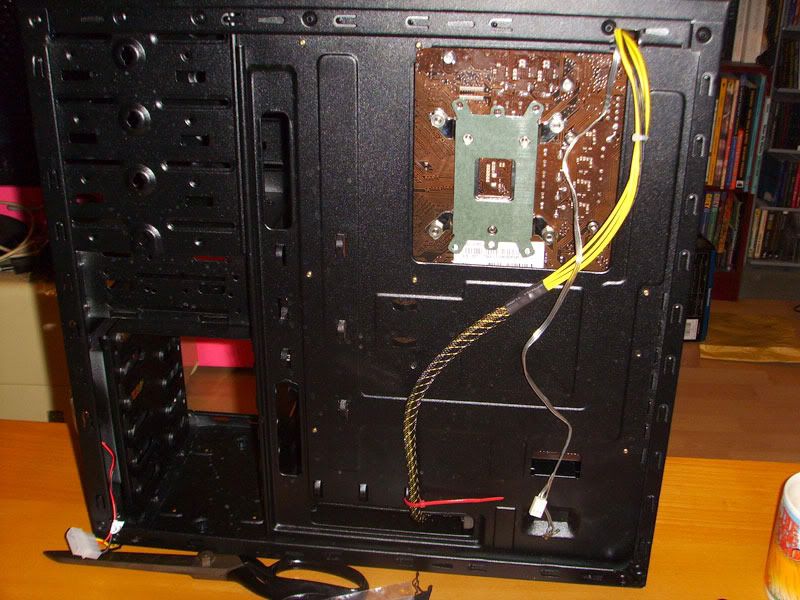
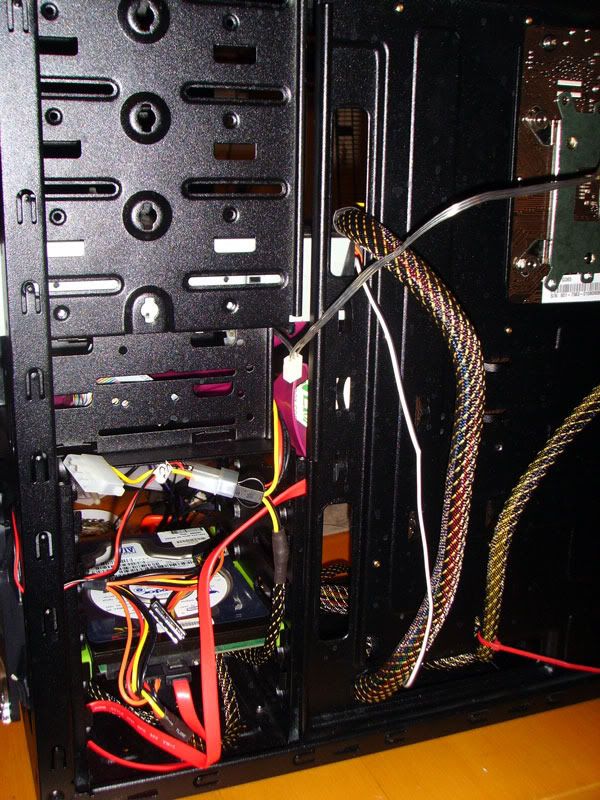
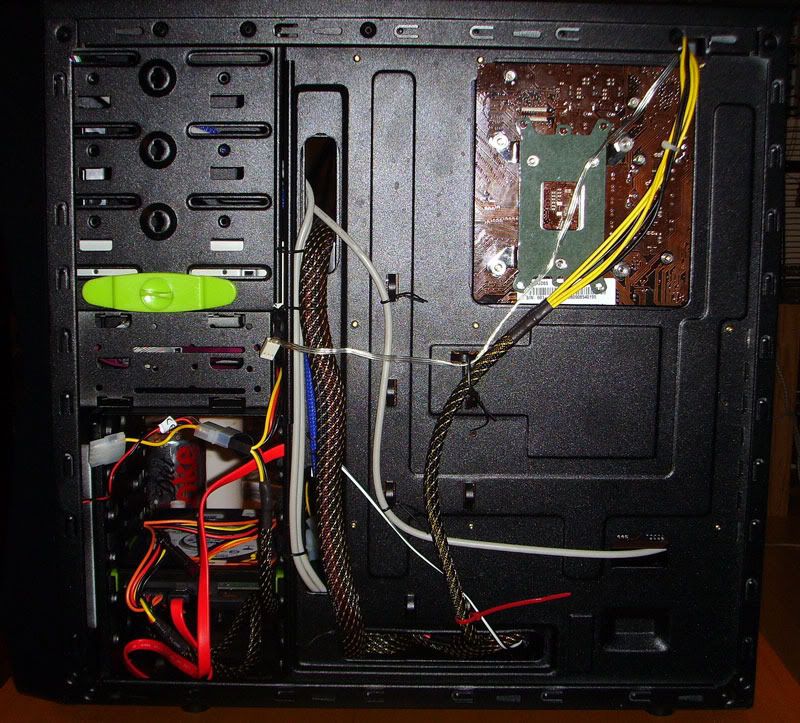
    Well duing all my fiddleing with the 6788 there was one major issue that I really had to fix befor I could build in this case, the lack of a motherboard cutout at the top left corner of the motherboard tray for the EPX power cable to be run behind the motherboard tray.

    So as it's wasn't that cold today out came the trusty rotary tool and lets cut a hole.

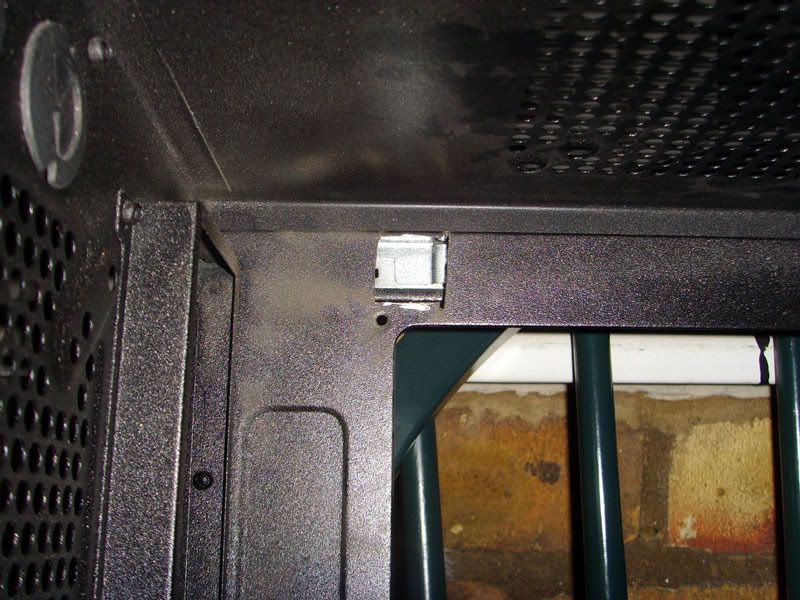
    The position was just too tricky to get to with just the tool so I used the flex shaft, many sparks later and this is what I had


    And you can see a slight problem, the hole is blocked by the lip that the side panel goes on.
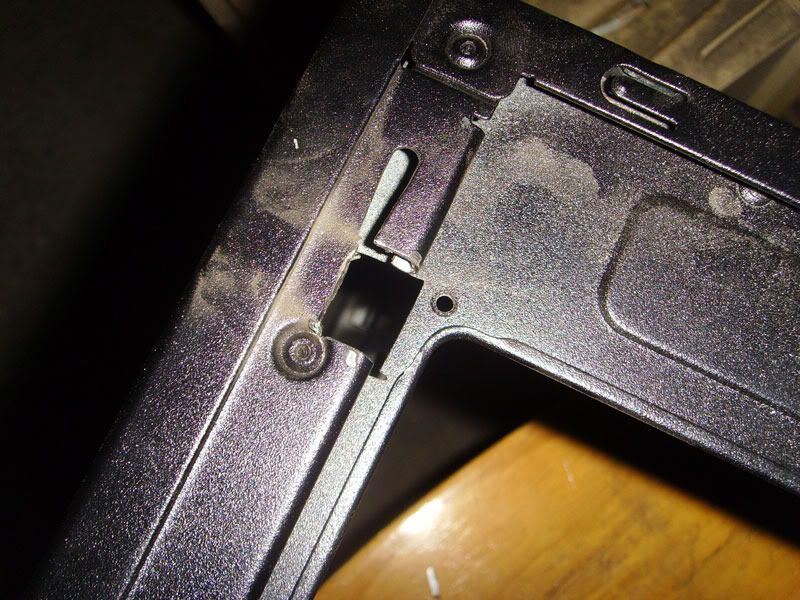
    So flip the case over and a few more pretty sparks.


    Ok not my neatest of cutting, but it was getting dark at this point so all I could do was grab a lamp to see by and a small hand file to clean it up a bit and remove the worst of the sharp edges.

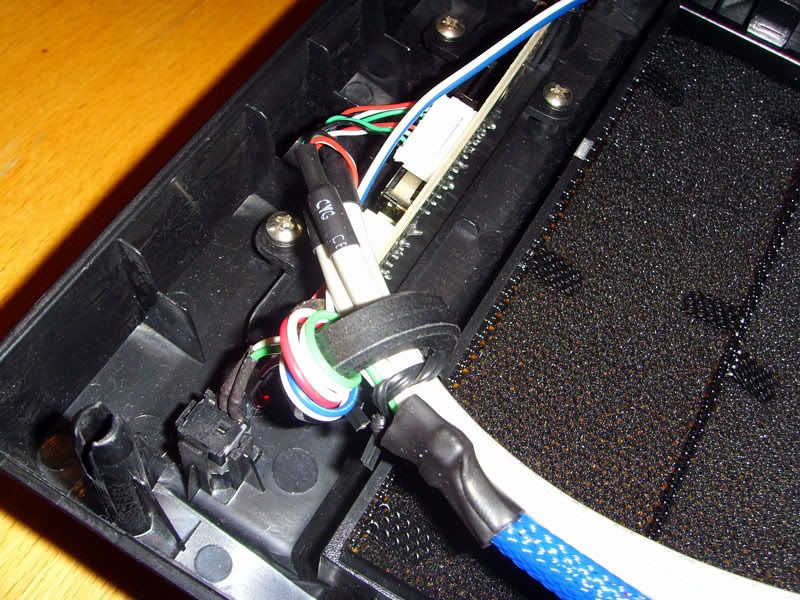
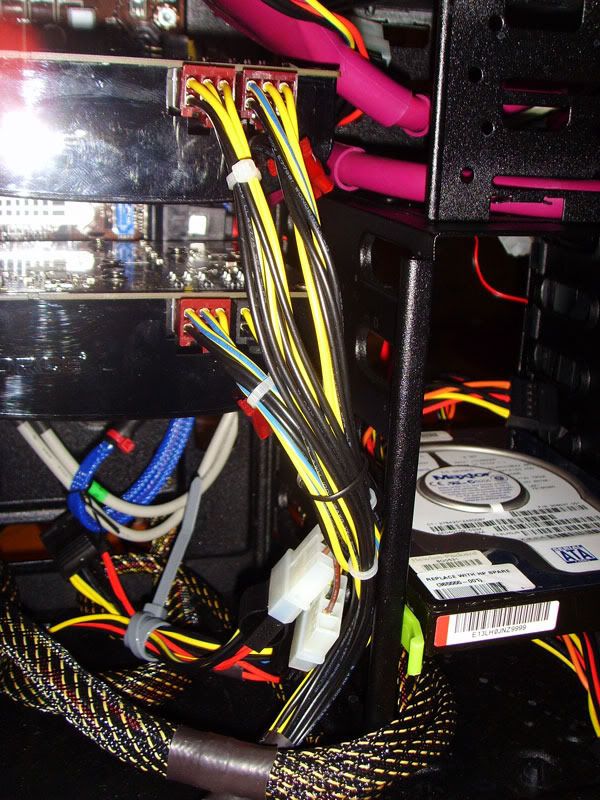
    The next step was to stick some edge trim on it to give the power cables that will be going here some added protection.

    I had some edge trim left over in my cupboard-o-bits so I cut a length and tried to work it on.

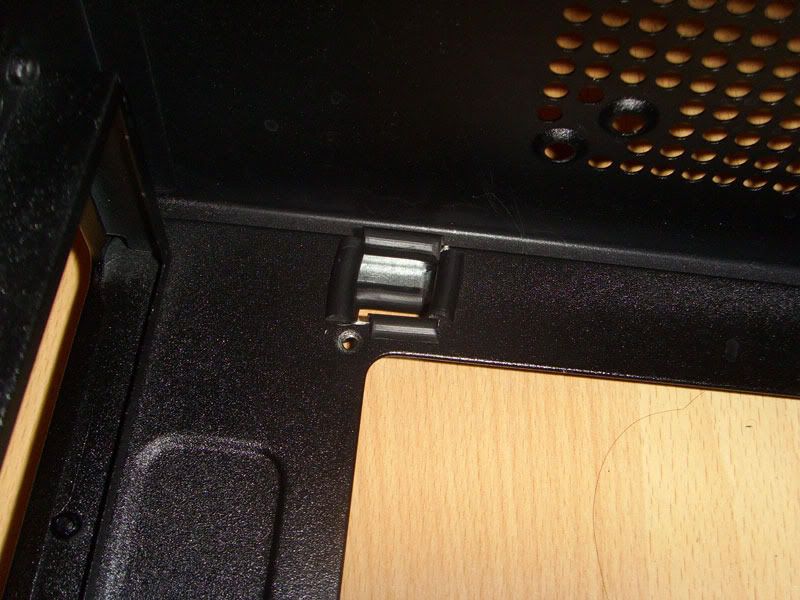
    The hole was just too small for the thickness of the trim add to that some other issues that ment I ended up having to instead 4 smaller lengths and just fit one to each edge.


    The top edge in that photo is actually at 90 degrees from the rest as the motherboard tray folds over there, next the bottom corner is where a motherboard stand off goes and the edge trim got in the way of that and finally it's too thick and doesn't want to bend around a square that small.

    I didn't want to cut into the back plate hole for fear of weakening the motherboard tray, I cannot extend the cut any more to the right as the top fan goes there.
    I may well end up extending the cut to the left at a later date, but for now it should be fine.

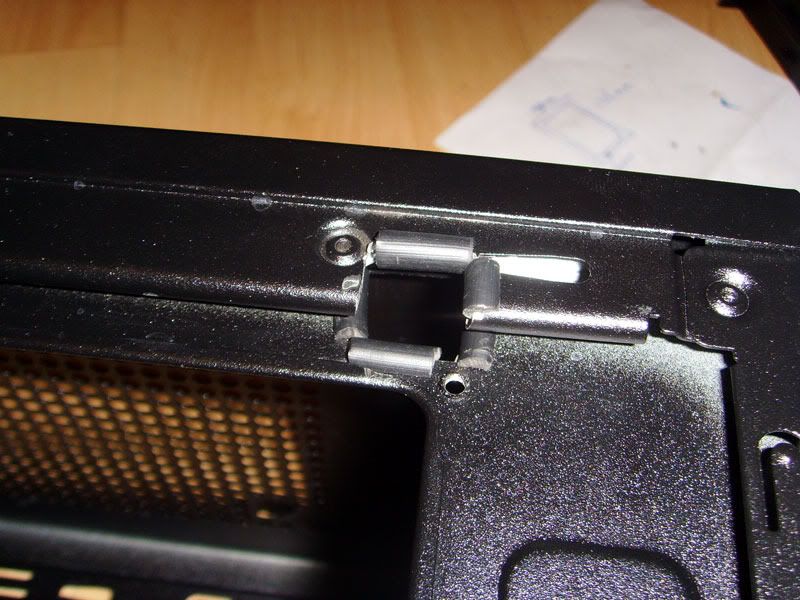
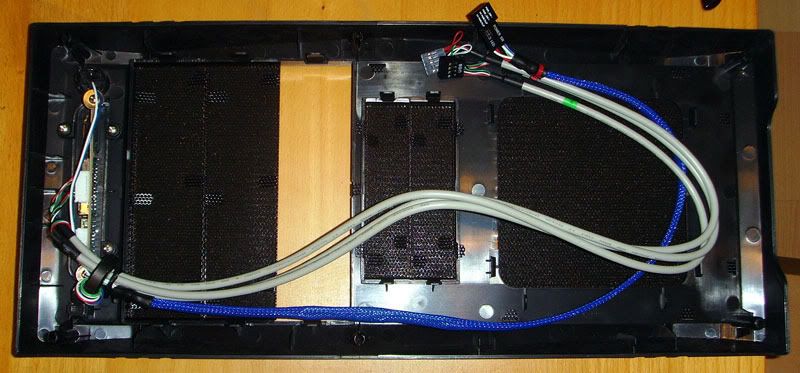
    Flip over the the other side and add a bit more edge trim.


    Again hit some problems, with the case rivit, the way the bottom of the lip is rolled over.
    And that slot where one of the side panel locks goes in might cause issues, we'll have to see later on.

    I should be fitting some of the hardware tomorrow so come back soon.

  2. #2
    Senior Member Pob255's Avatar
    Join Date
    Apr 2007
    Location
    The land of Brum
    Posts
    10,143
    Thanks
    608
    Thanked
    1,226 times in 1,123 posts
    • Pob255's system
      • Motherboard:
      • Asus M5A99X EVO
      • CPU:
      • FX8350 & CM Hyper 212+
      • Memory:
      • 4 x 2gb Corsair Vengence 1600mhz cas9
      • Storage:
      • 512gb samsung SSD +1tb Samsung HDD
      • Graphics card(s):
      • EGVA GTX970
      • PSU:
      • Seasonic GX 650W
      • Case:
      • HAF 912+
      • Operating System:
      • W7 Pro
      • Monitor(s):
      • iiyama XB3270QS-B1 32" IPS 1440p

    Re: Operation Casecom.

    Open Bench testing.

    I've been playing around with the hardware for a couple of days on my "open bench" it's an old chieftec motherboard tray, stood on a cardborad box and the psu tucked underneath it.


    I did some light overclocking then tried out the msi OC Genie button
    that gave me 3.44ghz 202fsb @ x17 it seemed ok at first then failed, it was pushing the memory far too hard.

    Back to default settings an another hour of verious stress tests on the msi 9800gtx that I got from ebay to make sure it's fully working.
    It's all good

    So then I took the leadtech 9800gtx out of my pc to try getting sli running
    (now running on my backup 7900gs so no games untill the new build is done)


    Worked first time no hitch 
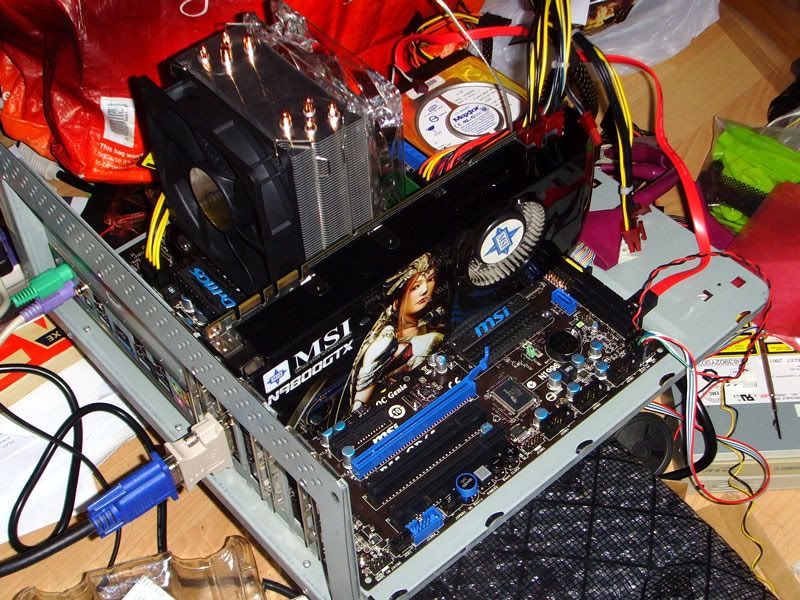
So I decided to try Overclocking again.

    It's now currently running stable at 3.727ghz (I just dropped the memory to minimum multiplier and just upped the fsb untill I reached the memory default speed)
    I can see that the cheap memory I have is going to be a major issue for overclocking.
    It was two sticks of the play brand from play.com, 1gb ddr3 pc-8500, one stick is Micron the other has Hynix chips, but is listed as Patriot in cpu-z and does have an XMP profile for 1333mhz which the motherboard spotted, I tried using the profile however this causes the Micron memory stick to be ignored.
    More tinkering is needed and probably some better memory (when the prices come down a bit)

    So back to the SLi.
    The p55-GD65 motherboard is nice as it's left 2 slots between the two cards so they are not right up against each other and gives them a bit of breathing space.
    Now I got a Thermalright HR-11 off of Hicks12 and I was planning on using this on the lower card, however I may not need it and annoyingly the cpu cooler is in the way to have it sticking out from the side.
    It looks like it should fit without issue if I rotate the hyper 212 through 90 degrees and have it pointing upwards, although sucking up the heat radiated from the graphics cards might not be so good for the cpu temps.

    I also discovered something I hadn't noticed before the MSI 9800gtx is the overclocked version, it's running at 700mhz not the stock 675mhz that my leadtec is.
    now I mention this because I was having a few vertical sync glitches running the cryostasis benchmark and I think that the speed missmatch is the root cause of it.
    The easy solution would be to underclock the msi to the default 675mhz however I might have a go at overclocking the leadtec to 700mhz

    That's it for now, the serious building should being later on tonight.

  3. #3
    Senior Member Pob255's Avatar
    Join Date
    Apr 2007
    Location
    The land of Brum
    Posts
    10,143
    Thanks
    608
    Thanked
    1,226 times in 1,123 posts
    • Pob255's system
      • Motherboard:
      • Asus M5A99X EVO
      • CPU:
      • FX8350 & CM Hyper 212+
      • Memory:
      • 4 x 2gb Corsair Vengence 1600mhz cas9
      • Storage:
      • 512gb samsung SSD +1tb Samsung HDD
      • Graphics card(s):
      • EGVA GTX970
      • PSU:
      • Seasonic GX 650W
      • Case:
      • HAF 912+
      • Operating System:
      • W7 Pro
      • Monitor(s):
      • iiyama XB3270QS-B1 32" IPS 1440p

    Re: Operation Casecom.

    Todays update - slightly more procrastination.

    Well as some of you may of spotted the fan on the msi 9800gtx was very dust encrusted, so I got my trusty paint brush out and started to clean out the worset of it, but there was so much dust coming out and so much I couldn't get too I realised that a paint brush wasn't enough and if the fan was like that what was the rest like?

    So I decided to open it up to give it a thorough clean out.

    On opening it up this is what I found.


    There was a good layer of dust, a solid build up of fluf around the edges of all the thermal pads and it seems MSi used a whole tube of thermal gunk on the gpu.

    So I started off by using a cocktail stick to scrape off most of the thermal gunk, there was just too much to just used a cotten bud and alcohol.

    This was the resault of the scrapeing.


    Next I carefully used a scalple to lift off the thermal pads (I may buy some replacements but for now I wanted to reuse the existing ones)
    I brushed the card down with my paint brush and a used some lung power to get rid of the dust.
    And finally I went over all the contacted chips with cotton buds & alcohol.


    The g92 core in all it's nakid glory.

    I then took the cooler appart and rinsed it off under the hot water tap, with a bit of washing up liquid and a tooth brush (one I got just for cleaning not used on teeth ) for any heat contact surface to get it all nice and clean.

    I used my zalman thermal paste reseated all the pads after trimming the edges slightly to remove the dust encrusted edges (they where hanging off the edges of the chips anyway)
    I also added a small dab of paste to the center of each memory chip and the center of each contact spot as well to try to help the reused pads a bit.
    Finally screwing it all back together.

    I also took my Leadtec apart as well just incase, it was no where as bad, a bit of brushing clean off the blower blades and a quick repaste of the gpu and I was done.


    Enought procrastination more building.

    I started by mounting the rear (coolermaster) and top (lian-li) case fans. See here for fan details the rear fan is mounted with rubber anti vibration fan plugs, the top fan, because of the fan guard and closed corners, cannot be mounted with plugs, so I had to use screws, however I added foam washers from my Sharkoon Silencer Kit (which is also where the plugs came from)
    Now I did this first because the hole I've cut in the motherboard tray is quite small, and it was eaiser to feed the fan cables through before the 4+4 EPS connector from the PSU.

    So next I fitted the PSU, with a vantec PSU anti-vibration gasket

    Now it was time to mount the motherboard, digging around in my cupboard-o-bits I found the torque screws I got out of an old server case that I had been saving so I decided to put them to use.


    I have a torque screw driver to fit these so it's no more hassle for me than normal cross head screws.
    The motherboard went in very eaisly, the 12v/EPS lead went up the back ot the motherboard tray and with a little bit of maneuvering each half of the 4+4pin connector went through the hole I'd cut.


    (at a later date I may have to add some additional small holes to secure the cabel in a better position.)

    I now took the opportunity to fit the Hyper 212 plus facing vertically to see if now had space to fit the Thermalright HR-11 on the lower 9800gtx, not quite If i have the fan on top sucking air through the cooler it'll fit, however with the fan below to blow up through the cooler the ends of the Thermalright HR-11 catch in the blades, about 3mm higher and it would of been a tight fit but it would of worked.

    So I refitted the Hyper 212 plus horizontally and I left the two 9800gtx in to give you an idea of how much room there is in side the 6788
    Remember the 9800gtx is a Long card, not quite as long as the dual gpu cards like the 4870x2, 5970 or gtx295, however it is just over 10.5"


    The lack of space and non-modular PSU is going to make cableing this case a major headache and a lot of fun at the same time.

  4. Received thanks from:

    Biscuit (23-02-2010)

  5. #4
    Oh Crumbs.... Biscuit's Avatar
    Join Date
    Feb 2007
    Location
    N. Yorkshire
    Posts
    11,193
    Thanks
    1,394
    Thanked
    1,091 times in 833 posts
    • Biscuit's system
      • Motherboard:
      • MSI B450M Mortar
      • CPU:
      • AMD 2700X (Be Quiet! Dark Rock 3)
      • Memory:
      • 16GB Patriot Viper 2 @ 3466MHz
      • Storage:
      • 500GB WD Black
      • Graphics card(s):
      • Sapphire R9 290X Vapor-X
      • PSU:
      • Seasonic Focus Gold 750W
      • Case:
      • Lian Li PC-V359
      • Operating System:
      • Windows 10 x64
      • Internet:
      • BT Infinity 80/20

    Re: Operation Casecom.

    Pob build for the win.

    Subscribed as usual

  6. #5
    Headless Chicken Terbinator's Avatar
    Join Date
    Apr 2009
    Posts
    7,670
    Thanks
    1,210
    Thanked
    727 times in 595 posts
    • Terbinator's system
      • Motherboard:
      • ASRock H61M
      • CPU:
      • Intel Xeon 1230-V3
      • Memory:
      • Geil Evo Corsa 2133/8GB
      • Storage:
      • M4 128GB, 2TB WD Red
      • Graphics card(s):
      • Gigabyte GTX Titan
      • PSU:
      • Corsair AX760i
      • Case:
      • Coolermaster 130
      • Operating System:
      • Windows 8.1 Pro
      • Monitor(s):
      • Dell Ultrasharp U2711H
      • Internet:
      • Virgin Media 60Mb.

    Re: Operation Casecom.

    Them 9800GTX look longer than my GTX 260 which was a pain in the arse to fit - its literally pressed up against my hard drive cage.
    On another note its been good seeing someone else build on the GD-65
    Kalniel: "Nice review Tarinder - would it be possible to get a picture of the case when the components are installed (with the side off obviously)?"
    CAT-THE-FIFTH: "The Antec 300 is a case which has an understated and clean appearance which many people like. Not everyone is into e-peen looking computers which look like a cross between the imagination of a hyperactive 10 year old and a Frog."
    TKPeters: "Off to AVForum better Deal - £20+Vat for Free Shipping @ Scan"
    for all intents it seems to be the same card minus some gays name on it and a shielded cover ? with OEM added to it - GoNz0.

  7. #6
    Senior Member Pob255's Avatar
    Join Date
    Apr 2007
    Location
    The land of Brum
    Posts
    10,143
    Thanks
    608
    Thanked
    1,226 times in 1,123 posts
    • Pob255's system
      • Motherboard:
      • Asus M5A99X EVO
      • CPU:
      • FX8350 & CM Hyper 212+
      • Memory:
      • 4 x 2gb Corsair Vengence 1600mhz cas9
      • Storage:
      • 512gb samsung SSD +1tb Samsung HDD
      • Graphics card(s):
      • EGVA GTX970
      • PSU:
      • Seasonic GX 650W
      • Case:
      • HAF 912+
      • Operating System:
      • W7 Pro
      • Monitor(s):
      • iiyama XB3270QS-B1 32" IPS 1440p

    Re: Operation Casecom.

    Quote Originally Posted by Biscuit View Post
    Pob build for the win.

    Subscribed as usual
    although you might be a little dissapointed as this is mainly just going to be sticking bit's in a case atm.

    A more serious modding attempt will probably wait for the summer when I may try to get hold of some 2nd hand water cooling bits and a big shoehorn to fit it.

    I'm not going to be able to play any games untill this is finished so I don't plan on hanging about too long.

    That said, I'm knackered atm so I'm going to leave it there for the night and try and get it finished tomorrow.

  8. #7
    I'm Very Important
    Join Date
    Jul 2009
    Posts
    2,945
    Thanks
    321
    Thanked
    360 times in 318 posts
    • Domestic_Ginger's system
      • Motherboard:
      • Gigabyte GA-MA770-UD3
      • CPU:
      • Phenom II X2 550
      • Memory:
      • 4GB DDR2
      • Storage:
      • F3 500gb
      • Graphics card(s):
      • 5850
      • PSU:
      • Corsair 550vx
      • Case:
      • NZXT beta evo
      • Operating System:
      • W7
      • Monitor(s):
      • G2222HDL

    Re: Operation Casecom.

    Looks good.

    A word of warning TRIM with pads is a recipe for disaster; if I read that correctly. More material interfaces is a recipe for insulation!

  9. #8
    Senior Member Pob255's Avatar
    Join Date
    Apr 2007
    Location
    The land of Brum
    Posts
    10,143
    Thanks
    608
    Thanked
    1,226 times in 1,123 posts
    • Pob255's system
      • Motherboard:
      • Asus M5A99X EVO
      • CPU:
      • FX8350 & CM Hyper 212+
      • Memory:
      • 4 x 2gb Corsair Vengence 1600mhz cas9
      • Storage:
      • 512gb samsung SSD +1tb Samsung HDD
      • Graphics card(s):
      • EGVA GTX970
      • PSU:
      • Seasonic GX 650W
      • Case:
      • HAF 912+
      • Operating System:
      • W7 Pro
      • Monitor(s):
      • iiyama XB3270QS-B1 32" IPS 1440p

    Re: Operation Casecom.

    The build progresses

    Another soft mod, one of the first things I did with this case was to sleeve and bundle up the cables from the bezel.


    As you can see I feed the cables through a ferrite toroid choke, this should in theory reduce noise on the wires.
    I the combined the power switch, reset switch and hdd led cables and sleeved them.

    Next was the front fan


    ThermalTake Cylo pattern fan, this has been modded by my father, replacing the resistors to the LEDs with weaker ones, so that the fan can be run at lower voltages without the LED's dimming, although if I tried to run it at a full 12volts now it would blow the LED's.
    It's a 4pin molex fan so I've swaped the earth pin with the 5volt pin in a 7volt fan mod.
    I've secured the fan with lengths of elastic hair band and foam pads.

    Now I started putting bits in.


    I don't have a spare sata dvd drive so for now I've used a IDE CDr/w which I did have kicking about.
    I've used the lowest bay so I can reach it with a molex from the psu more easily.

    A matrox 40gb sata hard drive which i've been using to test stuff (currently still has w7 beta on it)


    I've placed the HD in one slot up from the bottom on purpose, my plan is to hide escess psu cables under it and later make a cover to totally hide them, while leaveing the slots above for more HD's later.


    Round the back, as you can see there's not much space for cables, so I'm being careful and trying to plan out where to put stuff as I run it.

    With that in and wired to my satisfaction it's time to get the graphics cards in and the other final bits fitted.


    I've also fitted the Thermalright HR-11 to the upper card.

    Unfortunately my cable running plans hit a major wall in the form of the Enermax psu wire layout.

    This is the 625watt version, I'm actually using the 525watt version, which only has 3 pci-e connectors.
    The problem I've had is the way all the sata & molex wires are bundled together, so just come out of the psu in one big fat sleeved cable, same goes for the pci-e cables.

    This makes it next to impossible to run the cables to multiple locations within the Casecom 6788 as there's not enough room behind the motherboard tray for that big fat cable.

    So in the end I had to just leave most of them on the floor of the case infront of the psu.


    Not as neat as I wanted.

    Round the back I did have to do a couple of minor adjustments, however it came out pretty good


    I could do with a bit more length on some of the cables to run them along the paths I would of preferred.

    Getting the side panels on was a bit tricky, I though that the main 24pin motherboard psu lead would be the issue however it wasn't, what was the issue was the sata power connectors.
    The issue is that Enermax have used 2 sets of high gauge wire in an in-out format on each plug, this means it sticks out a little too far and the wire will not bend very tightly.
    I did manage to get the side panel on but it did require me to lay the case on it's side.

    Getting the left hand side panel on was far easier, plugging the side fan onto the motherboard was a little tricky as the fan header on the motherboard I used is in the normal position for a northbridge fan header. i.e. below the MOFETS, diagonally down and to the left of the cpu socket.
    However there is enough room between the Hyper 212+, the Thermalright HR-11 and the 9800gtx for me to get my hand in there to plug it in.

    Then when I tried to screw the panel on I found a major muck up on my part.


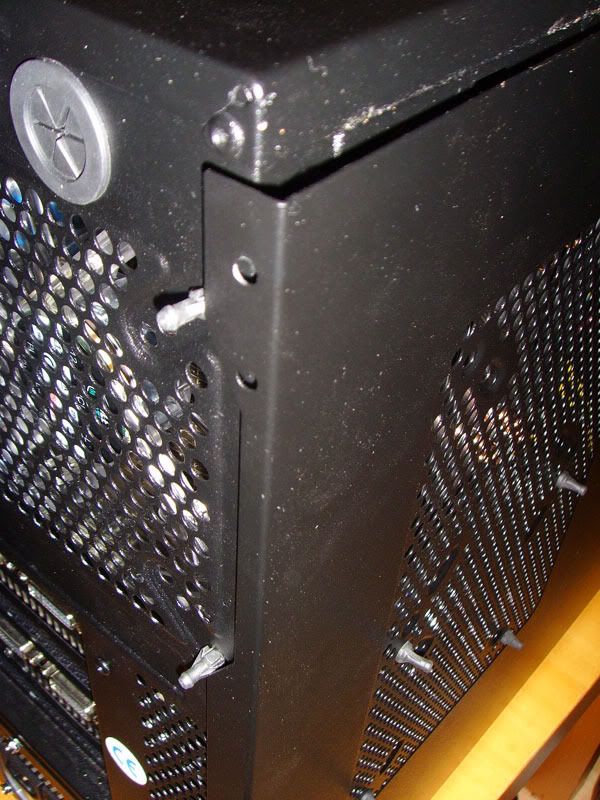
    the rubber fan plugs I've used on the rear fan have ends that stick out and get in the way. I can screw the side panel back on, just not do it up fully tight, still the rubber fan pulgs pushing back does keep the screw locked and the side panel will not fall off.

    I do have some fan plugs that will sit flat but swapping out that fan is going to require me taking too much of it apart so for now it's staying how it is.

  10. #9
    Senior Member Pob255's Avatar
    Join Date
    Apr 2007
    Location
    The land of Brum
    Posts
    10,143
    Thanks
    608
    Thanked
    1,226 times in 1,123 posts
    • Pob255's system
      • Motherboard:
      • Asus M5A99X EVO
      • CPU:
      • FX8350 & CM Hyper 212+
      • Memory:
      • 4 x 2gb Corsair Vengence 1600mhz cas9
      • Storage:
      • 512gb samsung SSD +1tb Samsung HDD
      • Graphics card(s):
      • EGVA GTX970
      • PSU:
      • Seasonic GX 650W
      • Case:
      • HAF 912+
      • Operating System:
      • W7 Pro
      • Monitor(s):
      • iiyama XB3270QS-B1 32" IPS 1440p

    Re: Operation Casecom.

    After some more tweeking and hard thinking, I'm getting nearer and nearer the point of getting the enermax out and modding the cables.
    But that will mean I'll have to cut off the cable braid and that stuff is really nice, no where near as plasticy as most braid I've seen.

    I also want to get a clamp meter so I can find out how much power is actually flowing down those pci-e cables.

    The reason is that to me some of the numbers just are not addind up.
    From my digging and reading up.
    pci-e motherboard lane can provide a max of 75w
    pci-e 6pin, 3x +12v and 3x earth wires, can provide a max of 75w (although this number may be incorrect as it's not an open standard)
    pci-e 8pin, 3x +12v and 5x earth wires, can provide a max of 150w (the 8pin is an open standard)

    This is all odd for the following reasons.
    150w / 12volt = 12.5 amp
    75w / 12v = 6.25amp

    So how do you double the output by just adding in 2 additional earth lines?

    Moving onto the psu specs, we have 3 12v rails at 25a each, combined max of 40a
    rail one supplies the motherboard 20+4pin and 4+4pin
    rail two supplies 1x pci-e 8pin, + 1x pci-e 6pin
    rail three supplise 1x pci-e 8pin, + all sata and molex (6x sata, 6x molex, 1x floppy)

    One 9800gtx should use roughly 180w at full load, or 15amp, combined from motherboard and 2x pci-e 6pin.
    So what I'm thinking is is how can I rewire 2x 8pin + 1x 6pin into 4x 6pin?

    Before anyone jumps on me with just use a molex to pci-e converter,
    point 1 - that's what I'm currently doing and that's the main reasons my cabling is in such a state.
    point 2 - a pci-e 8pin connector is rated at 175watts so in theory each 9800gtx could almost be powered off just a single pci-e 8pin, with the power from the motherboard added in it could.

    so converting 2x8pin + 1x6pin into 4x6pin should not be an issue for the load on ether wires or pcb. the main question for me is the load division between the rails.
    And how much it truely matters with virtual rails.

    I'm thinking about getting a clamp meter just so I can find out how much power is actually flowing down each wire.

  11. #10
    Pre-Cambrian nibbler's Avatar
    Join Date
    Aug 2009
    Location
    London
    Posts
    3,668
    Thanks
    913
    Thanked
    266 times in 216 posts
    • nibbler's system
      • CPU:
      • i5-2410m
      • Memory:
      • 6GB ddr3 1333mhz
      • Storage:
      • 256GB Plextor M5S SSD
      • Graphics card(s):
      • 1GB 6650M
      • Operating System:
      • Windows 7 64 bit

    Re: Operation Casecom.

    Hey pob
    As you have helped me so much I'll try to help you with any issues, we have pretty similar systems now. I'll read over the psu issue cos I don't have any problems :S

  12. #11
    Senior Member Pob255's Avatar
    Join Date
    Apr 2007
    Location
    The land of Brum
    Posts
    10,143
    Thanks
    608
    Thanked
    1,226 times in 1,123 posts
    • Pob255's system
      • Motherboard:
      • Asus M5A99X EVO
      • CPU:
      • FX8350 & CM Hyper 212+
      • Memory:
      • 4 x 2gb Corsair Vengence 1600mhz cas9
      • Storage:
      • 512gb samsung SSD +1tb Samsung HDD
      • Graphics card(s):
      • EGVA GTX970
      • PSU:
      • Seasonic GX 650W
      • Case:
      • HAF 912+
      • Operating System:
      • W7 Pro
      • Monitor(s):
      • iiyama XB3270QS-B1 32" IPS 1440p

    Re: Operation Casecom.

    The problem is basically a non-modular psu, the demand for four pci-e cables and me wanting the wire neat

  13. #12
    Pre-Cambrian nibbler's Avatar
    Join Date
    Aug 2009
    Location
    London
    Posts
    3,668
    Thanks
    913
    Thanked
    266 times in 216 posts
    • nibbler's system
      • CPU:
      • i5-2410m
      • Memory:
      • 6GB ddr3 1333mhz
      • Storage:
      • 256GB Plextor M5S SSD
      • Graphics card(s):
      • 1GB 6650M
      • Operating System:
      • Windows 7 64 bit

    Re: Operation Casecom.

    Aah, I got the modular version.

Thread Information

Users Browsing this Thread

There are currently 1 users browsing this thread. (0 members and 1 guests)

Similar Threads

  1. Operation 2 from 3 went fine
    By bledd in forum General Discussion
    Replies: 4
    Last Post: 23-05-2006, 10:17 PM
  2. Replies: 2
    Last Post: 16-10-2005, 07:59 PM
  3. My Operation: Flashpoint Movie
    By BEANFro Elite in forum Gaming
    Replies: 0
    Last Post: 17-11-2004, 02:32 PM

Posting Permissions

  • You may not post new threads
  • You may not post replies
  • You may not post attachments
  • You may not edit your posts
  •