Results 1 to 3 of 3

Thread: Fractal Node 804 and Kelvin S24 Review

  1. #1
    Senior Member Hicks12's Avatar
    Join Date
    Jan 2008
    Location
    Plymouth-SouthWest
    Posts
    6,586
    Thanks
    1,070
    Thanked
    340 times in 293 posts
    • Hicks12's system
      • Motherboard:
      • Asus P8Z68-V
      • CPU:
      • Intel i5 2500k@4ghz, cooled by EK Supreme HF
      • Memory:
      • 8GB Kingston hyperX ddr3 PC3-12800 1600mhz
      • Storage:
      • 64GB M4/128GB M4 / WD 640GB AAKS / 1TB Samsung F3
      • Graphics card(s):
      • Palit GTX460 @ 900Mhz Core
      • PSU:
      • 675W ThermalTake ThoughPower XT
      • Case:
      • Lian Li PC-A70 with modded top for 360mm rad
      • Operating System:
      • Windows 7 Professional 64bit
      • Monitor(s):
      • Dell U2311H IPS
      • Internet:
      • 10mb/s cable from virgin media

    Fractal Node 804 and Kelvin S24 Review

    So I won one of the prizes from the Hexus competition, greatly appreciated and I hope these continue .

    On to the review!

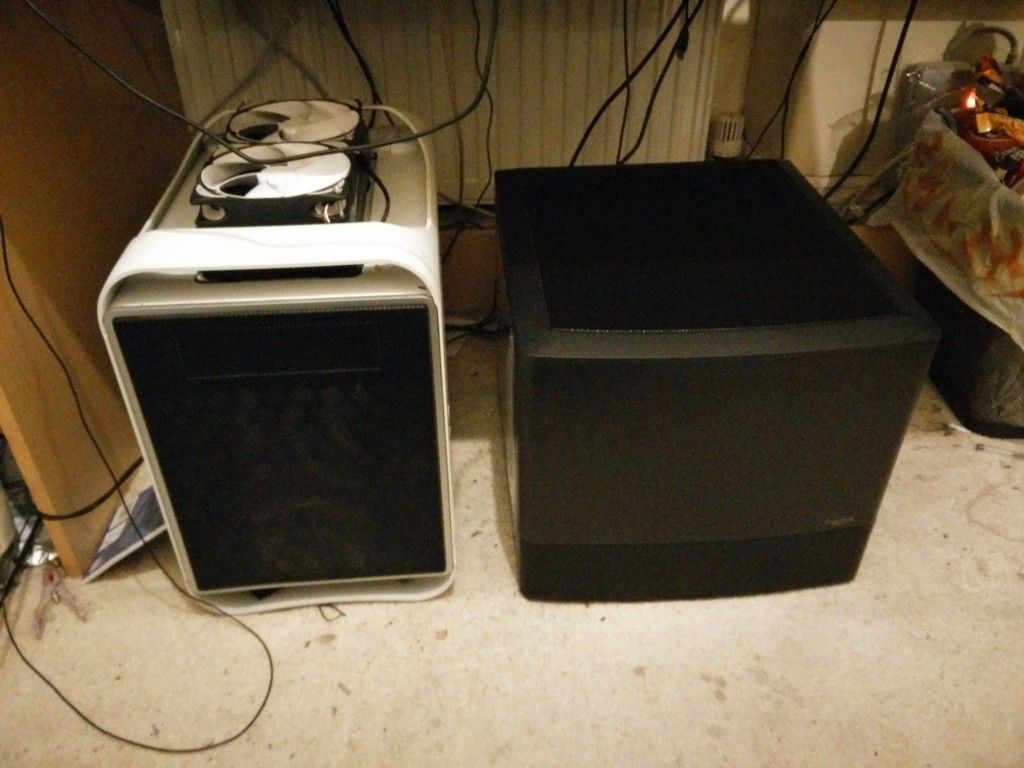
    Starting with the Fractal Node 804 case, I personally think cube cases are a love or hate style and I quite like them , coming from a Bitfenix prodidgy this 804 has some tough shoes to fill. For me the smaller compact cases were a good choice as I wanted my system to be portable enough for frequent lans, originally I had cases such as the Lian Li A70 and Xigamtek Elsyium so I appreciate the compactness but I do also miss the expansion!

    After a very quick glance as pricing I saw it on amazon for £75 so this is the pricing I am basing my praise and criticism on.

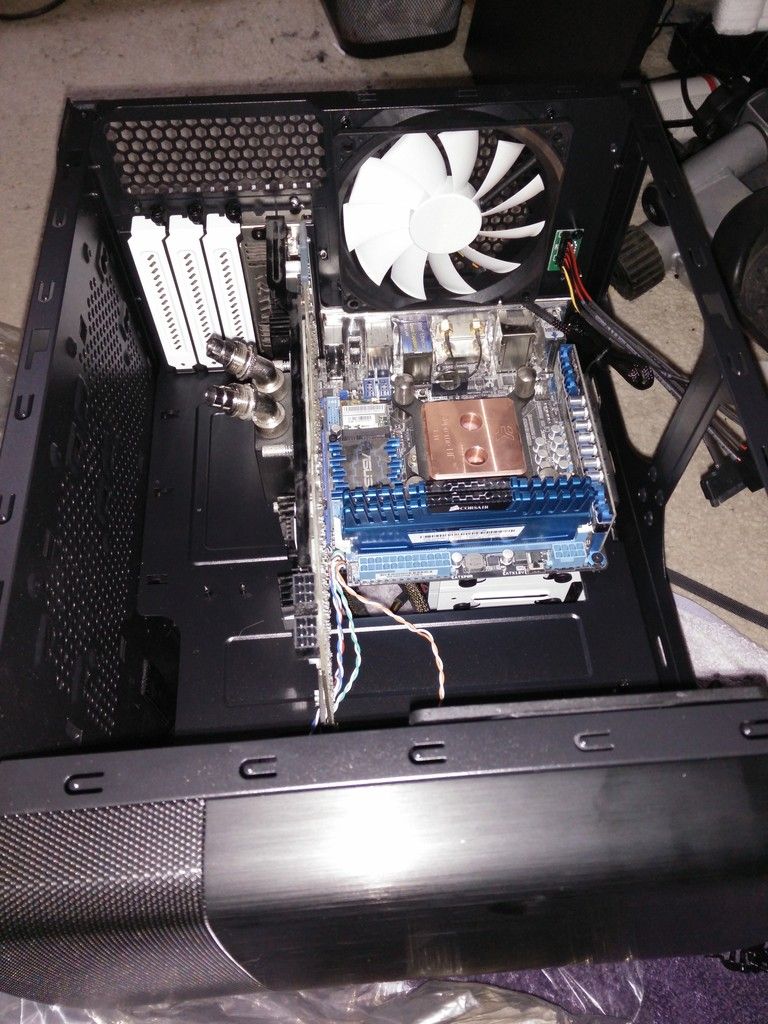
    So what does it look like ?


    First impressions is that it looks great, very clean and has a fractal feel to it. The front has large piece of brushed aluminium paired with a sizeable vented mesh, it gives the case I nice break on the front while ensuring plenty of airflow is possible which is nice. The front is held in by 4 plastic pins (your average holding system), personally I found this easy but it is too easy and I feel like its going to break, I much prefer the plastic clips used on the prodigy as it came off unless I wanted it to but this is a minor niggle as ones its down it wont come off (just dont pull it from the front!). The panel IO is good, 2 USB 3.0 ports and the standard HD audio mic and output along with a power button that has little play on it and relatively nice however you may have noticed there is a lack of a reset button... im not sure why this isnt present and personally I like both buttons but maybe this is just a dying mentality, I can live without it though.


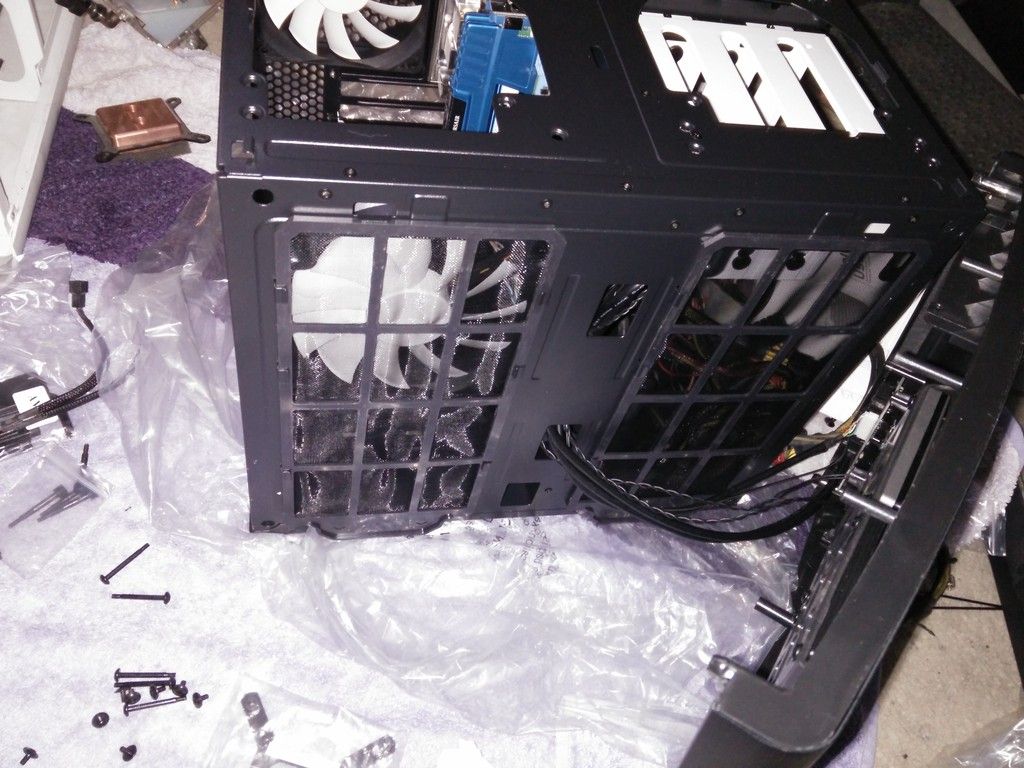
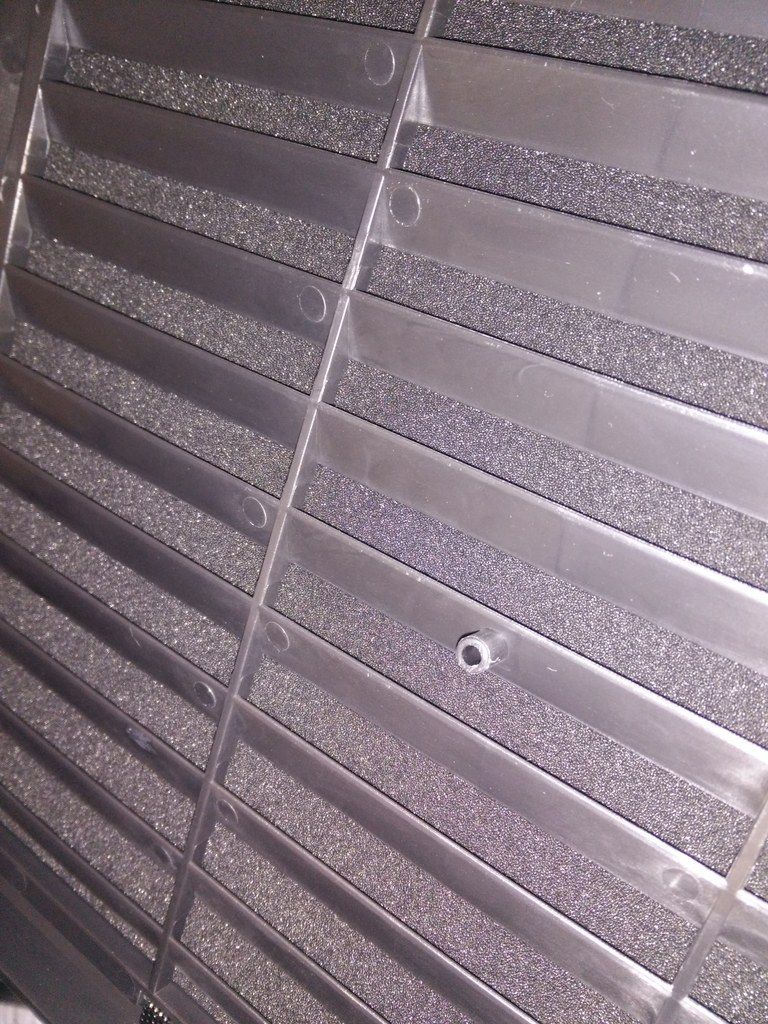
    Taking the front panel off you can see mounting designed for 2x120mm fans per side with fan filters provided, now this looks good but there clearly has been a major oversight when implementing these fan filters, its so simple but I dont know how this was missed, the fan filters slide out but the tab is at the bottom and all the plastic lugging to hold them in place is implemented so you have to pull the whole fan filter down to get it out but of course if your system is sat on any surface like you normally would then you have to physically lift up the whole unit just so you can create a whole fan filter length sized gap at the bottom, either I am being stupid or someone needs a slap at fractal for leaving this detail... the whole mounting of the fan filter simply needs to be flipped so you pull the tab up and out instead of down and out.


    (the tab in question...)

    On from that you have a nice space for 2x 2.5mm drives on the front, I like this as its a great feature and exactly like the one done on the Bitfenix prodigy so I feel this is meant to be a basic feature for cases now a days , there are two holes that allow you to pass cables through allowing easier management. You will also see the room for mounting a slot drive to the front, I like this idea but I havent found any slot drives on the cheap so I wont be using this unfortunately, it would have been better if they simply implemented room for a slim laptop drive as its similar (maybe charge this as a £5 extra to have it pre cut etc). Other issue was the fact the power LED was very poorly glued down, first time I opened the panel it just fell off so I had to use a hot glue gun to put it in place, must have slipped through QC .
    Overall fairly good standard front panel.

    The top panel, this pretty much a standard meshed top panel with what appears to be a dust filter type material (maybe for noise reduction more than anything), comes off fairly easily and it has a very simply mounting method which is two mounting holes and these line up with the front panels 2 large locating pins, then you screw it down at the back, does the job however I think mine came slightly compromised as one of the locating holes appears to be on the verge of snapping off which is rather annoying but I will just try and avoid taking the top off so much.


    (top panel mesh)


    (top without cover)

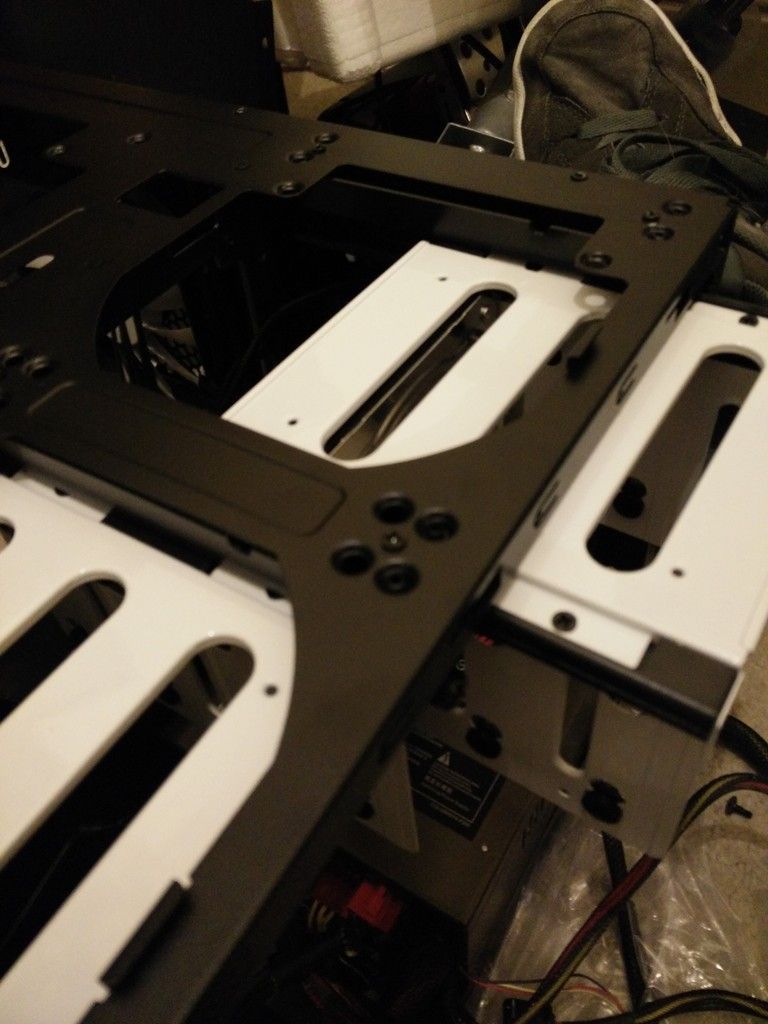
    The actual top of the case gives you plenty of options, you can install 4x120mm (or 140mm at a push) fans, the hard drive cages are easily removable, 2 small screws per rail and there are 3 on the right so give you the room to install something on the top. The hard drive cages mount the drive vertically which is interesting and does make it slightly harder to hide cables (I am terrible at this anyway... no difference ha) also no tool less design but at least the vibration washers are pre-installed, really though I think fractal missed out on an opportunity here as they could have made them horizontal mounting and then they could have brought the hard drive cages further down from the top allowing you to have fans installed along with both cages.


    (hdd cage mounting)

    Now the right section (if looking from the front) has plenty of space available including the two HDD cages which house 4 drives each.

    The PSU sits at the bottom with a fan filter and you have two large velcro straps built into the front which I can only assume is meant to be a really simple way of managing the cables or as the manual suggestions, you can place one of the HDD bays in there and strap it down, I like this small feature its nice. There is a very large cut out for the motherboard which is great, for my mini-itx motherboard it even allows me to feed the 24pin power cable right there to minimise mess, there are several cut outs in places to allow easy feeding of cables, they are well sized and suitably positioned however I would have liked for the larger cut outs to have rubber grommets to make it easier to hide cables but again this is a minor niggle.


    (right side with PSU installed)


    (left section)
    The left side holds the motherboard and other components, its pretty spacious especially when working with a mini-itx board. It allows for 320mm GPUs but that is without a fan or anything at the front, as soon as you add in components at the front you are eating into this space, with the supplied fan it goes to 290mm space which is still enough to house all single GPUs as far as I am aware, the 290x is 278mm stock but obviously if a third party has moved components or cooling to extend past the PCB it maybe problematic.

    Not much else to say on the left side, the PCI panels are white which is a nice break but its pretty much your standard case ,


    Installed my motherboard and GPU pretty easily, was worried about the GPU not fitting due to it being so high up but no problems there . While we are in this section there is a basic fan controller built in, it has a L/M/H setting on the rear of the case and the connections are just above the fan, it has three 3 pin connections available and for some reason has a sata power connector for power... really odd as everyone uses molex for fan controllers right? Heres another niggle for me, why I cant get any sata cables over to that place as I used all mine to power the 2 SSDs in the front and one HDD in the left compartment, it would have been better if they put the controller in the right section as that would have meant the fan controller was right next to the power and all you would need to route is the three fan cables, personal perference I guess but seems a bit silly to put it up in the left section where not many power cables are!

    Now as a water cooling enthusiast I have had watercooling for about 6 years now, the prodigy did me well at condensing my setup while maximising watercooling performance as I had an XSPC RX240 and an RS240 all in one case for a simple CPU + GPU loop, worked extremely well so with the promise of great watercooling support I went to investigate the actual options. In the right compartment I could easily fit the RX240 in the roof but I couldnt fit it in the front as its apparently too tall , would have been amazing if I could have put it in the front but still one of the thickest radiators( its like 3 times the thickness of the S24 radiator...) in the top is good. Onto the left section I found an immediate issue with the roof installation of a slim radiator, the motherboard is too high up so there is no room to safely mount it as it would block the CPU connections along with the fact my motherboard has a VRM riser card means its an unexpected obstacle at the beginning of the motherboard , still can get a 240mm radiator in the front of it but again you're taking vital space away from the GPU length, with the Kelvin s24 installed in the front I can fit my 7950 in but its down to like 2 mm spare and thats a 275mm card so i think that specific raditor pushes out the option of a longer GPu (obviously sacrificing one Fan will claim the space back). Overall the watercooling posibilities seem very strong for what is an MATX/Mitx case and is comparable with my prodigy.

    Summary, the build quality of the case is fairly good but in some places there is a bit too much flex and the paint seems to come off very easily however the case is extremely spacious and allows for good cable management, I am happy with this case and I think £75 is an okay price for it right now but I would prefer to see it closer to the £60 mark. Not sure whate lse to say with regards to the case so lets move onto the Kelvin S24.
    Quote Originally Posted by snootyjim View Post
    Trust me, go into any local club and shout "I've got dual Nehalem Xeons" and all of the girls will practically collapse on the spot at the thought of your e-penis

  2. #2
    Senior Member Hicks12's Avatar
    Join Date
    Jan 2008
    Location
    Plymouth-SouthWest
    Posts
    6,586
    Thanks
    1,070
    Thanked
    340 times in 293 posts
    • Hicks12's system
      • Motherboard:
      • Asus P8Z68-V
      • CPU:
      • Intel i5 2500k@4ghz, cooled by EK Supreme HF
      • Memory:
      • 8GB Kingston hyperX ddr3 PC3-12800 1600mhz
      • Storage:
      • 64GB M4/128GB M4 / WD 640GB AAKS / 1TB Samsung F3
      • Graphics card(s):
      • Palit GTX460 @ 900Mhz Core
      • PSU:
      • 675W ThermalTake ThoughPower XT
      • Case:
      • Lian Li PC-A70 with modded top for 360mm rad
      • Operating System:
      • Windows 7 Professional 64bit
      • Monitor(s):
      • Dell U2311H IPS
      • Internet:
      • 10mb/s cable from virgin media

    Re: Fractal Node 804 and Kelvin S24 Review

    Kelvin S24
    As previously mentioned ive been watercooling for quite some time so kinda already have a bar to be met, I moved from normal air cooling because of the GPU being stupidly loud . First impressions is a nice box and well packaged ready for a solid delivery.


    The contents that came with it was quite good, you get a full 1 gram thermal paste (i was expecting a pre applied or simple sachet, this is nice), the mounting brackets are seperated into AMD and Intel bags making it easier to get going.


    Pulling out the actual unit is a thin 240mm radiator with a pump/heatsink, the pump connects via 3 pin which is a shame as the two fans they provide are connected via PWM. looks good to me so lets actually install this!

    Installation... god was this hard, I am probably going to lose credibility here but it honestly took me 4 attempts to get this done right and many swear words were throw at the unit, I have had much experience with all different types of mounting systems, generic and specific socket mounts and spring loaded etc so I thought this should be a piece of cake. I can only speak from an Intel 1155 socket experience as this is what I tested it with but the process is straight forward, get 4 screws put on sprints and a washer on all of them then put them in the slide holes on the unit and fix them in place by a nut on the end, done that and went onto the next part which is to put thermal paste on CPU (no problem ), then I needed to put the provided plastic back plate onto the back and screw the heatsink into it.

    This all sounds simple in theory but as this is one of the worst generic mounts I have used it proved difficult, the plastic backplate had 2 sticky lengths on it to obviously hold it to the motherboard when pressed against it but this tape was severely insufficient as it kept falling off (part of the problem...), the back plat also has moving screw holes so if it falls out of position the built in bolt also slides out of position requiring you to reposition it, add ontop of this you have the heatsink that has 4 screws that also has the same amount of room to slide around to accomodate different sockets it means you have to line up both sides at the same time while putting pressure on the heatsink to press the sprint down and begin screwing.

    After being unable to screw these in successfully and having to redo the thermal paste due to the movement a few times I went back to the manual as I must have done something wrong and no it showed that I was using the correct screws etc so I tried again, no luck and again I went back to the manual and found a STUPIDLY STUPID error that had been the main cause of my issues...

    Intially I looked at the manul and the top text seemed pretty useless so I just went through with the images as it seemed extremely simple, I was dead wrong I should have looked at the list at the top that showed what items you needed for each step...


    Look at the image and compare it to the screw that it shows you need at the top, its a different screw! This really confused me as when I opened the intel bag I had 8 screws and thought id just go with the diagram, I didnt realise until I looked at the front of the manual that its broken down into three mounting systems, INTEL / AMD / INTEL 2011, now for me I think its their fault for having the wrong image and a simple fix is to correct the image used or another way is to split the contents of the mounts into the segments they do in the manual so a bag for Intel 2011 , intel and amd.

    Maybe more of a rant but this just brings me back to DIY weekends putting up furniture that was completely different to the manual pictures . Anyway after replacing the screws with the correct sized ones it was much easier and I eventually got it mounted but it was still a small pain, Fractal should change this mounting system as a better alternative would be to just put the screws through the bottom of the motherboard and have them fixed by a nut on the otherside then you put the heatsink ontop and have a nut and spring that go ont the top similar to it is now but this will mean users can fix a mount platform easily and still have full compatibility with all sockets, they no longer have to try and line up two moving pieces and instead can simply fix one onto another.

    Now that the mounting debacle is over, how does it run?

    I only have an I5 2500k running at 3.6 Ghz (recently down from 4.7ghz due to stupid windows issue I was making sure it wasnt the problem ), on my previous watercooling system I idled at 25C and hit full load of 30 - 33C under intelburntest. So far the S24 has been idling around 26C so no difference (I have no way of measuring the current room temp so lets ignore the idle), on max load intel burn test with the supplied 2 120mm fans @ max 1800RPM after 10 passes it tops out at 45C, not bad but I cannot stand the fan noise its WAY TO LOUD its almost like having delta fans on! So I had them sit at 850RPM which is quiet enough for me and after another 10 passes that now tops out at 49C so not much difference and much more tolerable.

    I havent used other all in ones before so im not sure how 'good' this is but its certainly does the job however there is one major issue with this unit, the pump is terrible either due to poor mounting or just in general, at full speed the whine or hum is far too loud and now a PWM connection would have been good however I plugged it into my fan controller (strong enough for pumps yes), and pushed this down to 6v which is 1200RPM (compared to the 2400RPM stock speed), this has reduced the noise considerably but im unsure as to how 'safe' this level is due to it might not be enough to consistently start the pump for cold although the performance seems unaffected by the change in RPM im still getting < 49C on intel burn test with this speed so I think Fractal needs to use a lower speed pump or switch to something like the Laing DDC which is the most common watercooling pump for a reason (strong and quiet, if mounted correctly),it does seem like it is the plastic shell the is poorly mounted so it should be something that can be fixed in a V2 of the unit but as it its not the best.

    So overall? its not a bad cooler but its not that quiet which in my opinion defeats a major pro with watercooling, personally I would just get a large aftermarket heatsink if all i wanted to cool was the CPU as £89 is a lot for this, you can get a lot of metal for £89 .
    Quote Originally Posted by snootyjim View Post
    Trust me, go into any local club and shout "I've got dual Nehalem Xeons" and all of the girls will practically collapse on the spot at the thought of your e-penis

  3. Received thanks from:

    Apex (04-05-2015)

  4. #3
    Laird Of The Glen jimborae's Avatar
    Join Date
    Oct 2003
    Location
    I come from a land of plenty......not
    Posts
    3,490
    Thanks
    259
    Thanked
    370 times in 303 posts
    • jimborae's system
      • Motherboard:
      • Gigabyte Aorus Z390 Pro
      • CPU:
      • Core i7 9700K@4.7Ghz
      • Memory:
      • Team Group DDR-3000 32Gig
      • Storage:
      • 1x Samsung 870 Evo 500Gb SSD, 1 x WD Red 4TB
      • Graphics card(s):
      • Gigabyte Radeon 5700XT watercooled
      • PSU:
      • XFX 850W Black Edition
      • Case:
      • Phantek Enthoo Prime
      • Operating System:
      • Windows 10 Pro
      • Monitor(s):
      • 2 xDell 24"
      • Internet:
      • PlusNet 70Mb

    Re: Fractal Node 804 and Kelvin S24 Review

    Nice review. Weird, i didn't get any of the mounting issues you did. Once I had the backplate in right orientation so the cutouts cleared the cpu socket screws/rivets the tape held it fine and it was easy to mount the cpu block. Albeit it was still a 2 handed job but compared to others AIO solutions (looking at you Antec Khuler!) this was a breeze.

  5. Received thanks from:

    Apex (04-05-2015)

Thread Information

Users Browsing this Thread

There are currently 1 users browsing this thread. (0 members and 1 guests)

Posting Permissions

  • You may not post new threads
  • You may not post replies
  • You may not post attachments
  • You may not edit your posts
  •