Results 1 to 8 of 8

Thread: AB9 Pro Northbridge heatsink removal help!

  1. #1
    Senior Member
    Join Date
    Feb 2007
    Posts
    417
    Thanks
    4
    Thanked
    3 times in 3 posts

    AB9 Pro Northbridge heatsink removal help!

    Hi there,

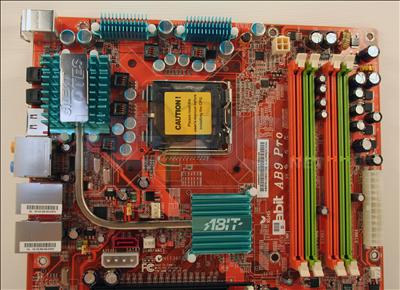
    I have a Noctua NC-U6 on the way and I just need some guidance on removing the stock heatsink on the northbridge of the AB9 Pro. Do I need to remove the entire heatpipe system? Any tips or help would be much appreciated.


  2. #2
    Moderator chuckskull's Avatar
    Join Date
    Apr 2006
    Location
    The Frozen North
    Posts
    7,713
    Thanks
    951
    Thanked
    690 times in 463 posts
    • chuckskull's system
      • Motherboard:
      • Gigabyte Z77-D3H
      • CPU:
      • 3570k @ 4.7 - H100i
      • Memory:
      • 32GB XMS3 1600mhz
      • Storage:
      • 256GB Samsung 850 Pro + 3TB Seagate
      • Graphics card(s):
      • EVGA GTX 980Ti Classified
      • PSU:
      • Seasonic M12 700W
      • Case:
      • Corsair 500R
      • Operating System:
      • Windows 10 Pro
      • Monitor(s):
      • Asus VG278HE
      • Internet:
      • FTTC
    Those little white pins are what's holding it on. just squeeze the underside and pull the top, should just pop out, do that for all six and you're sorted.

    The heatpipe is most likely soldered to both heatsinks so yeah you have to remove the whole lot.

  3. #3
    Senior Member
    Join Date
    Feb 2007
    Posts
    417
    Thanks
    4
    Thanked
    3 times in 3 posts
    so the whole heatpipe solution has to be removed?

  4. #4
    Moderator chuckskull's Avatar
    Join Date
    Apr 2006
    Location
    The Frozen North
    Posts
    7,713
    Thanks
    951
    Thanked
    690 times in 463 posts
    • chuckskull's system
      • Motherboard:
      • Gigabyte Z77-D3H
      • CPU:
      • 3570k @ 4.7 - H100i
      • Memory:
      • 32GB XMS3 1600mhz
      • Storage:
      • 256GB Samsung 850 Pro + 3TB Seagate
      • Graphics card(s):
      • EVGA GTX 980Ti Classified
      • PSU:
      • Seasonic M12 700W
      • Case:
      • Corsair 500R
      • Operating System:
      • Windows 10 Pro
      • Monitor(s):
      • Asus VG278HE
      • Internet:
      • FTTC
    Yeah I'd say so.

  5. #5
    Senior Member
    Join Date
    Oct 2006
    Posts
    292
    Thanks
    7
    Thanked
    11 times in 10 posts
    • Richh's system
      • Motherboard:
      • ROG Maximus VIII Hero
      • CPU:
      • Core i7 8700K delid, H115i Platinum
      • Memory:
      • 16GB Corsair Dominator GT 3200
      • Storage:
      • Loads
      • Graphics card(s):
      • EVGA GTX970 FTW+
      • PSU:
      • Corsair AX860i
      • Case:
      • Custom open frame
      • Operating System:
      • Win10 Pro x64 / occasionally Win 7 Pro x64
      • Monitor(s):
      • ROG Swift PG279Q, Sony 48A9
    I've seen it said elsewhere Mishima that it is possible to remove the heatpipe from the PWM heatsink, after which you can re-fit this part of the standard solution. I doubt that the pipe is actually soldered in, so it is likely to be a case of just twisting it out.

    As Chuck says, retract the barbs on the pushpins with some pliers and then it's just the TIMs holding the solution onto the board. Carefully persuade it loose, and it should be fairly obvious just from looking how the pipe is secured - and also what the best removal method is.

    Alternatively, scroll down here a bit, as I'm sure someone else has asked a similar question recently, and got an answer from someone who's actually done it.
    BH6, BX6 2.0, BE6, BE6-II 2.0, ST6-RAID, BE6-II 2.0 (again), BD7-RAID, BD7II-RAID, IC7-G, IC7 Max3, AB9 QuadGT, IX38 QuadGT. IX58... Oh, b*ll*cks. RIP Abit

  6. #6
    Senior Member
    Join Date
    Feb 2007
    Posts
    417
    Thanks
    4
    Thanked
    3 times in 3 posts
    Thanks for the info guys, I will jus have to be really careful when I'm doing this then - I want to be able to restore it to its stock state in the future.

  7. #7
    Registered+
    Join Date
    Feb 2007
    Location
    Birmingham
    Posts
    20
    Thanks
    0
    Thanked
    0 times in 0 posts
    This reply is probably too late to be of use but I've just done this on my AB9 pro. The heat pipe is just a push fit into the PWM heatsink with a bit of thermal paste applied.... I just gave it a twist and it came out easlily (I suspect that functionally this arrangement is rubbish and contributes little to northbridge cooling). I removed it to fit a water-cooled northbridge block.

  8. #8
    Senior Member
    Join Date
    Feb 2007
    Posts
    417
    Thanks
    4
    Thanked
    3 times in 3 posts
    Not too late at all, I haven't yet attempted to fit the new cooler. Thanks for the insight, I now know what I have to do!

Thread Information

Users Browsing this Thread

There are currently 1 users browsing this thread. (0 members and 1 guests)

Similar Threads

  1. AB9 Pro e4300 overclocking woes
    By bonus uk in forum abit.care@HEXUS
    Replies: 12
    Last Post: 30-05-2007, 11:15 AM
  2. AB9 Pro JMicron performance
    By d3fiant in forum abit.care@HEXUS
    Replies: 12
    Last Post: 04-04-2007, 11:21 PM
  3. New AB9 Pro keeps entering BIOS
    By ice0009 in forum abit.care@HEXUS
    Replies: 1
    Last Post: 21-12-2006, 10:31 AM
  4. AB9 pro not booting, POST code is 90
    By ned@tropic in forum abit.care@HEXUS
    Replies: 3
    Last Post: 18-12-2006, 03:35 AM
  5. Setting AB9 Pro to run Smoothly...
    By ab9 in forum abit.care@HEXUS
    Replies: 11
    Last Post: 26-08-2006, 12:07 AM

Posting Permissions

  • You may not post new threads
  • You may not post replies
  • You may not post attachments
  • You may not edit your posts
  •