Results 1 to 6 of 6

Thread: Gigabyte GM-M6800 mouse modding

  1. #1
    Senior Member Pob255's Avatar
    Join Date
    Apr 2007
    Location
    The land of Brum
    Posts
    10,143
    Thanks
    608
    Thanked
    1,226 times in 1,123 posts
    • Pob255's system
      • Motherboard:
      • Asus M5A99X EVO
      • CPU:
      • FX8350 & CM Hyper 212+
      • Memory:
      • 4 x 2gb Corsair Vengence 1600mhz cas9
      • Storage:
      • 512gb samsung SSD +1tb Samsung HDD
      • Graphics card(s):
      • EGVA GTX970
      • PSU:
      • Seasonic GX 650W
      • Case:
      • HAF 912+
      • Operating System:
      • W7 Pro
      • Monitor(s):
      • iiyama XB3270QS-B1 32" IPS 1440p

    Gigabyte GM-M6800 mouse modding

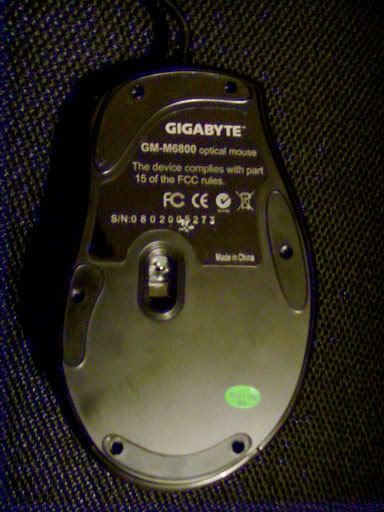
    For thoes of you who's missed it, the gigabyte GM-M6800 mouse is a dirt cheap optical mouse, with two speed setting and 2 side buttons.
    Personally I think it's a nice shape and fit my hand quite well.

    http://forums.hexus.net/current-barg...ml#post1554242

    The down sides was an overall light weight and cheap feel, so I've had a go at modding it.

    Oh and Apologies for the bad photo's, energy effecent light bulbs,black plastic and digital cameras just never seem to work well together.

    Part 1: Skinning a mouse.

    For anyone who's never opened up a mouse before it's fairly easy, there well be one or more screws on the bottom, for which you'll need a thin crosspoint screwdriver, jeweller type as a standard screwdriver head is too thick to allow access to the sunk screws.

    Now normally (infact on every other mouse I've opened) the screw is ether exposed or hidden under the serial number/information sticker.
    Simple way to locate such a hidden screw is just to run the tip of the screwdriver over the sticker untill it "dips" in and there is the screw.
    I did the same on this mouse found a dip of about the correct size, however after carefully cutting open the sticker I found it's a moulding point This is a bit odd as moulding points are normally on the inside.

    I next peeled away one of the side rubber panels on a hunch, there are a few small square holes under it and I got a bad feeling that this mouse might be held together by plastic clips and not screw was involved, which would make it next to impossible to open without breaking.

    Luckly the is not the case, which I discovered when I peeled away one of the feet, there are infact 6 screws in total, 2 under both the top and bottom feet and 1 each under the left and right feet.


    No you only need to remove the top two and bottom two at first, these screws hold in the top section.

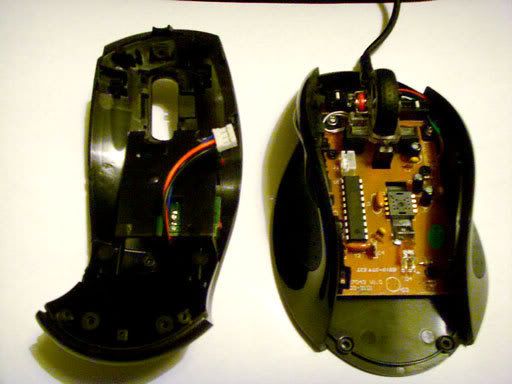
    ok not easy to see here but the top is actually made up of two peices sandwiched together.
    and held together by one screw (which can just been seen below the wire)
    the curcit board sandwiched between the two parts has the microswitchs for the side buttons and the speed button, it's held on to the lower part by a couple of screws (I didn't try to remove it)

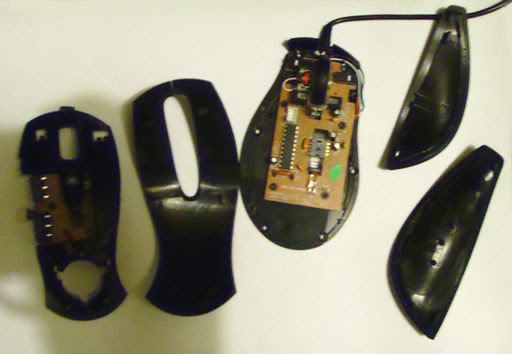
    The two side sections are held on by both the single screw on the bottom and a single screw on the inside near the front.

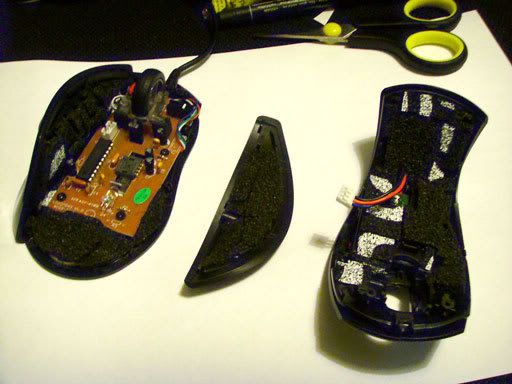
    Here it is broken down into all 4 parts.


    I had a go at removeing the main curcit board which is held on by 4 screws, however before you can take that off you need to remove the wheel section and I couldn't get to off.
    The wheel section is held in by a plastic pin at the front, which I could detach and a clip arrangement at the back which I could not realease and didn't want to break it so for now I gave up.

  2. Received thanks from:

    Mithrandir (27-10-2008),RoBe (27-10-2008)

  3. #2
    Senior Member Pob255's Avatar
    Join Date
    Apr 2007
    Location
    The land of Brum
    Posts
    10,143
    Thanks
    608
    Thanked
    1,226 times in 1,123 posts
    • Pob255's system
      • Motherboard:
      • Asus M5A99X EVO
      • CPU:
      • FX8350 & CM Hyper 212+
      • Memory:
      • 4 x 2gb Corsair Vengence 1600mhz cas9
      • Storage:
      • 512gb samsung SSD +1tb Samsung HDD
      • Graphics card(s):
      • EGVA GTX970
      • PSU:
      • Seasonic GX 650W
      • Case:
      • HAF 912+
      • Operating System:
      • W7 Pro
      • Monitor(s):
      • iiyama XB3270QS-B1 32" IPS 1440p

    Re: Gigabyte GM-M6800 mouse modding

    Part 2: modding, adding weight and padding.

    What I wanted to do with this mouse was add a bit of wight and try to reduce the hollow sound if you tap it.

    I used some more of my very handy left over Paxmate sound damping foam cutting up small bits and covering the lower half of the inside of the top section.
    Basically covering all of it from the point where the plastic thins to allow the front buttons to be depressed more easily all the way to the back, leaveing clear areas around any plastic tab or screw hole, so as not to get in the way when I had to put the two halves back together.
    I didn't cover the front section incase it disrupted mouse clicking.

    Sorry forgot to get a photo of this

    Even though I had left spaces round the tabs and screw holes the padding was still too thick and while it would go back together, when I aligned the side peices up the top section was still sticking up a good half mm or so.
    In the end I had to rip off most of the foam to reduce it's thickness to get the two halves back together snugly.

    on a side note, there is a hole on the rear of the lower section that looks like it's designed for a badge to sit in, being sandwiched between the two sections if the outter section had a corresponding hole.
    Which this mouse does not.


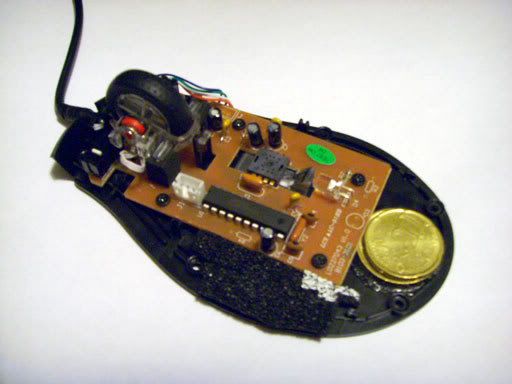
    Next I glued in two coins I happened to have laying about to add some weight to the base.

    It's a 50cent € and a 20cent €, with a combined weight of three quarters of an ounce
    You can also spot a couple of bits of pzxmate I stuck on while checking clearence on the side section.

    I continued adding Paxmate to teh inside of all the sections, creafully checking for clearence and makeing sure I didn't block anything. (esp after the problems I had getting the top back together)

    Here it is ready to go back together


    Now it's all back together I didn't bother with another pic as from the outside it still looks the same.
    The weight of the mouse, without wire, has gone from 4 ounces to 5 ounces ( yep that's a full quarter ounce of Paxmate )
    The differnce in weight, while small, is a noticeable improvement to the overall feel.
    I would of liked another 0.5-1 ounce addition, however I did not want to add too much to the rear of the mouse and unballance it.
    The Paxmate stuffing has greatly reduced the hollow sound and while I know it's structually no different, it "feels" more solid in my hand.

    All told a simple mod which has improved the feel of this cheap mouse, I'm currently thinking of seeing if there's something I could use to cover the surface of the top section to improve the feel of surface.

    I'd love to do something to give it a rubberised feel, just no idea what as yet I'll add more if I figure something out.

    Well I hope you enjoyed it, now go get a screw driver and skin your mouse
    Last edited by Pob255; 27-10-2008 at 01:50 AM.

  4. Received thanks from:

    Hicks12 (27-10-2008),Mithrandir (27-10-2008)

  5. #3
    Ban Hammer! Pingu2003's Avatar
    Join Date
    Jul 2003
    Posts
    2,780
    Thanks
    59
    Thanked
    194 times in 75 posts

    Re: Gigabyte GM-M6800 mouse modding

    lol had it 2 days and already looking to destroy it

  6. #4
    Senior Member Pob255's Avatar
    Join Date
    Apr 2007
    Location
    The land of Brum
    Posts
    10,143
    Thanks
    608
    Thanked
    1,226 times in 1,123 posts
    • Pob255's system
      • Motherboard:
      • Asus M5A99X EVO
      • CPU:
      • FX8350 & CM Hyper 212+
      • Memory:
      • 4 x 2gb Corsair Vengence 1600mhz cas9
      • Storage:
      • 512gb samsung SSD +1tb Samsung HDD
      • Graphics card(s):
      • EGVA GTX970
      • PSU:
      • Seasonic GX 650W
      • Case:
      • HAF 912+
      • Operating System:
      • W7 Pro
      • Monitor(s):
      • iiyama XB3270QS-B1 32" IPS 1440p

    Re: Gigabyte GM-M6800 mouse modding

    Well less than 36hours

    Any idea where I could find this Plasti Dip or simular?

    EDIT: must google before posting
    Yes it's www.plastidip.co.uk

    Has anyone used this stuff before?
    http://www.plastidip.co.uk/index2.cf...ducts&prodId=1

    EDIT2: they've even got an ebay shop under the name plastidipukltd
    Last edited by Pob255; 27-10-2008 at 01:21 PM.

  7. #5
    Ban Hammer! Pingu2003's Avatar
    Join Date
    Jul 2003
    Posts
    2,780
    Thanks
    59
    Thanked
    194 times in 75 posts

    Re: Gigabyte GM-M6800 mouse modding

    well you inspired me, ive modded both my cheap mice, put 6p in one and 12p in another (in pennies)

    feels nice and heavy now lol

  8. #6
    Senior Member Pob255's Avatar
    Join Date
    Apr 2007
    Location
    The land of Brum
    Posts
    10,143
    Thanks
    608
    Thanked
    1,226 times in 1,123 posts
    • Pob255's system
      • Motherboard:
      • Asus M5A99X EVO
      • CPU:
      • FX8350 & CM Hyper 212+
      • Memory:
      • 4 x 2gb Corsair Vengence 1600mhz cas9
      • Storage:
      • 512gb samsung SSD +1tb Samsung HDD
      • Graphics card(s):
      • EGVA GTX970
      • PSU:
      • Seasonic GX 650W
      • Case:
      • HAF 912+
      • Operating System:
      • W7 Pro
      • Monitor(s):
      • iiyama XB3270QS-B1 32" IPS 1440p

    Re: Gigabyte GM-M6800 mouse modding

    Cross threading here.

    As part of project Spork, I've decided to give up this mouse and so I've repainted it.

    http://forums.hexus.net/project-logs...ml#post1761914

    Damb but it's looking sexy now

Thread Information

Users Browsing this Thread

There are currently 1 users browsing this thread. (0 members and 1 guests)

Similar Threads

  1. Cyber Snipa Stinger Gaming Mouse
    By shadowmaster in forum Reader Reviews
    Replies: 8
    Last Post: 20-02-2010, 10:22 PM
  2. Apple: New Multi button mouse shocker
    By Gordy in forum Apple Mac
    Replies: 17
    Last Post: 03-08-2005, 11:51 PM
  3. IceMat - Second Edition
    By autopilot in forum Reader Reviews
    Replies: 5
    Last Post: 12-02-2005, 09:44 AM
  4. Logitech MX700 Cordless Mouse
    By Lee H in forum Reader Reviews
    Replies: 0
    Last Post: 04-12-2004, 01:23 PM
  5. Razor Boomslang 2100.
    By Stewart in forum Reader Reviews
    Replies: 0
    Last Post: 30-08-2004, 06:32 PM

Posting Permissions

  • You may not post new threads
  • You may not post replies
  • You may not post attachments
  • You may not edit your posts
  •