LinkBack URL
 About LinkBacks
Wow, this looks incredible, first laptop mod I've seen but very impressed


Wow, this looks incredible, first laptop mod I've seen but very impressed

Maybe, depends what's the job and what's on offerOriginally Posted by Behemoth

Thanks, laptop mod's are more rare mainly down to that fact there's a lot less you can do with them and most people who buy laptops want an all-in-one unit they don't have to do anything too.
Where as to me it's all about portability, I'd never get anything bigger than this 13" screen laptop anything larger is just too big to me.
Heck I love my little EEEpc 901 the only reason I have this toshiba is because it just the only cost was the replacement screen.
Update:
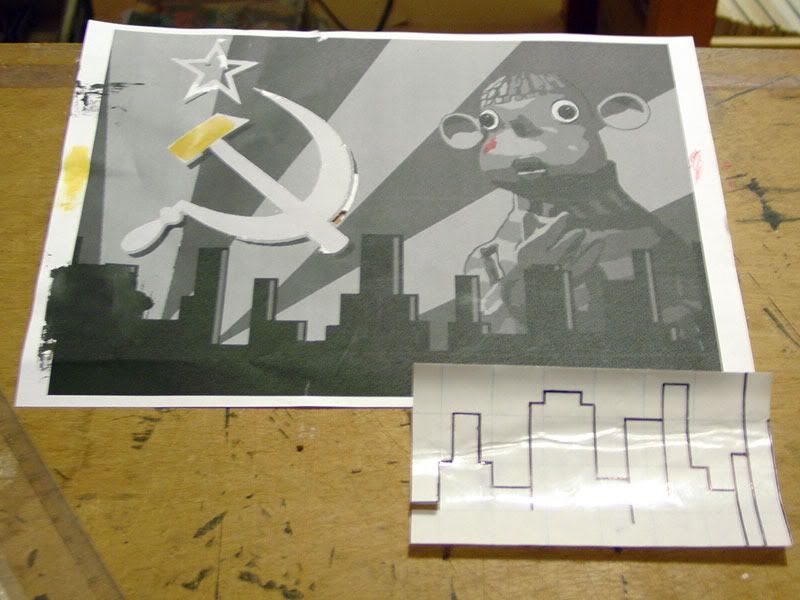
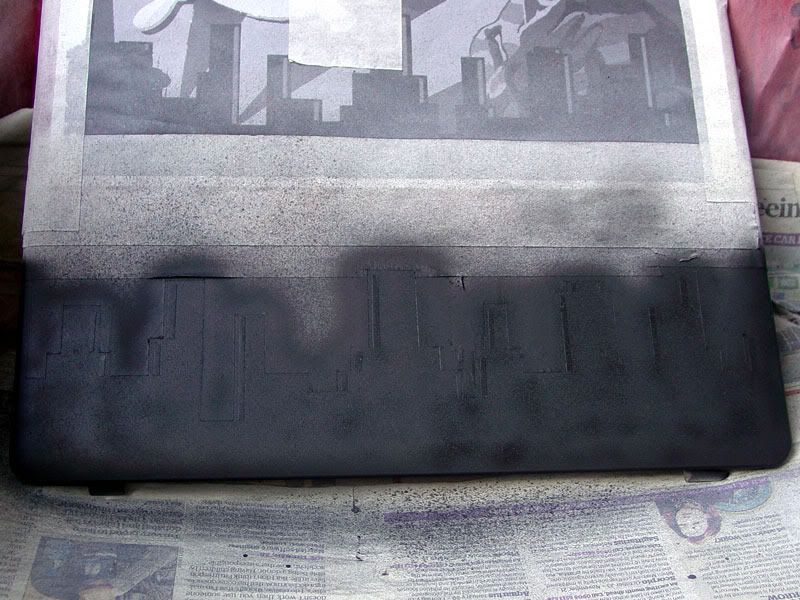
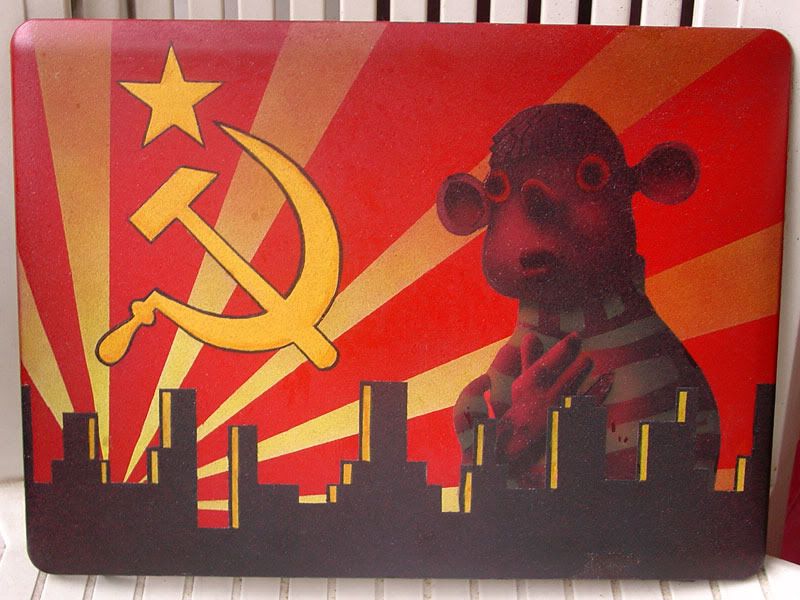
With the Pob image done it's time to work on the skyline
With a mask this simple I didn't bother trying to trace it I just marked it out onto two separate bits of film.
Easier to stick down without getting creases or distortions.
That was easy, I realised I still had a bit of glue residue on the edge so I cleaned it off with alcohol, which also ate into the paint slightly, why it looks a bit messy.
Because of the alcohol reaction I left it for a good hour before I put on a light spray of primer.
Once the primer was dry I cut some thin strips of mask to make the highlights, it'll be too much hassle to air brush so I'll hand paint them later.
Masking them off now means I'd not have to re-mask to lay down more white over the black I'll be using, because a colour will not go down well over black.
two coats of black with the air brush and we're done, it is solid black, it just looks patchy because it's still wet.
Almost done with the lid nowso it's time to start on the keyboard surround
I thought it would be a bit boring with just the girl by the touch pad.
So to make it a bit more interesting I've used the negative section from the skyline mask, I'll create a similar effect too the lid but this time more subtle.
But that's for another day . . . when I can pull myself away from MineCraft
[rem IMG]https://i69.photobucket.com/albums/i45/pob_aka_robg/Spork/project_spork.jpg[rem /IMG] [rem IMG]https://i69.photobucket.com/albums/i45/pob_aka_robg/dichotomy/dichotomy_footer_zps1c040519.jpg[rem /IMG]
Pob's new mod, Soviet Pob Propaganda style Laptop.
"Are you suggesting that I can't punch an entire dimension into submission?" - Flying squirrel - The Red Panda Adventures
Sorry photobucket links broken
Update time:
I did mean to do this painting yesterday, but the otherhalf put the extension cord away, in a cupboard, so I couldn't find it.
Not being able to get power onto the balcony sort of scuppered any modding.
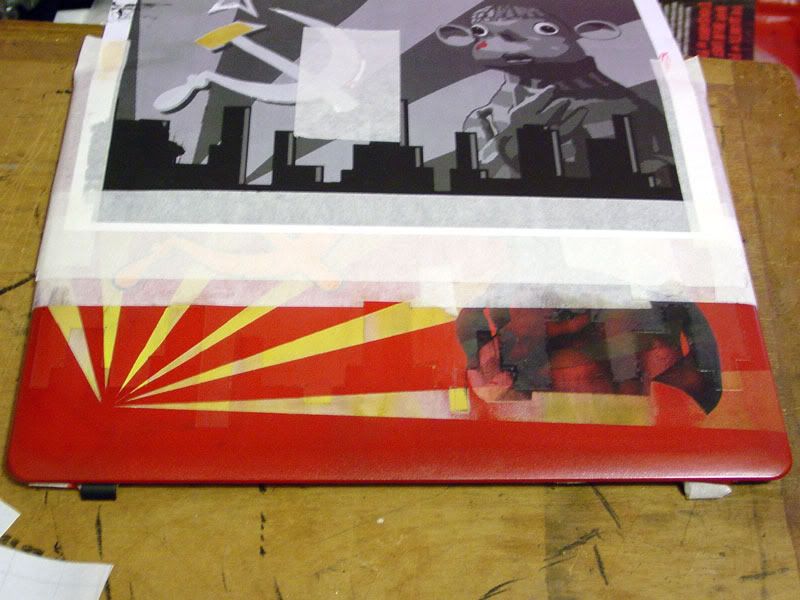
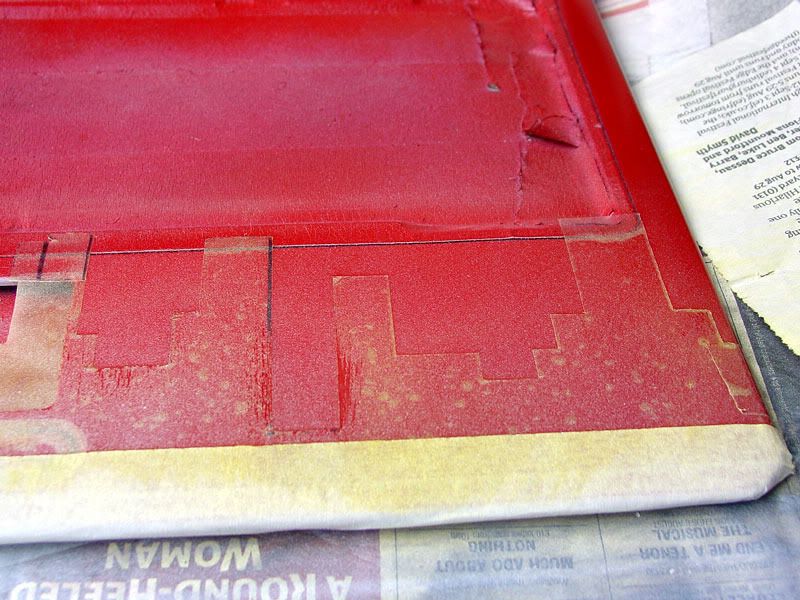
Last off I showed you a skyline mask on the keyboard surround well now it's time to paint it.
I started off airbrushing yellow straight on, it didn't go well, just as with the sunbeams, it clumped and started clogging the air brush.
So I had to wipe it off, take the air brush to pieces and give it a full clean out with alcohol.
So strike 2
Started with a very light undercoat spray, it's a bit annoying as I did want a slightly more subtle effect.
With the under coat down and air brush clean the yellow went down well.
I'm pleased with the final result, even if it's a bit stronger than I planned.
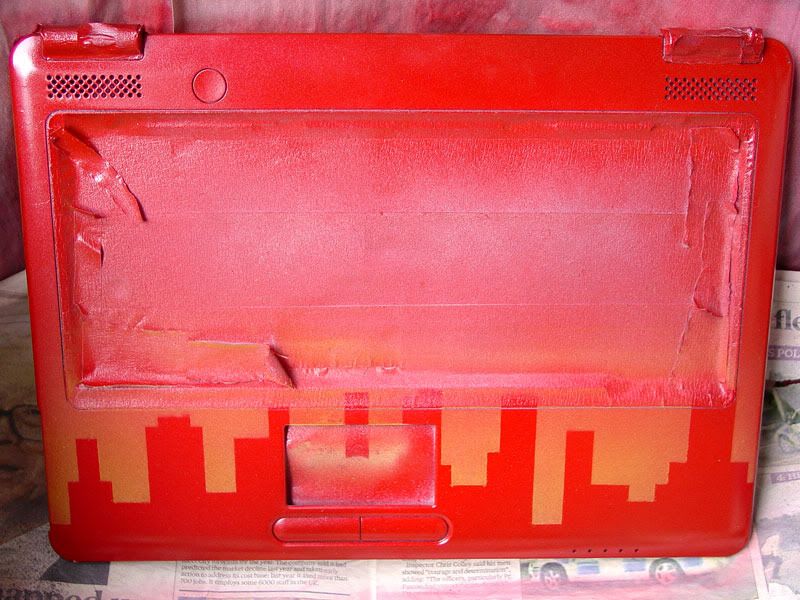
Back to the lid, I decided against having any text, it would be a little too busy.
Here it is in all it's final glory, hand painted highlights and all . . .
But wait I'm not finished with it yet.
Here's my secret weapon
.jpg)
ok that's a image from the plastikote website and it's not even the correct colour, I've just forgot to take a photo of the can
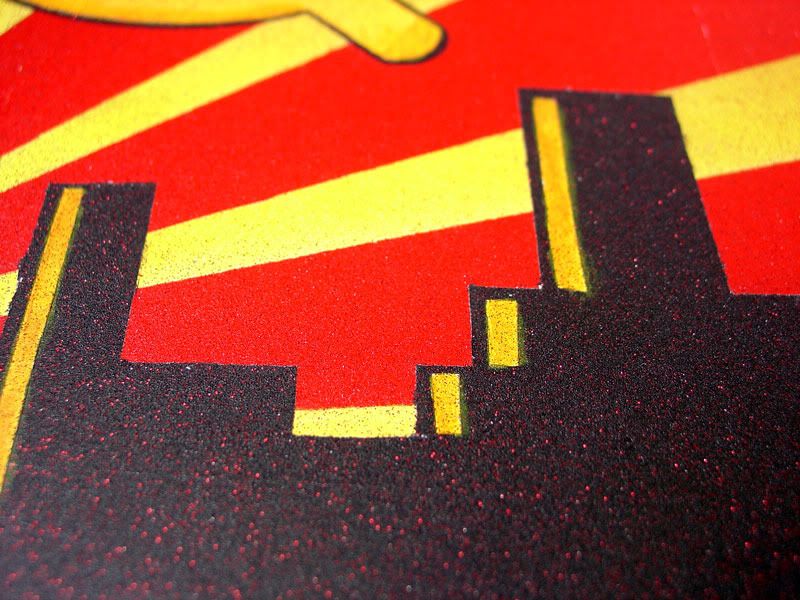
A while back I managed to get hold of a can of the plasti-kote red glitter spray, it was being sold off cheap because they've stopped making the red one.
So instead of a Cherry, which might make it a bit too red and tint the yellow too much, I'm going to use the glitter spray and clean coat over the top of that.
It's very hard to pick it up on the camera especially on top of the red but it does show well on the black, I had 3 different shots but this was the only one where you can really see it.
I'll give it another go later.
I also put the glitter on the keyboard surround too, the Geof image is going to not be glittered.
Then I laid down some clear coat, using plasti-kote Krystal Clear, I'm not overlay impressed with that so far, it's not a very fine spray, far from it, it's rather splotchy and that's meant I've had to lay down rather thick on the lid to get a solid smooth layer.
I've also put a thin layer down on the surround, hopefully so I'll not remove the glitter when I mask out the Geof drawing.
One it's dry I'll get some shots of the final effect.
[rem IMG]https://i69.photobucket.com/albums/i45/pob_aka_robg/Spork/project_spork.jpg[rem /IMG] [rem IMG]https://i69.photobucket.com/albums/i45/pob_aka_robg/dichotomy/dichotomy_footer_zps1c040519.jpg[rem /IMG]
Pob's new mod, Soviet Pob Propaganda style Laptop.
"Are you suggesting that I can't punch an entire dimension into submission?" - Flying squirrel - The Red Panda Adventures
Sorry photobucket links broken
Looking very smart mate indeedBet your pleased with that
Oh yes I am
I wish I could afford an SSD for it and some way of making it touch screen
Just a photoless update/note/observation
Now that the plasti-kote Krystal Clear has dried, I'm far more impressed with it, it seems to be harder than the Acrylic Lacquers that I've used before.
The big test will come this weekend when I'll sand it down, and boy does it need sanding, that's one major issue with glitter spray, it left it with an almost sandpaper like texture.
[rem IMG]https://i69.photobucket.com/albums/i45/pob_aka_robg/Spork/project_spork.jpg[rem /IMG] [rem IMG]https://i69.photobucket.com/albums/i45/pob_aka_robg/dichotomy/dichotomy_footer_zps1c040519.jpg[rem /IMG]
Pob's new mod, Soviet Pob Propaganda style Laptop.
"Are you suggesting that I can't punch an entire dimension into submission?" - Flying squirrel - The Red Panda Adventures
Sorry photobucket links broken
Update: not many pictures, my bad.
Well I'm back to work now
I gave the lid a full 4 days to harden, the glitter had left it with a very rough almost sandpaper like surface.
I started sanding with 800gritt but that was just not enough, so I dropped to 400gritt still not enough.
it was just not cutting in enough to clear the lumps and the paper itself was clogging up with lumps. (4 days drying might not of been enough)
So I moved over to emery paper (size is 1/3 about 200-300gritt) which cut it down nicely, I had to be careful not to go to hard or deep.
I then lightly wet sanded with 800gritt to smooth it out and reduce scratches from the emery.
Another coat of clear.
And it looks like this, there's still a couple of lumps, so I'm going to leave it for a full 7days before I do the next sand and coat, which should be all it needs.
I've also got a better photo of the glitter.

[rem IMG]https://i69.photobucket.com/albums/i45/pob_aka_robg/Spork/project_spork.jpg[rem /IMG] [rem IMG]https://i69.photobucket.com/albums/i45/pob_aka_robg/dichotomy/dichotomy_footer_zps1c040519.jpg[rem /IMG]
Pob's new mod, Soviet Pob Propaganda style Laptop.
"Are you suggesting that I can't punch an entire dimension into submission?" - Flying squirrel - The Red Panda Adventures
Sorry photobucket links broken
DannyM (24-09-2011),Terbinator (04-09-2011)

Wow pob amazing work there! not exactly my style but damn would i like my laptop to look as good as that! stunning work indeed
I read this with interest having had some experience of spraying different paints. Have you tried using T-Cut instead of wet'n'dry to help get that final smooth finish on the laquer?
don't drink and derive
Thanks, I know it's not going to be to everyone's taste but it's something different and unique, I can pretty much guarantee I'll never see someone with something the looks the same.
One thing I've mentioned before in some other thread (cannot remember if it was on hexus or not) T-Cut is a range of polishing and waxing compounds from Car Plan not a single product it's one of those things that's come to mean polishing compound in the way that Hoover has come to mean vacuum cleaner.
But to answer your question, no I've not tried a polishing compound, I will have to at some stage, however it's more for polishing and final finishing, the surface was very lumpy and polishing compound wouldn't of been enough, heck the wet and dry wasn't enough, it was that bad and I had to use emery cloth instead, then wet'n'dry.
Polishing compound should be used to remove scratches and swirls* from paint and final polishing not sanding a rough surface smooth. (well that's my understanding)
*Swirls in paint isn't something that effects computer cases, it effects cars, they are created from tiny grit particles in the grime that builds up on a car then get rubbed over the surface when you wash it.
[rem IMG]https://i69.photobucket.com/albums/i45/pob_aka_robg/Spork/project_spork.jpg[rem /IMG] [rem IMG]https://i69.photobucket.com/albums/i45/pob_aka_robg/dichotomy/dichotomy_footer_zps1c040519.jpg[rem /IMG]
Pob's new mod, Soviet Pob Propaganda style Laptop.
"Are you suggesting that I can't punch an entire dimension into submission?" - Flying squirrel - The Red Panda Adventures
Sorry photobucket links broken
Nice work! I wasn't sure if it was going to look good when you first started but the end result came out really well.
If the glitter is anything like flake it used to take a lot of clear to cover
it, if you sand into it you get dull gray bits instead of the sparkly flake.
Flake is probably larger than the glitter you have used, so would take more to cover. I would put the flake in with clear and apply a coat or two and then at least 5 coats of clear on top[sprayed it's probably a lot thicker than from an aerosol]. Hopefully that could be flatted and polished.
It's looking good, will look even better when you have polished it.
immer in der Scheiße, ist es nur die Tiefe, die sich verändert.
Personally, not my favourite colour scheme, but I have a small idea, cut out a piece and fill it with a transparent plastic, acrylic would be best and get it to light up either on switch or to the music, this is an easy mod, just pm me if you are interested in the instructions, or you could Google it....
Very Very nice! the gloss coat makes it looks awesome
My understanding is flake is just that it's flakes of thin foil where as glitter is more gritty, the clear coat I'm using is interesting in that you cannot put on a thin coat, it's rather viscus and it's more like a squirt than a spray.
I did sand down the lid and it came out very smooth . . . however see below
Umm have you taken a laptop apart before? esp on this laptop, there is very little space between the lid and the lcd panel.
The back of the panel is of course the light panel, to increase the brightness of the screen you need to focus as much light forward as possible, this is done by putting as reflective surface behind the panel, on some screens the back of the actual panel has a mirrored layer glued onto the back of it, however most go with the cheaper option and glue a layer of foil onto the back of the lid (the foil can also be connected to the wireless aerial)
Now I could of cut a hole in the lid, then got a thin piece of acrylic milled to fit it (it would need to be milled to sit flush) then it would of glowed when the screen was on, however it would also of left a darkened area on the screen, not much but it would of been noticeable, other issues would of been not damaging the webcam which is heat riveted in, as well as removing the foil and replacing it.
Other alternative would of been to add a foil back to the lcd panel, add some led's to the acrylic sheet and then find space in the case to wire in a USB controller for them . . . nether would of been easy to do and I'm not good enough with a soldering iron to go messing about with a laptop motherboard.
Thanks
Sorry I've not updated this recently, unfortunately between my pc dying (yes I realise the irony in my pc dying while this laptop, which I wanted mainly in case of pc issues, is in unusable bits) and a rather big problem (covered in this update) I've not actually done much work on this.
Update: The Good, the Bad and the Repair job.
Yes I have good news and bad news.
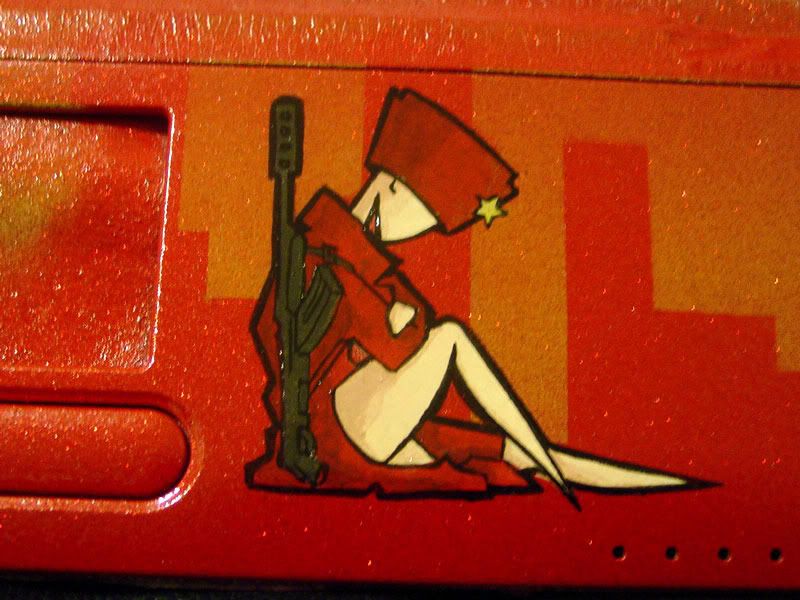
Good news, I finished the Geof artwork on the keyboard surround, this part is finished.
Bad news I lost all the photo's I took.
So at this stage I can only show you the finished artwork after it's been clear coated and describe what I did.
How I did this, I started by tracing & cutting out a mask.
Next I laid down a coat of white primer.
Once that was dry I tack clothed it to remove any lose paint, then covered over the skin areas and the gun.
I hand painted (filling in the block colour then shading) in the red, I didn't remask the flesh areas to protect them but to mark out the areas as all I had was a white silhouette at this point.
Then I filled in the flesh areas and other details
Finally I handed it over to my otherhalf so she could paint the lines, as she's far better than me and if I had tried it would of been very wibbly.
The next day I put on a final coat of clear to seal it.
Now some of you may of noticed I've not sanded my clear coats on the keyboard surround, and you're correct, there is a reason for this, I know from my little eee pc 901 that I don't like a silky smooth keyboard surround esp the palm area (I took some wet&dry to my netbook to sand off the shiny surface around the touchpad and roughen it slightly) which is why I've not sanded it and left it with some texture.
On to the next bit of good and bad. (yes there's more of both)
I sanded cleat coat on the lid smooth and sprayed on the final coat of clear.
Then I did something rather foolish, it was an idea day for spraying, no wind at all, so I decided to leave the lid outside to dry for a bit before bringing it in to minimise the risk of getting cat hair stuck in the clear.
I went back an hour later to discover that some of the newspaper I'd covered that chair with (it's a plastic lawn chair I do my spraying on) had got blown off and onto the lid
I pealed off the paper but bits where left behind, so I tried to wet them to make the remaining bits of paper easier to rub off, unfortunately this caused the clear to bubble and peal, and not just the 2nd layer but the first layer below it.
So what I ended up doing was to carefully and quickly (because it was rapidly drying at this point) peal off the whole clear coat while trying not to damage the artwork underneath.
I was not 100% successful as you can see, that is the worst of the damage, in places it also lifted the glitter too.
I have since touched it up a bit and put down a new layer of glitter, however I must admit this whole thing has disheartened me some what.
However I'm not giving in, but the end result isn't going to be as clean as it was.
[rem IMG]https://i69.photobucket.com/albums/i45/pob_aka_robg/Spork/project_spork.jpg[rem /IMG] [rem IMG]https://i69.photobucket.com/albums/i45/pob_aka_robg/dichotomy/dichotomy_footer_zps1c040519.jpg[rem /IMG]
Pob's new mod, Soviet Pob Propaganda style Laptop.
"Are you suggesting that I can't punch an entire dimension into submission?" - Flying squirrel - The Red Panda Adventures
Sorry photobucket links broken
Update: yes another one
I had already repaired the damage as best as I could and put on some more glitter spray to patch that up.
Today I carefully wiped it down with a tack cloth to remove as much of the lose glitter as possible.
Here's the final result, the repairs show up esp on the airbrush shaded pob image but short of sanding it all off and starting the whole thing from scratch there's not much I can do about it.
On goes the first new coat of clear and this time I made sure there was no way for any paper to get blown onto it.
And I only left it outside for 20min before bringing it in, it's now carefully sitting beside me, well away from any cats (we keep them out of this room) so it should be ok.
Although I might suffer from the fumes.
[rem IMG]https://i69.photobucket.com/albums/i45/pob_aka_robg/Spork/project_spork.jpg[rem /IMG] [rem IMG]https://i69.photobucket.com/albums/i45/pob_aka_robg/dichotomy/dichotomy_footer_zps1c040519.jpg[rem /IMG]
Pob's new mod, Soviet Pob Propaganda style Laptop.
"Are you suggesting that I can't punch an entire dimension into submission?" - Flying squirrel - The Red Panda Adventures
Sorry photobucket links broken
razer121 (01-11-2011)
Glad to see this is closing in on its finish
But back onto your mod, what else is left to do? can we see some more detailed pictures of the keyboard section? how come you don't like smooth around it??
There are currently 1 users browsing this thread. (0 members and 1 guests)
 Posting Permissions

 Reply With Quote