Results 1 to 13 of 13

Thread: Tweak my photo...

  1. #1
    Senior Member stavroshamster's Avatar
    Join Date
    May 2008
    Location
    York
    Posts
    528
    Thanks
    58
    Thanked
    53 times in 35 posts
    • stavroshamster's system
      • Motherboard:
      • Asus P5Q Pro
      • CPU:
      • Intel Core 2 Quad Q6600 @ 2.4Ghz G0 Stepping (O.C@3.3Ghz)
      • Memory:
      • 8GB Corsair TwinX XMS2 PC2-6400
      • Storage:
      • Samsung HD753LJ Spinpoint F1 750GB + Samsung HD103SJ Spinpoint F3 1TB
      • Graphics card(s):
      • Sapphire AMD Radeon 7770
      • PSU:
      • Corsair HX Series 520W
      • Case:
      • Coolermaster CM690
      • Operating System:
      • Windows 7 Pro 64bit
      • Monitor(s):
      • Dell U2412M (1920x1200)

    Tweak my photo...

    Hi everyone,

    I have had some comments back on my landscapes and the general consensus seems to be that they looked a bit flat and I need to calibrate my screen.

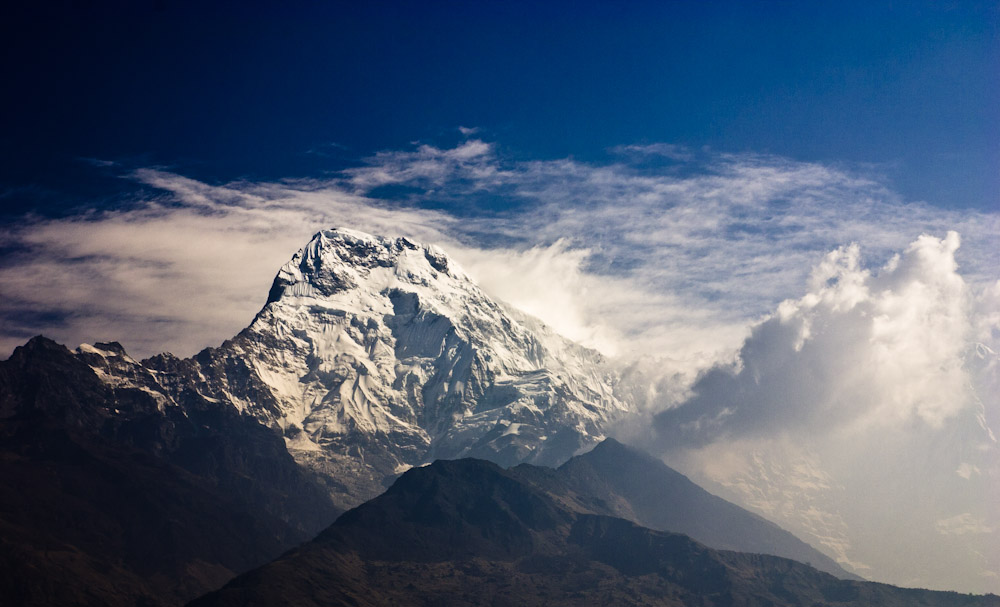
    I have had another attempt at tweaking the most popular photo myself. To remind you, this is what I uploaded first...


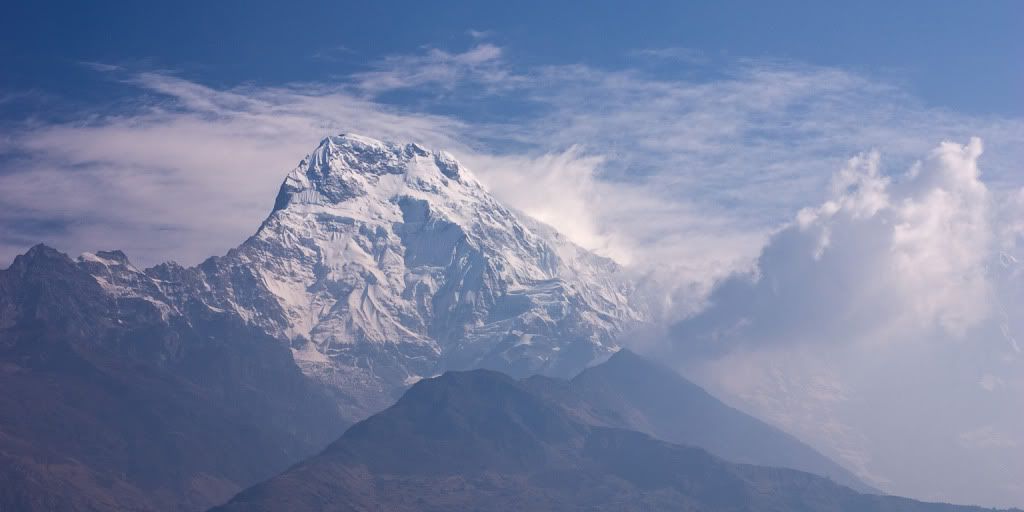
    And here is my second attempt at tweaking it...


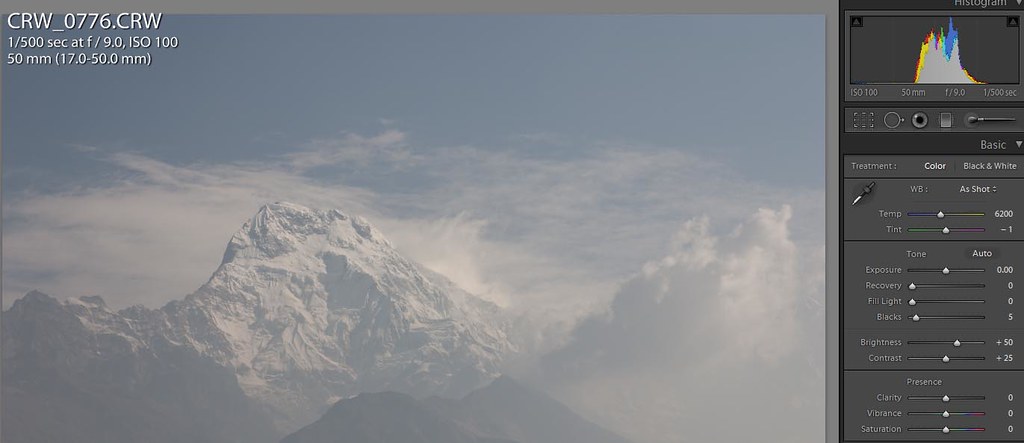
    Here, I have edited the RAW file in Photoshop Camera Raw. I have changed the white balance, tweaked the exposure upwards by about 0.5 stops from the original, tweaked brightness and contrast, and increased the blacks. Then I edited the curves, again in Camera Raw, to increase the highlights and midtones.

    The issue with what I have done with it is that, although it definitely has more 'pop' on my screen, and the haze has been reduced, this wasn't quite as I remember it looking. I think it almost has too much contrast now, and the sky has gone a funny colour - but I guess I can tweak it again later if I decide to use this image to print...

    Here is a link to the RAW file...

    http://rapidshare.com/files/391499989/CRW_0776.CRW.html

    It would be great if I could see other people's attempts. Especially from those who have a properly calibrated screen (I don't). If you could let me know exactly what you did to produce your edit that would be great.

    Cheers!

  2. #2
    Banhammer in peace PeterB kalniel's Avatar
    Join Date
    Aug 2005
    Posts
    31,025
    Thanks
    1,871
    Thanked
    3,383 times in 2,720 posts
    • kalniel's system
      • Motherboard:
      • Gigabyte Z390 Aorus Ultra
      • CPU:
      • Intel i9 9900k
      • Memory:
      • 32GB DDR4 3200 CL16
      • Storage:
      • 1TB Samsung 970Evo+ NVMe
      • Graphics card(s):
      • nVidia GTX 1060 6GB
      • PSU:
      • Seasonic 600W
      • Case:
      • Cooler Master HAF 912
      • Operating System:
      • Win 10 Pro x64
      • Monitor(s):
      • Dell S2721DGF
      • Internet:
      • rubbish

    Re: Tweak my photo...

    Cool - I agree your edit looks a little odd on the left hand side, but you've done a good job on haze reduction.

    I'll have a go at the raw myself when I'm at home, though I've only got freebie tools.

  3. #3
    Senior Member
    Join Date
    Jan 2004
    Location
    Notts UK
    Posts
    766
    Thanks
    11
    Thanked
    55 times in 52 posts

    Re: Tweak my photo...

    Ok, just got your shot into LR and here's what the histogram says:


    That massive block on the right is wasted potential 
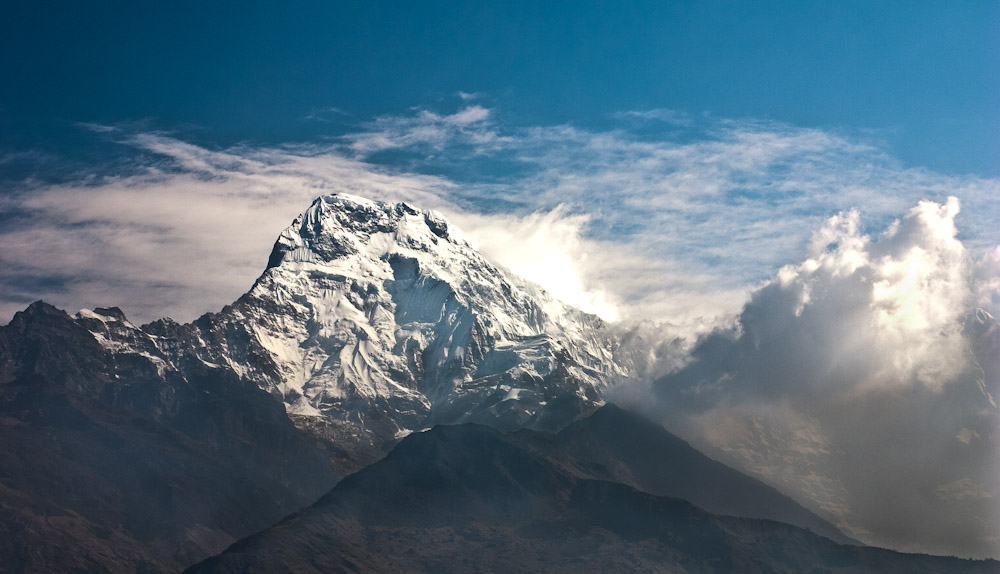
The way that all the tones are clumped together shows that this actually isn't a particularly challenging exposure, the dynamic range is very narrow. It's just massively underexposed - the meter's been fooled by the snow. I'd have exposed this at least 1.5EV more, maybe 2 or 3. Bracketing would have saved you here - one of the shots would have been a stop brighter than this and would actually have been a better base exposure, with this serving to retain highlight detail.

    I'll be back once I've had 30mins with it

  4. #4
    Senior Member
    Join Date
    Jan 2004
    Location
    Notts UK
    Posts
    766
    Thanks
    11
    Thanked
    55 times in 52 posts

    Re: Tweak my photo...


    And there's... something.

    Main changes - +2.13 exposure comp, and a lot of curves to try to get some contrast into the snow. Once that looked ok, dodging and burning to get contrast back into the rest of it, esp the rocks in the mountin - it gets very rough around the hills though. Custom camera profile to try and get the green out of, loads of blue bias. Main problem was having to give it over 2EV positive comp - that really buggers up the colour accuracy and any further changes start giving wierd errors.
    Last edited by brammers; 26-05-2010 at 05:16 PM.

  5. Received thanks from:

    stavroshamster (26-05-2010)

  6. #5
    Senior Member stavroshamster's Avatar
    Join Date
    May 2008
    Location
    York
    Posts
    528
    Thanks
    58
    Thanked
    53 times in 35 posts
    • stavroshamster's system
      • Motherboard:
      • Asus P5Q Pro
      • CPU:
      • Intel Core 2 Quad Q6600 @ 2.4Ghz G0 Stepping (O.C@3.3Ghz)
      • Memory:
      • 8GB Corsair TwinX XMS2 PC2-6400
      • Storage:
      • Samsung HD753LJ Spinpoint F1 750GB + Samsung HD103SJ Spinpoint F3 1TB
      • Graphics card(s):
      • Sapphire AMD Radeon 7770
      • PSU:
      • Corsair HX Series 520W
      • Case:
      • Coolermaster CM690
      • Operating System:
      • Windows 7 Pro 64bit
      • Monitor(s):
      • Dell U2412M (1920x1200)

    Re: Tweak my photo...

    Looks great now.

    I know nothing about dodge and burn - is there a good tutorial online you can recommend to me?

    When you talk about using a custom camera profile - is that in Camera Raw? I haven't experimented with this and don't know what its about...

  7. #6
    Senior Member
    Join Date
    Jan 2004
    Location
    Notts UK
    Posts
    766
    Thanks
    11
    Thanked
    55 times in 52 posts

    Re: Tweak my photo...

    It's ok... still not great. In fact it's not really ok tbh...

    Dodging and burning is a very basic technique, just give it a quick google.

    Custom camera profiles aren't really something I ever worry about - it's just that with having to whack so much positive exposure comp on your pic the colours started to go all weird and I had to compensate. The best thing to do is not take pictures that need +2EV in PS so you won't need to correct that with a custom camera profile

    Tbh, for printing it might be better to go with a different shot. Do you have one that's better exposed?

  8. Received thanks from:

    stavroshamster (26-05-2010)

  9. #7
    Senior Member stavroshamster's Avatar
    Join Date
    May 2008
    Location
    York
    Posts
    528
    Thanks
    58
    Thanked
    53 times in 35 posts
    • stavroshamster's system
      • Motherboard:
      • Asus P5Q Pro
      • CPU:
      • Intel Core 2 Quad Q6600 @ 2.4Ghz G0 Stepping (O.C@3.3Ghz)
      • Memory:
      • 8GB Corsair TwinX XMS2 PC2-6400
      • Storage:
      • Samsung HD753LJ Spinpoint F1 750GB + Samsung HD103SJ Spinpoint F3 1TB
      • Graphics card(s):
      • Sapphire AMD Radeon 7770
      • PSU:
      • Corsair HX Series 520W
      • Case:
      • Coolermaster CM690
      • Operating System:
      • Windows 7 Pro 64bit
      • Monitor(s):
      • Dell U2412M (1920x1200)

    Re: Tweak my photo...

    Quote Originally Posted by brammers View Post
    Tbh, for printing it might be better to go with a different shot. Do you have one that's better exposed?
    I was starting to think the same thing for two reasons: 1. I clearly haven't exposed it that well, although I didn't realise it at the time (it's good to learn stuff!) 2. The PP to expose it better makes it look unrealistic compared to what it looked like originally which was quite hazy and lacking contrast - I think if you didn't know what it looked like before it would make a reasonable photo, but I am wanting to get something printed which my father-in-law can relate to.

    I'll upload a couple of different shots which my better half likes, to see what you can come up with if you are happy to spend the time doing that...

    This first one could do with the mountains bringing out more:

    http://rapidshare.com/files/391821593/CRW_0601.CRW.html

    The second one I would quite like the silhouette to be kept/enhance, but the mountain needs more pop (I think this one is a bit underexposed too - my main problem with most of this stuff is that a lot of the photos were taken very quickly to prevent me getting left behind - ironically, I did bracket when I could but in most of the scenes I like best I don't seem to have done so):

    http://rapidshare.com/files/391823065/CRW_1058.CRW.html

    Also, any chance you could send me a copy of the layer which you dodge/burned on the last photo just so I can get an idea of how much detail you've gone into?

  10. #8
    Senior Member
    Join Date
    Jan 2004
    Location
    Notts UK
    Posts
    766
    Thanks
    11
    Thanked
    55 times in 52 posts

    Re: Tweak my photo...

    If you want it less hazy you could do something like this:


    Still got that greeny/yellowy haze which I just can't get rid of - as soon as I do it flips to purple. I'm so used to the flexibility of my a900, your 300D is coming as a bit of a shock to me I'm afraid

    No layers used - all that was a LR jobby which doesn't support layers. I'm not really interested in processing your pics for you I'm afraid - happy to have a quick crack and show where you can improve but I've got my own work to be getting on with. If you want to hire me to knock one or two of these up to a standard that I'd be happy with then give me a PM and we can agree a price

  11. #9
    Banhammer in peace PeterB kalniel's Avatar
    Join Date
    Aug 2005
    Posts
    31,025
    Thanks
    1,871
    Thanked
    3,383 times in 2,720 posts
    • kalniel's system
      • Motherboard:
      • Gigabyte Z390 Aorus Ultra
      • CPU:
      • Intel i9 9900k
      • Memory:
      • 32GB DDR4 3200 CL16
      • Storage:
      • 1TB Samsung 970Evo+ NVMe
      • Graphics card(s):
      • nVidia GTX 1060 6GB
      • PSU:
      • Seasonic 600W
      • Case:
      • Cooler Master HAF 912
      • Operating System:
      • Win 10 Pro x64
      • Monitor(s):
      • Dell S2721DGF
      • Internet:
      • rubbish

    Re: Tweak my photo...

    First effort:


    Converted from raw with Raw Therapee. Edited in The GIMP - levels adjustment to bring up black level, white level down a tad. Duplicate layer and roughly masked off ground, used large radius USM to enhance microcontrast (clear) - probably overdid it, I'm not used to these file sizes

    Note - I didn't adjust exposure. Raw therapee's default was fine with this shot.

    edit - almost certainly not as you remember it too

  12. #10
    Banhammer in peace PeterB kalniel's Avatar
    Join Date
    Aug 2005
    Posts
    31,025
    Thanks
    1,871
    Thanked
    3,383 times in 2,720 posts
    • kalniel's system
      • Motherboard:
      • Gigabyte Z390 Aorus Ultra
      • CPU:
      • Intel i9 9900k
      • Memory:
      • 32GB DDR4 3200 CL16
      • Storage:
      • 1TB Samsung 970Evo+ NVMe
      • Graphics card(s):
      • nVidia GTX 1060 6GB
      • PSU:
      • Seasonic 600W
      • Case:
      • Cooler Master HAF 912
      • Operating System:
      • Win 10 Pro x64
      • Monitor(s):
      • Dell S2721DGF
      • Internet:
      • rubbish

    Re: Tweak my photo...

    And this one's hopefully a bit more realistic...


  13. Received thanks from:

    stavroshamster (26-05-2010)

  14. #11
    Senior Member stavroshamster's Avatar
    Join Date
    May 2008
    Location
    York
    Posts
    528
    Thanks
    58
    Thanked
    53 times in 35 posts
    • stavroshamster's system
      • Motherboard:
      • Asus P5Q Pro
      • CPU:
      • Intel Core 2 Quad Q6600 @ 2.4Ghz G0 Stepping (O.C@3.3Ghz)
      • Memory:
      • 8GB Corsair TwinX XMS2 PC2-6400
      • Storage:
      • Samsung HD753LJ Spinpoint F1 750GB + Samsung HD103SJ Spinpoint F3 1TB
      • Graphics card(s):
      • Sapphire AMD Radeon 7770
      • PSU:
      • Corsair HX Series 520W
      • Case:
      • Coolermaster CM690
      • Operating System:
      • Windows 7 Pro 64bit
      • Monitor(s):
      • Dell U2412M (1920x1200)

    Re: Tweak my photo...

    The second one is much more realistic apart from the top of the mountain which is too contrasty.

    Think I am going to just ask the in-laws to pick a photo that they would like and spend my time tweaking that one rather than spending a lot of time tweaking things for nothing.

    Thanks for everyone's help and suggestions - much appreciated - I have learnt a lot.

    No doubt I shall have more questions in the not so distant future when I actually know which one I am getting printed.

  15. #12
    Senior Member this_is_gav's Avatar
    Join Date
    Dec 2005
    Posts
    4,854
    Thanks
    175
    Thanked
    255 times in 217 posts

    Re: Tweak my photo...

    Yeah, that 2nd one looks good.

    My go. I've edited just about everything. Levels, curves, hue/saturation, used gradient fills, masks... and I think I prefer Kalniels 2nd version still. I decided to leave a little more murk in. Looking back it could probably do with a little boost of the brightness though.


    Tiff file here if you want it.

    I think given the lack of colour in the image that it would look more dramatic and even give a better definition of scale in black and white.

  16. Received thanks from:

    stavroshamster (27-05-2010)

  17. #13
    Senior Member stavroshamster's Avatar
    Join Date
    May 2008
    Location
    York
    Posts
    528
    Thanks
    58
    Thanked
    53 times in 35 posts
    • stavroshamster's system
      • Motherboard:
      • Asus P5Q Pro
      • CPU:
      • Intel Core 2 Quad Q6600 @ 2.4Ghz G0 Stepping (O.C@3.3Ghz)
      • Memory:
      • 8GB Corsair TwinX XMS2 PC2-6400
      • Storage:
      • Samsung HD753LJ Spinpoint F1 750GB + Samsung HD103SJ Spinpoint F3 1TB
      • Graphics card(s):
      • Sapphire AMD Radeon 7770
      • PSU:
      • Corsair HX Series 520W
      • Case:
      • Coolermaster CM690
      • Operating System:
      • Windows 7 Pro 64bit
      • Monitor(s):
      • Dell U2412M (1920x1200)

    Re: Tweak my photo...

    Thanks for doing that - that one looks more realistic definitely, but less dramatic. Think I will choose another one probably. Thanks for your help!

Thread Information

Users Browsing this Thread

There are currently 1 users browsing this thread. (0 members and 1 guests)

Similar Threads

  1. Replies: 61
    Last Post: 09-10-2008, 05:28 PM
  2. Best photo printing software
    By Taz in forum Consumer Electronics
    Replies: 4
    Last Post: 28-09-2005, 11:08 AM

Posting Permissions

  • You may not post new threads
  • You may not post replies
  • You may not post attachments
  • You may not edit your posts
  •