Page 1 of 6 1234 ... LastLast
Results 1 to 16 of 96

Thread: How To DIY Alloy Wheel Repair Refurbishment! (pics)

  1. #1
    Senior Member joshwa's Avatar
    Join Date
    Jul 2003
    Location
    Sheffield, UK
    Posts
    4,847
    Thanks
    126
    Thanked
    67 times in 62 posts
    • joshwa's system
      • Motherboard:
      • PC Chips M577 AT/ATX
      • CPU:
      • AMD K6-2 500Mhz
      • Memory:
      • 128mb PC100 SDRAM
      • Storage:
      • 8GB Fujitsu
      • Graphics card(s):
      • 3dfx Voodoo 3 3000 AGP (16mb)
      • PSU:
      • ATX 500watt
      • Case:
      • Midi Tower AT
      • Operating System:
      • Windows 98 SE
      • Monitor(s):
      • 22" TFT Widescreen

    How To DIY Alloy Wheel Repair Refurbishment! (pics)

    I needed to refurb one of my alloy wheels (I need to refurb them all actually) and have 1 spare one so started with that... I got instructions from a friend and this is the first refurb of an alloy wheel I've ever done...
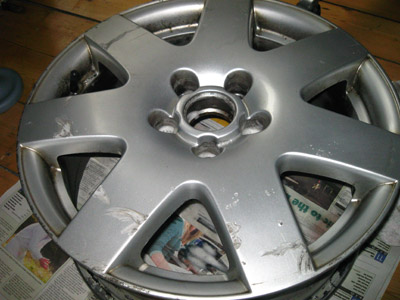
    Before:


    Although the pics a bit naff, the wheel has: Lots of kerbing, scratches, dents, bubbles in the paint etc.

    First step: Sand all down with 80, fill dents, scratches, kerbing etc (with david's isopon filler from motorworld), sand 80, then 240:


    ** clean wheel like mad! ** (sugar soap spray is good at removing dirt and grime, or clean in the bath, but be careful not to mark / knacker your bath!)

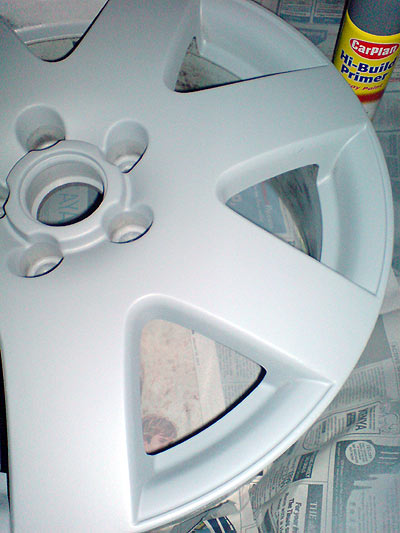
    Second step: Spray with hi-build primer: (1 light, 10min wait, 1 heavy coat, 10 min wait, 1 heavy coat - same process for all spraying: primer, paint, lacquer)


    Allow to dry over night

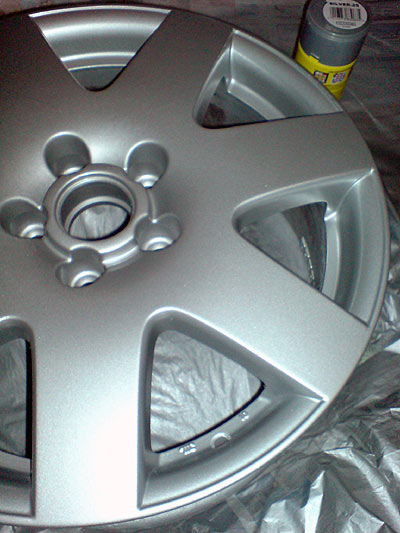
    Third step: Sand wet (with some washing up liquid) 1000 wet n dry, then you can spray with silver spray paint:


    Allow to dry (30+ minutes)
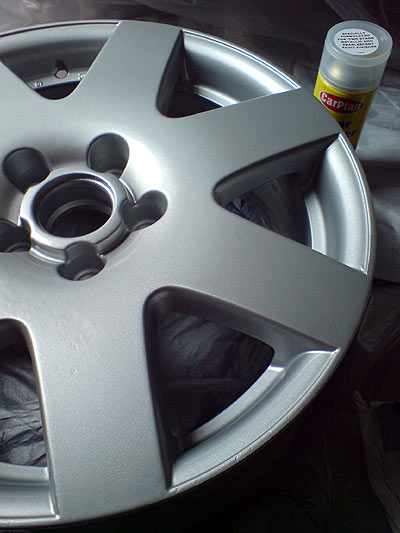
    Forth step: spray with lacquer.


    Optional step (but a good idea) - "finish" the lacquer - with very fine wet and dry (eg 1500 / 2000) to remove any roughness, then using something like Scratch X to remove any marks left by the sandpaper.

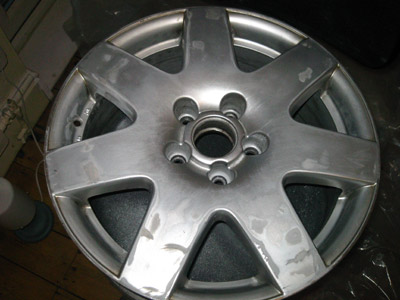
    Then polish and admire your handy work

    Lessons learnt:

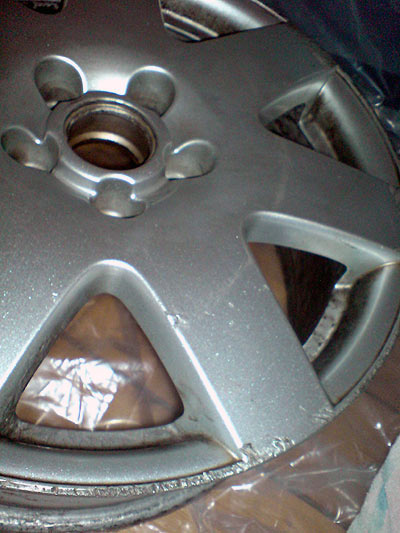
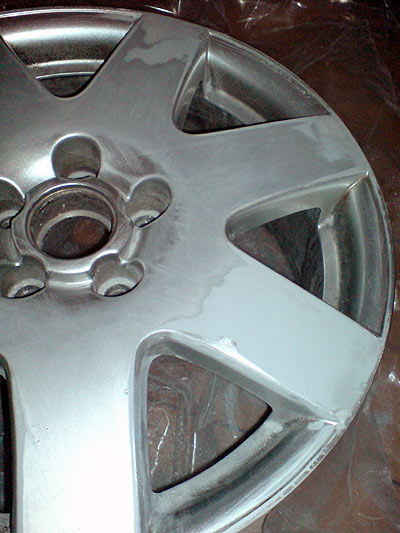
    - Always test sprays on something else prior to wheel - I had a bad can of lacquer that didn't spray - it just dripped on the paint and melted it away, meaning I had to re-sand / re-spray that area again leaving some small wobbly bits as can be seen in the last pic (I could have resanded down and re-filled but was impatient and didn't want to take it back down to the primer stage).

    - If you get small hairs in - don't try removing it when wet! This will bodge surrounding area and you'll need to respray / resand / refill area potentially taking it back to primer stage. Apparently it's easier to remove when dry (obviously I learnt the hard way)
    Last edited by joshwa; 12-09-2010 at 09:22 PM. Reason: Finishing steps added...

  2. #2
    radix lecti dave87's Avatar
    Join Date
    Sep 2005
    Location
    England
    Posts
    12,806
    Thanks
    657
    Thanked
    931 times in 634 posts
    • dave87's system
      • Motherboard:
      • Asus
      • CPU:
      • i5 3470k under Corsair H80 WC
      • Memory:
      • 8gb DDR3
      • Storage:
      • 240gb SSD + 120gb SSD
      • Graphics card(s):
      • Asus HD7950
      • PSU:
      • XFX 600w Modular
      • Case:
      • Lian Li PC-A05FNB + Acoustipack
      • Operating System:
      • Windows 10 Pro
      • Monitor(s):
      • 2x Dell S2309W (1920x1080)
      • Internet:
      • BT Infinity Option 2
    Looking good, luckily its bloody difficult to kerb the Enkei's on my bike

  3. #3
    HEXUS.timelord. Zak33's Avatar
    Join Date
    Jul 2003
    Location
    I'm a Jessie
    Posts
    35,176
    Thanks
    3,121
    Thanked
    3,173 times in 1,922 posts
    • Zak33's system
      • Storage:
      • Kingston HyperX SSD, Hitachi 1Tb
      • Graphics card(s):
      • Nvidia 1050
      • PSU:
      • Coolermaster 800w
      • Case:
      • Silverstone Fortress FT01
      • Operating System:
      • Win10
      • Internet:
      • Zen FTC uber speedy
    Josh...thats' bloody marvelous

    And I saw them as they were .... that's superb mate

    Quote Originally Posted by Advice Trinity by Knoxville
    "The second you aren't paying attention to the tool you're using, it will take your fingers from you. It does not know sympathy." |
    "If you don't gaffer it, it will gaffer you" | "Belt and braces"

  4. #4
    Senior Member joshwa's Avatar
    Join Date
    Jul 2003
    Location
    Sheffield, UK
    Posts
    4,847
    Thanks
    126
    Thanked
    67 times in 62 posts
    • joshwa's system
      • Motherboard:
      • PC Chips M577 AT/ATX
      • CPU:
      • AMD K6-2 500Mhz
      • Memory:
      • 128mb PC100 SDRAM
      • Storage:
      • 8GB Fujitsu
      • Graphics card(s):
      • 3dfx Voodoo 3 3000 AGP (16mb)
      • PSU:
      • ATX 500watt
      • Case:
      • Midi Tower AT
      • Operating System:
      • Windows 98 SE
      • Monitor(s):
      • 22" TFT Widescreen
    My plan is to do the spare one, get that put back on the car, then do the next spare one, they all have varying amounts of damage on them, and as long as I use the same spray paint every time, they should all eventually match each other

    The wheel above that I did also had a slow leak because the paint on the inside of the wheel (where the tyre sits) was all bubbling letting air escape, so I had to sand all the insides off as well to get rid of the paint bubbles. (some places like ATS have a buffer for this kind of thing, but I've had varying levels of service from various places, so I thought it'd be best to do it myself)

  5. #5
    Va Va Voom Lowe's Avatar
    Join Date
    Jul 2003
    Location
    Newcastle Under Lyme
    Posts
    6,748
    Thanks
    323
    Thanked
    359 times in 267 posts
    • Lowe's system
      • Motherboard:
      • Gigabyte Z97MX Gaming 5
      • CPU:
      • Intel i5 4690K
      • Memory:
      • 16GB Crucial Ballistix Tactical
      • Storage:
      • Crucial M550 256GB and 1TB spindle drive
      • Graphics card(s):
      • Palit Geforce GTX1080 Jetstream
      • PSU:
      • EVGA 600w
      • Case:
      • Coolermaster Silencio 352 m-ATX
      • Operating System:
      • Win 7/Mac OSX
      • Monitor(s):
      • 27" 1080p AOC, Oculus Rift CV1
      • Internet:
      • 200mb Virgin VIVID
    I've got a set of rims which I'm thinking of having a go at in the summer when the weather's a bit better. Gonna do em a nice gloss white, rally style.

  6. #6
    Senior Member SilentDeath's Avatar
    Join Date
    Aug 2003
    Posts
    4,745
    Thanks
    38
    Thanked
    16 times in 11 posts
    The look nice but I think its morally wrong to have painted alloys they should be pollished, sandbalsted, or powdercoated
    That said, paint will fill any scratches a lot better than pollishing - or rather pollishing them out will take long long time..

    says me with my steel wheels and plastic trim, a zip tie on each to hold it on!

  7. #7
    Looser Konan555's Avatar
    Join Date
    Jan 2005
    Location
    Norfolk
    Posts
    2,749
    Thanks
    9
    Thanked
    47 times in 44 posts
    Only thing I'd query is piddling about with the high build. I just spray it on thick-thick-thick-thick, 2 minutes between coats. As long as the surface is good to key to, there's no probs. I don't even worry about runs on it as it sands back so quickly.

    Just let it dry for 24 hours.

  8. #8
    Senior Member joshwa's Avatar
    Join Date
    Jul 2003
    Location
    Sheffield, UK
    Posts
    4,847
    Thanks
    126
    Thanked
    67 times in 62 posts
    • joshwa's system
      • Motherboard:
      • PC Chips M577 AT/ATX
      • CPU:
      • AMD K6-2 500Mhz
      • Memory:
      • 128mb PC100 SDRAM
      • Storage:
      • 8GB Fujitsu
      • Graphics card(s):
      • 3dfx Voodoo 3 3000 AGP (16mb)
      • PSU:
      • ATX 500watt
      • Case:
      • Midi Tower AT
      • Operating System:
      • Windows 98 SE
      • Monitor(s):
      • 22" TFT Widescreen
    Quote Originally Posted by Konan555 View Post
    Only thing I'd query is piddling about with the high build. I just spray it on thick-thick-thick-thick, 2 minutes between coats. As long as the surface is good to key to, there's no probs. I don't even worry about runs on it as it sands back so quickly.

    Just let it dry for 24 hours.
    Do you use a hairdryer between coats? or does it dry quickly enough anyway?

  9. #9
    Looser Konan555's Avatar
    Join Date
    Jan 2005
    Location
    Norfolk
    Posts
    2,749
    Thanks
    9
    Thanked
    47 times in 44 posts
    If you mist the stuff I use on too lightly, it actually falls on dry and powedery and won't stick. I just let it go tacky (couple of minutes) before doing another layer. No hairryers in sight (that's for fixing bumpers with epoxy )

  10. #10
    YippeeKayay Kimosabe madmaca's Avatar
    Join Date
    Jul 2003
    Location
    Staffordshire, UK
    Posts
    649
    Thanks
    1
    Thanked
    8 times in 8 posts
    That's an awesome guide fella - my alloys are looking seriously second hand atm (that's what happens when the missus drives the car 5 days a week )

    So come summer time - I might give this a go

    1 wheel > 2 wheels > 4 wheels | My Photos

  11. #11
    F.A.S.T. Butuz's Avatar
    Join Date
    Jul 2003
    Location
    Wales
    Posts
    4,708
    Thanks
    51
    Thanked
    72 times in 59 posts
    • Butuz's system
      • Motherboard:
      • MSI Z77 MPOWER
      • CPU:
      • I7 3770K @ 4.6
      • Memory:
      • 16GB Corsair XMS 1866
      • Storage:
      • Sandisk SSDs
      • Graphics card(s):
      • 3xR9 290
      • PSU:
      • be quiet! Dark Power Pro 10
      • Case:
      • Inwin H Frame
      • Operating System:
      • Windows 7
    Very good!

    Have to give this a go one day!

    Butuz

  12. #12
    Zoom-Zoom
    Join Date
    Jul 2003
    Location
    Mistley, Nr Colchester Essex
    Posts
    771
    Thanks
    7
    Thanked
    2 times in 2 posts
    They have come up really well. Keep thinking about doing my accord alloys, but they have a fair bit of damage.
    "It is impossible to strike up an intelligent conversation with an inanimate object."

  13. #13
    HEXUS.social member 99Flake's Avatar
    Join Date
    Oct 2005
    Posts
    1,713
    Thanks
    30
    Thanked
    94 times in 60 posts
    Looks good!! Luckily I know a guy who does this for a living so I can get 2 wheels done for £20. Really need to get my n/s/f done! He generally only sands back a little way and blends the edge though instead of doing the whole wheel.

  14. #14
    Senior Member joshwa's Avatar
    Join Date
    Jul 2003
    Location
    Sheffield, UK
    Posts
    4,847
    Thanks
    126
    Thanked
    67 times in 62 posts
    • joshwa's system
      • Motherboard:
      • PC Chips M577 AT/ATX
      • CPU:
      • AMD K6-2 500Mhz
      • Memory:
      • 128mb PC100 SDRAM
      • Storage:
      • 8GB Fujitsu
      • Graphics card(s):
      • 3dfx Voodoo 3 3000 AGP (16mb)
      • PSU:
      • ATX 500watt
      • Case:
      • Midi Tower AT
      • Operating System:
      • Windows 98 SE
      • Monitor(s):
      • 22" TFT Widescreen
    I've done my second wheel using the same technique again - the chap fitting it back onto my car was impressed by the job I'd done

    Pics: Before:


    Sanded and filled and sanded :


    Primered and sanded again:


    Sprayed and lacquered:


    I'll post another thread with pics of the car with the wheels fitted

    Does anyone have any recommendations of something (like wax) that I can put on to protect them a bit?

    I've had my car (hand) washed and waxed and they did the wheels but don't know if this will suffice.

    Josh
    Last edited by joshwa; 12-09-2010 at 09:27 PM. Reason: pics fixed

  15. #15
    My name is James J4MES's Avatar
    Join Date
    Aug 2003
    Location
    Wilts
    Posts
    1,455
    Thanks
    39
    Thanked
    24 times in 21 posts
    the lacquer should do the job fine, but keep them waxed with turtle wax (or similar) as well to help protect them... i've got a vintage set of 5 '80s ford pepperpot alloys to do sometime - will be using your hand guide..
    http://www.helpforheroes.org.uk

  16. #16
    Senior Member joshwa's Avatar
    Join Date
    Jul 2003
    Location
    Sheffield, UK
    Posts
    4,847
    Thanks
    126
    Thanked
    67 times in 62 posts
    • joshwa's system
      • Motherboard:
      • PC Chips M577 AT/ATX
      • CPU:
      • AMD K6-2 500Mhz
      • Memory:
      • 128mb PC100 SDRAM
      • Storage:
      • 8GB Fujitsu
      • Graphics card(s):
      • 3dfx Voodoo 3 3000 AGP (16mb)
      • PSU:
      • ATX 500watt
      • Case:
      • Midi Tower AT
      • Operating System:
      • Windows 98 SE
      • Monitor(s):
      • 22" TFT Widescreen
    Quote Originally Posted by J4MES View Post
    the lacquer should do the job fine, but keep them waxed with turtle wax (or similar) as well to help protect them... i've got a vintage set of 5 '80s ford pepperpot alloys to do sometime - will be using your hand guide..
    Cool I'll get some next time I'm at the right kind of shop.

    I'm glad you like the guide, I gotta thank the guy who does it for a living who told me how to do it

    Put some pics of them fitted to the car here:
    http://forums.hexus.net/showthread.php?t=103407

Page 1 of 6 1234 ... LastLast

Thread Information

Users Browsing this Thread

There are currently 1 users browsing this thread. (0 members and 1 guests)

Posting Permissions

  • You may not post new threads
  • You may not post replies
  • You may not post attachments
  • You may not edit your posts
  •