P5K Add-On.
A Fully Updated and Supported Version Of This Guide Is Available At Clunk.org.uk
Recently, Asus have released a new range of motherboards based on the Intel P35 chipset. The P35 looks to be the successor to the excellent 965 chipset that has featured on the majority of C2D boards from the past year that have turned out to be excellent overclockers.
It just so happens, that the P5K Deluxe WiFi (The replacement for the highly regarded P5B Deluxe WiFi) is also a monster overclocker, is rock solid, and yet can go even higher that the P5B Deluxe, so it looks set to be a popular board, and with that in mind, here is an add-on to the guide, to help the people that went straight to the P35 chipset, without having the benefit of using the 965 chipset first.
Throughout this guide, I will be using a Q6600, which has a 9x multi. If your CPU has a different multi, please see the first part of the guide on how to work it out.
OK, firstly, familiarise yourself with the BIOS. There are a few new settings to get your head round, but those of you who have come from a P5B series board, it should be pretty straight forward.
All of the overclocking settings, including memory timings and voltages are all on the same page now, so that makes things easier.
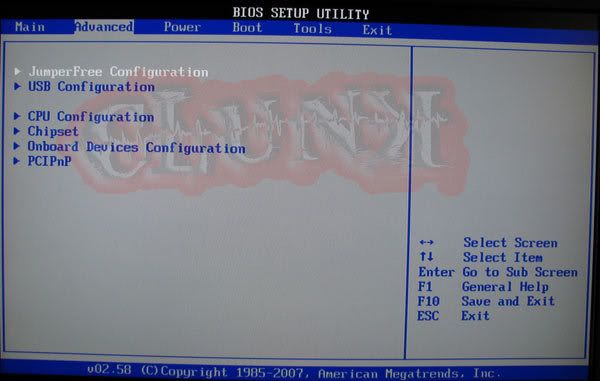
Open the BIOS and go to “Jumper free configuration”, and open that page.
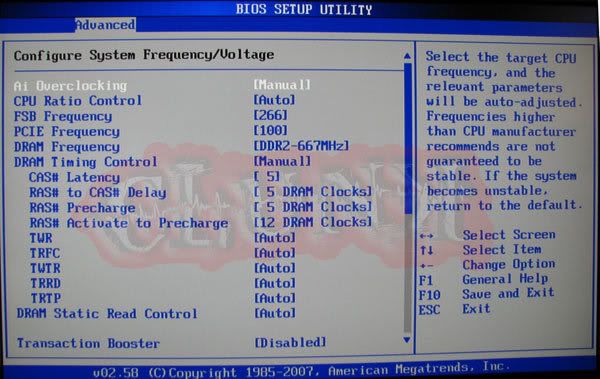
You will see the main page with all your overclocking settings. Some of them will be hidden at first, so you need to change a few things, so that you can see all the options.
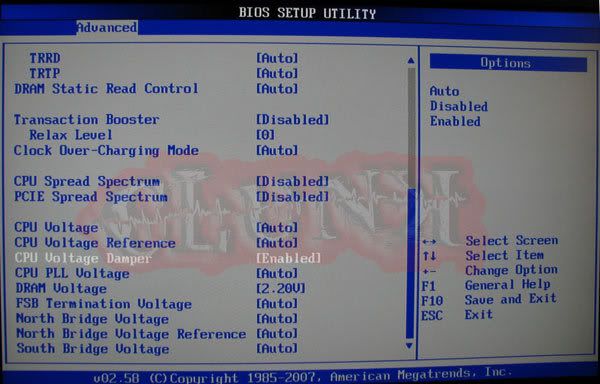
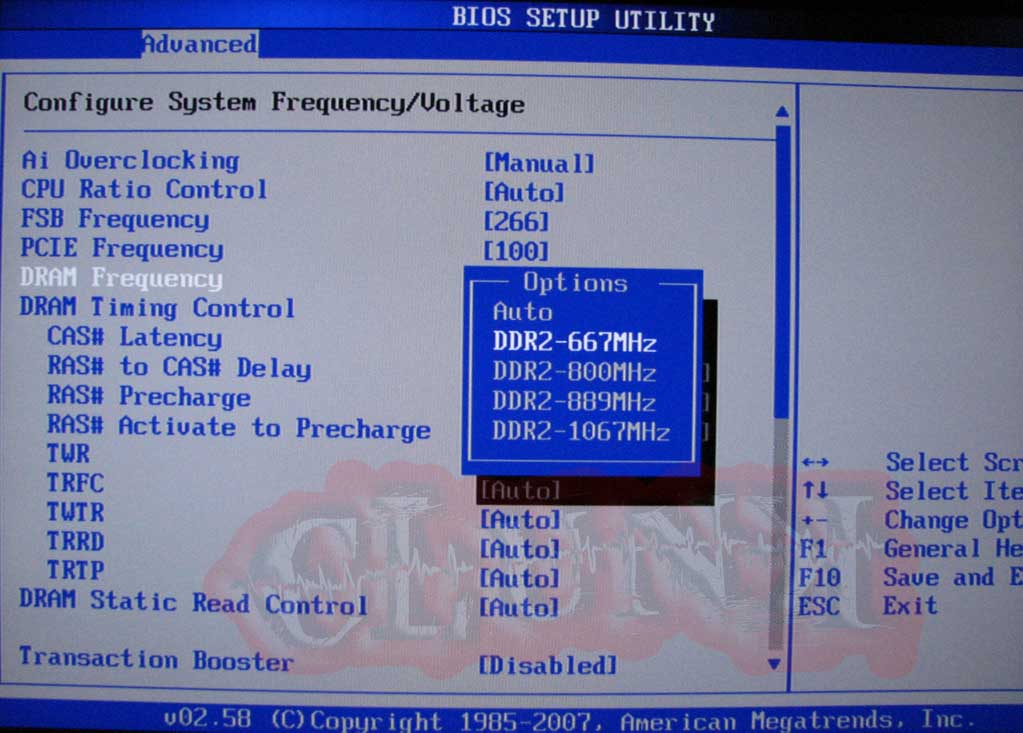
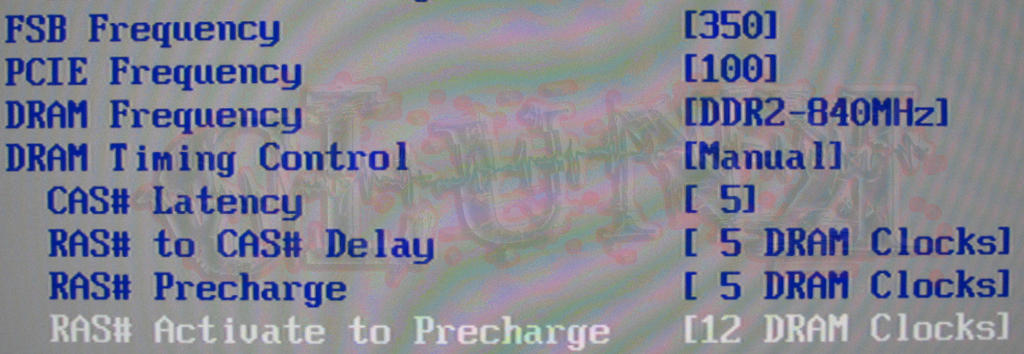
I've split the page into 2 images, as it wouldn't all fit on one.
AI Overclocking - Change to MANUAL
CPU RATIO CONTROL – Leave on AUTO, unless you intend using a lower Multi (No idea what this means? Click here!)
FSB Frequency – Stock is 266, we will change this later.
PCI-E Frequency – I have had ZERO problems leaving this on AUTO, for even fairly high overclocks, on the P5B deluxe and the P5K deluxe using an X1900XT and an 8800GTX, but if you want to be safe, then manually set it to 100.
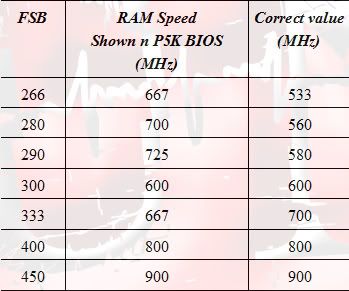
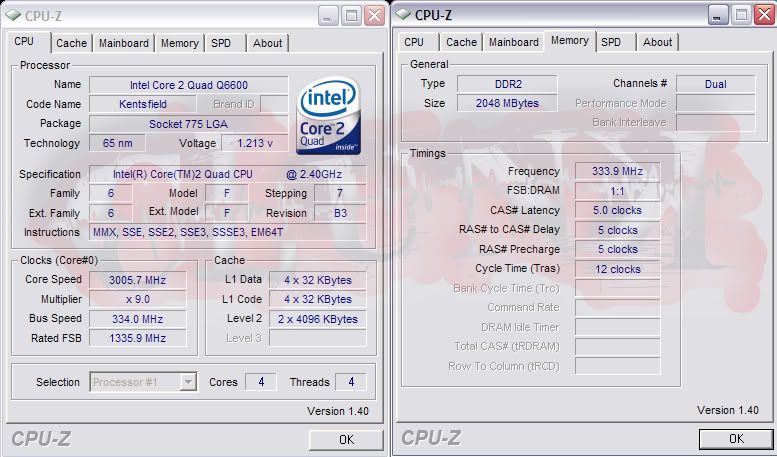
DRAM Frequency – Set this to the lowest divider for now, your FSB Frequency is set at 266 at the moment, so you should be able to see a 667 setting, use this.....For the eagle eyed amongst you, that wondered where the 533 setting had gone, I can confirm that I have no idea either, and, to be honest, I only noticed it while I was writing this! But don't worry, this divider, still shows up as 1:1 in CPU-Z. (See further down, about this, it may just be my board, will confirm later)
DRAM Timing Control – Set this to MANUAL, and you will see all the RAM timings and sub timings, I will go into these in more detail later, but for now, just enter the correct timings for your RAM, if its 5-5-5-12 (it will say on the label on the sticks themselves), then that's what you enter here, like this (and I'm using RAM that uses 5-5-5-12) ;
CAS# Latency = 5
RAS# to CAS# Delay = 5
RAS# Precharge 5
RAS# Activate to Precharge = 12
The following settings are the RAM Sub timings Leave these at AUTO, unless you actually know what they are for your specific RAM and this board, because if you enter the wrong timings, your PC can become unstable, and we wouldn't want that would we?
TWR = AUTO
TRFC = AUTO
TWTR = AUTO
TRRD = AUTO
TRTP = AUTO
DRAM Static Read Control = AUTO
Transaction Booster = DISABLED* This is one of the new settings for the P5K. So far, I haven't been able to get any stability with this set to ENABLED, so, for now, disable it. If I find a use for this, I will add it here.
Clock Over-Charging Mode = AUTO* Another new setting for the P5K, and I'm still trying to find a use for this, stable overclocks become unstable with this on anything but AUTO for me, so for now, leave it on AUTO. ****Testing this at the moment, and it has enabled me to boot at 4ghz (on a quad), same for someone else on a dual core. Just set it to 1000mv if you need it. If I find any other use for it, I will add it here****
CPU Spread Spectrum = DISABLED
PCIE Spread Spectrum = DISABLED
CPU VOLTAGE = This is where you add/subtract extra Vcore if needed.
CPU Voltage Reference = AUTO* This appears to have an effect on stability at higher overclocks, so you can keep it at AUTO, or if you are feeling confident later, you can set it manually.
CPU Voltage Damper = Set this to ENABLED* Another new feature for the P5K, which almost eliminates Vdroop. Not everyone will need it, but I have found it handy when overclocking. If you set a Vcore value in the BIOS, on past Asus boards, there has been a large difference between the voltage shown in the BIOS, and what you actually get, especially under load (Vdroop). This makes the Vdroop much less. Click here to find out more about Vdroop.
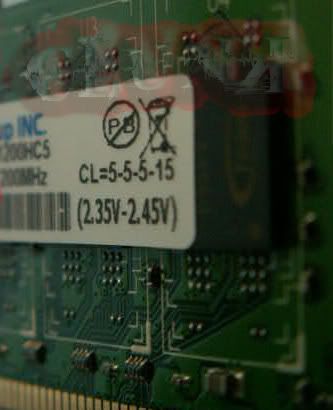
DRAM Voltage = This is where you set the voltage for your RAM. This is important, do it now while you are here. If you are unsure what the voltage should be, take out one of the sticks and it says on the label, usually right next to where it tells you what the timings should be (See pic at the end of this list of settings)
FSB Termination Voltage = Leave at AUTO for now.
North Bridge Voltage = Leave this at AUTO for now. Later on, when we use lower multis, and tighten the RAM timings, we may need to set this manually.
North Bridge Voltage Reference = Another new setting for the P5K. Leave at AUTO for now, we can change this later if needed.
South Bridge Voltage = Leave at AUTO for now.
Look on the label on the sticks of RAM to find the correct timings and voltages.
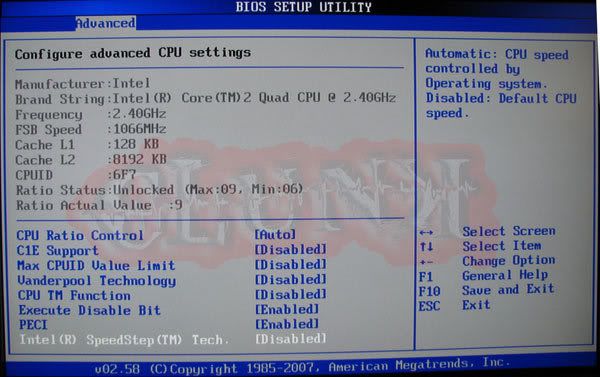
Have a look at the advanced CPU settings page.
You will see the following settings;
CPU Ratio Control – This just lets you choose the Multi, you can also do this on the main Jumperfree BIOS settings page.
C1E Support – Disable this, it just isn't needed when overclocking.
Max CPUID Limit – Disable this, its for older P4 CPUs with Hyperthreading, and older operating systems.
Vanderpool Technology – Disable this, unless you specifically need it, find out if you do, by clicking here.
CPU TM Function – Disable this. I can find no use for this with C2D, apparently it was to throttle older P4 Prescott CPUs. I have always disabled it on every C2D board with no problems whatsoever.
Execute Disable Bit – I generally disable this, but it is up to you. If you experience instability with it enabled, try disabling it. You can find out more here.
PECI – I usually disable this. I have tested this with several CPUs and have been unable to find any use for it. Enabled/Disabled doesn't affect my temps in any way, and no throttling occurs. If anyone knows any different, please let me know.
Intel ® SpeedStep (TM) Tech – Disable this, generally, it doesn't play nicely with overclocking.
That's the important settings covered!
Before we go any further, have you manually entered the correct RAM timings and voltages? If not, do it now. One of the most common problems with unstable/poor overclocks is because people haven't set the RAM timings and voltages properly. BAH!
continued below......


 LinkBack URL
 About LinkBacks


 Reply With Quote





 i owe u one