LinkBack URL
 About LinkBacks
I'm not sure bored0m would take it back anyway


I'm not sure bored0m would take it back anyway

Nice work!
It's the kind of project where I imagine you just set out with the mission statement: I can do it - you don't necessarily know how. Cross that bridge when we get to it kind of thing. I like it! Unpredictable
pretty much, yeah. I decided about 18 months ago that I wanted to play with water cooling, and initially considered sticking my ancient Athlon XP system under water just to get a feel for working with it. But when I worked out how much that would cost I decided against. Since then I've been mulling it over and gathering bits and bobs as they came up on the For Sale forum here, without any great plan as to how to stick it all together.Originally Posted by nibbler

So basically the modding project started with working out that the only place I could actually fit the rad was in the top of the case, and working out where everything else goes from there. I've ended up pretty much exactly where I thought I would though, with the rad in the top, the PSU in the bottom at the front, and the pump up against the rear fan vents. The only thing I hadn't anticipated where the issues around running resless - i.e. the complexity of fitting a filling point to the system, how I was going to prime it, and how to bleed it. That said, I haven't totally abandoned the concept of running resless yet - although if I can squeeze a custom mini-res into the loop as well I'll be rather chuffed and count it as a good day's work

Some great work going into this one. Looking forward to the next update!
Well, thread's been a bit quiet, I guess. That's largely because it was my wedding anniversary this weekend, and I don't think heading out into the garden with power tools would've gone down well. That and the fact that we hit Manchester Monsoon season on Sunday - not nice at all!
The only bit of modding I've done since the last update was on an IEC power cable - I was tidying up my study last night and just decided to start hacking away at a spare one
Unsurprisingly, I'm still dithering to a certain extent about how to finish off the project (this is normal for me, and was the recurring theme on all my CDT reports at school). So here's a few things I'm mulling over: any input anyone has on any of them will be gratefully received
1) Chassis power connection. With the PSU being entirely enclosed in the front of the case, I need to add an IEC male socket to the chassis to get the power coming in! My plan is to take apart an old, cheap PSU and yoink the input from that (as well as any other interesting looking components). I've got a Q-TEC lying around somewhere that should do the job
2) There's big holes in the front and back of the chassis where a) there's no longer a PSU, b) I've lost all the 5.25" cover plates, and c) I've also lost the 3.5" cover plates. I need to do *something* with them: I was considering making mesh panels so there'll be airflow but also some filtering. Any thoughts on styles / materials / pre-made options?
3) I'm starting to question my cunning plan to go SLI (I've read a few things about SLI being generaly uppity, and the case spacing is already tight). Should I be worried? Would it be a cunning plan to test the rig with the new 8800GTX under water, but the old one still on air so I can check that SLI is going to work for me before I strip off the stock cooler? Obviously that will mean a drain-down and re-fill when I add the second card, but I'd rather that than do all the build work then find out the cards won't play nicely together!
4) I've got enough chipset blocks to watercool both NB and SB and the VRMs, but the SB is going to be between the 2 GPUs (if I go SLI!) and connecting it into the loop could be a PITA, frankly. I've had a quick google and can't find anything definitive on how hot the SB gets on 680i-based mobos, but was wondering if I might get away with a small air cooler for the SB instead of plumbing it into the water loop. It would certainly make life much easier. Any opinions?
5) The ongoing saga of to Res or not to Res. The more I look at how little space I have at the back of the case, the more I go off the idea of trying to squeeze a custom res between the pump and rad, and measuring up I don't think I can quite squeeze the pump in the front of the case (so a 3.5" bay res is out, too). I always planned to has a resless system, and I'm becoming more and more inclined to go back to that. HOWEVER Gonz made a very good point about being able to feed the pump during priming, so I had a thunk. Since I'm putting a bulkhead fixing in the roof of the case anyway to act as a fillport, would it make sense to concoct some sort of "priming" res e.g. a large bowl / box with some kind of fitting in the bottom with a G1/4" thread, that I can connect to the fill port during priming to make sure I have plenty of water feeding the pump? That way once I'd finished priming / bleeding the system (it's very easy to raise the rad bleed valve to the highest point of the case, which I assume will do the trick?) I could just seal off the res, remove it and stop off the fillport. I'll probably go for the universal T plan from back a few pages to connect up the rad, pump and fillport. So, am I missing some crucial aspect of priming a water loop that will scupper my cunning plan? Or should I be fine with my resless setup as long as I keep feeding the loop water during the priming stage?
6) Painting the case. I said half jokingly after I fitted the rad that it looked so good I might have to paint the case, and I'm growing increasingly keen on the idea. Now, I know that in "good modder" circles the correct way to go about painting a case is to dismantle it and spray everything individually, but I really can't be bothered drilling out and re-riveting the entire case, so I'm bound to just attack with cans of spray paint

But really, was it ever going to be any other way ?
Kalniel: "Nice review Tarinder - would it be possible to get a picture of the case when the components are installed (with the side off obviously)?"
CAT-THE-FIFTH: "The Antec 300 is a case which has an understated and clean appearance which many people like. Not everyone is into e-peen looking computers which look like a cross between the imagination of a hyperactive 10 year old and a Frog."
TKPeters: "Off to AVForum better Deal - £20+Vat for Free Shipping @ Scan"
for all intents it seems to be the same card minus some gays name on it and a shielded cover ? with OEM added to it - GoNz0.
Pitfalls from my experience of 'attacking the case with paint' are mainly that it is hit and miss. Pooling is somethng to void, but I would say reallly take a good long while with the prep. Sanding priming sanding priming.

you will notice one screw is shorter than the rest, that was to allow the sb block to fit under a video card, make sure its mounted the correct way and everything will fit fine, i had the same board with both cards and all the blocks
and fek it, add both cards, 90% chance with new drivers it will work fine, i never had any issues after the initial new period with crap drivers and needed bios updates, all was well after 6 months m8!
if SLI falls flat on its face you have a dedicated physics card (oh yeh says jim)
now jim, stop being a pussy and get it all hooked up
*edit, if we should ever meet face to face i meant pussy is a nice way
Capitalization is the difference between helping your Uncle Jack
off a horse and helping your uncle jack off a horse.
scaryjim (04-10-2010)
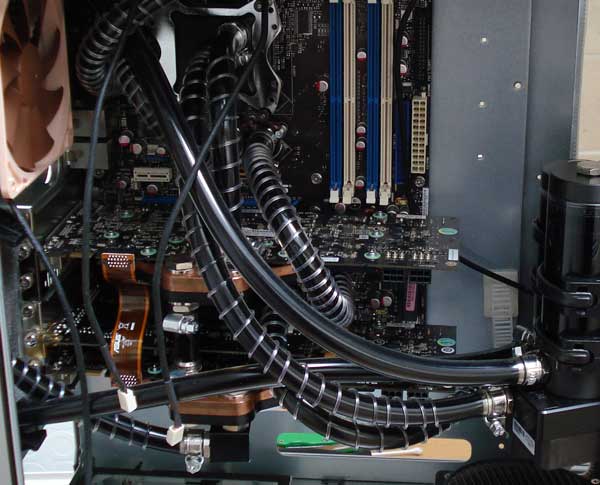
Wow, it looks a lot less cramped than I imagined (that said, you haven't got everything on one loop there
yeah, 'cause I own exactly zero games with PhysX supportif SLI falls flat on its face you have a dedicated physics cardAn extra 8800GTX burning electric like there's no tomorrow...? Hmmmm.


the main thing for my experience with sli is that both cards want the same bios (card bios not motherboard bios) so you may need to flash one of the cards.
However I don't think there where many variations to the 8800gtx so it shouldn't be to bad.
[rem IMG]https://i69.photobucket.com/albums/i45/pob_aka_robg/Spork/project_spork.jpg[rem /IMG] [rem IMG]https://i69.photobucket.com/albums/i45/pob_aka_robg/dichotomy/dichotomy_footer_zps1c040519.jpg[rem /IMG]
Pob's new mod, Soviet Pob Propaganda style Laptop.
"Are you suggesting that I can't punch an entire dimension into submission?" - Flying squirrel - The Red Panda Adventures
Sorry photobucket links broken
Quick question, ideally for Gonz (since he's the one I bought my rad off) but I'll take answers off anyone who knows!
Radiator shroud: what's the point?
Or rather: as far as I can tell (my google-fu is weak), the idea is to create space between the fans and the rad, reducing dead spots and presumably increasing rad performance. When I bought my rad off gonz he kindly included the shroud, but so far (due partly to my space restrictions) I hadn't planned on using it. However, looking at fans I'm caught between getting the normal AC F12 PWM which will fit nicely onto the rad and save space, or the funkier AC F12 Pro PWM which are a little funkier, have vibration damping mounts, and are also slightly cheaper. The issue is: they won't attach directly to the rad without considerable messing around due to the funky mounting system, but they *will* attach nicely to the shroud. So is it worth losing a bit of space to use the shroud and funkier fans (remembering that I'll potentially be pushing the rad to the limits, so any improvement in performance could be crucial), or should I just get the ordinary PWMs and be done with it?
i never used the shroud, may save 1 degree, fan rubber mounts remove the seal allowing air to escape before the rad.
Capitalization is the difference between helping your Uncle Jack
off a horse and helping your uncle jack off a horse.
scaryjim (17-10-2010)
The F12 Pro's have a vibration damping frame: you attach them using standard fan screws but the holes are only open on one side so you have to screw them up into the fan, which means I can't screw through the fan into the rad like you would with a normal fan.
That said, I've just checked the specifications on the AC website and they have identical airflow and sound ratings. I've been completely unable to find any detailed reviews of either fan so I've no idea what the static pressure is like on them. Given they're the cheapest 120mm PWN fans available you'd think someone would've done a worthwhile review somewhere... *sigh*
Anyway, thanks for the input Gonz - I take it that means I'm right about the purpose of the shroud then? Perhaps I'll get both sets of fans and do my own test!
i would go for the standard fans as the static pressure will be pants with the open frame fan
Capitalization is the difference between helping your Uncle Jack
off a horse and helping your uncle jack off a horse.
scaryjim (17-10-2010)
I always say it all else fails then pick it up and shake it
Interesting mod I have to say. Thought I'd look in and see how it was going. Pleased to see your not using that Q-Tec.
lol, don't diss the Q-Tec! It can at least power up my HTPC, more than the £45 PSU I've just bought can say
For loyal followers of project cunning plan, things have been put temporarily on hold as this month's component money went on a picoPSU for my HTPC after the proprietary PSU in my HTPC case blew, and now it turns out that the pico can't feed enough current to the CPU to post. All in all I'm feeling a little despondent at the minute (particularly given how much I've just seen I'll need to spend in order to fix this little frustration...)
There are currently 1 users browsing this thread. (0 members and 1 guests)
 Posting Permissions

 Reply With Quote