Page 1 of 4 1234 LastLast
Results 1 to 16 of 60

Thread: Modding an Antec 300

  1. #1
    Pre-Cambrian nibbler's Avatar
    Join Date
    Aug 2009
    Location
    London
    Posts
    3,668
    Thanks
    913
    Thanked
    266 times in 216 posts
    • nibbler's system
      • CPU:
      • i5-2410m
      • Memory:
      • 6GB ddr3 1333mhz
      • Storage:
      • 256GB Plextor M5S SSD
      • Graphics card(s):
      • 1GB 6650M
      • Operating System:
      • Windows 7 64 bit

    Modding an Antec 300

    So I've ordered a 300, a dremel 300 series, primer and matt black paint. I really want to make holes in mobo tray for cable management but an all black interior would be nice - nothing amazing just smooth and black. View to a window possibly but that's a whole different ball park - I'm new to this. My first query is about painting. I understand primer is necessary to... er... prime the steel for want of a better word. However I've seen a lot about sanding it down. Really necessary? Or will it be passable. This is only for HDD cages etc mind. Secondly any other suggestions when painting / cutting dremel holes?
    Cheers guys.

  2. #2
    Senior Member Pob255's Avatar
    Join Date
    Apr 2007
    Location
    The land of Brum
    Posts
    10,143
    Thanks
    608
    Thanked
    1,226 times in 1,123 posts
    • Pob255's system
      • Motherboard:
      • Asus M5A99X EVO
      • CPU:
      • FX8350 & CM Hyper 212+
      • Memory:
      • 4 x 2gb Corsair Vengence 1600mhz cas9
      • Storage:
      • 512gb samsung SSD +1tb Samsung HDD
      • Graphics card(s):
      • EGVA GTX970
      • PSU:
      • Seasonic GX 650W
      • Case:
      • HAF 912+
      • Operating System:
      • W7 Pro
      • Monitor(s):
      • iiyama XB3270QS-B1 32" IPS 1440p

    Re: Modding an Antec 300

    Sure

    Primer is used to help create a Key surface, ie a surface that the following coloured paint will stick to, it's also used to help protect the metal underneath. (there's also the issue of colour when useing something other than black)
    Ideally You want a self etching primer, a self etching primer contains a mild acid to eat into the surface layer of the metal to create a better bond, it also contains zinc to help seal the metal from moisture.
    In theory you don't need to sand when using a self etching primer, however the esisting paint could cause issues, so it generally best to sand anyway.

    When painting cases prep work is is very important, the better the underlieing surface the better the final resaults will be.

    First strip down the case as much as possible, make sure you remove the front usb+sound+buttons+leds as you don't want to get paint/water/dust into them.

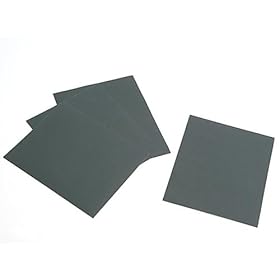
    Sand blasting is of course the best thing, however if you're like most of us you don't have a sand blaster handy so just get a couple of 600 grit sheets of wet&dry paper (can be got from any car repair place) and just lightly rub down the case.

    Now you need to remove all the dust left behind, you can get a tack cloth or you can use the methord I've used:
    Pop it in the shower and rinse it off
    Get a new (clean) washing up cloth with a little washing up liquid (just the plane green stuff, you don't want any thing fancy as it'll leave all sorts of crap behind) wipe the case down to make sure all the paint dust is gone.
    Rinse it down again.
    Pat it dry with a clean towl to get rid of excess water.
    Finally dry it off fully with a hair drier on hot setting.

    As I don't think the top of the 300 is eaisly detachable, you'll want to get some masking/painters tape to cover the top and any areas you don't want to repaint. (Again car repair place is good for this, as is any decent DIY store)
    My advice here is wide tape and don't get the really cheap stuff, 3 roll's for a pound type stuff, I found it just didn't stick down for more than 5 minutes.
    The Blue painters tape is best but it's not the cheapest of stuff.
    As you're tapeing up the areas you don't want painted overlap the tape slightly, to make sure paint will not bleed in through the joins.
    Use a craft knife/scalpel to trim off any excess tape away from areas you want painted.

    I'm guessing you've bought spray paint? (although this sort of thing can be done well by hand if you have the brush skills)
    Follow the instructions on the side of the spray can.

    When painting, ware a mask, a basic decoraters dust mask is not really suited for this, a good canister mask is best, however if you're not doing large amounts of painting regulary then a good mask is a heck of an expense, personally a cheap dust mask will be ok.
    note: you have been warned, if your snot turns black or you have an asthma attack, then don't come crying to me.
    Be aware that cheap dust masks do not provide any protection from the paint fumes, which leads me on to.
    Spraying outside, on a day which is not windy, is best. I don't care how cold it is out there, don't do it indoors with the windows closed.

    Long even strokes, don't hold the can too close, thin layers, don't hold the can in one place keep it moving. (You can do single spot blasts to get into a corner or simular, keep it to a quick blast, under a second)
    Don't try to do it all solid black in one go, you'll want at least 3 layers for a good solid black.
    You'll want to leave it to dry slightly between layers (read the can for how long)

    Leave the whole thing over night at least (depending on air temp) to fully dry before reassebling.

    A matte finish is far more forgiveing than gloss finish Also as this is the internals and not the outter surface, you'll be able to get away without doing additional sanding and small errors will not really show.

    Here's a couple of youtube videos from Bill Owen on/include spray can painting.
    http://www.youtube.com/watch?v=znv5Fpmirds
    http://www.youtube.com/watch?v=UjVgfHkWbcE

    EDIT: I missed the dremel comment, You'll want some decent large reinforced cutting discs, they'll make cutting far eaiser.
    this sort of thing http://cgi.ebay.co.uk/REINFORCED-CUT...item5ad504451e
    Cut the holes before you paint mask up any painted surfaces you don't want to accidently damage.
    Rinse in the shower after cutting, or run a vacum cleaner over the case after cutting as you'll have a lot of powdered cutting disk about which will scratch a surface/paint if you rub it.
    Although as long as any painted areas that you keep as is are well masked and the cutting disc dust doesn't get under the tape (this is an important reason not to use very cheap tape) you should be fine to sand right after cutting out the holes as you'll be cleaning if all off any way.

  3. Received thanks from:

    nibbler (15-12-2009)

  4. #3
    Pre-Cambrian nibbler's Avatar
    Join Date
    Aug 2009
    Location
    London
    Posts
    3,668
    Thanks
    913
    Thanked
    266 times in 216 posts
    • nibbler's system
      • CPU:
      • i5-2410m
      • Memory:
      • 6GB ddr3 1333mhz
      • Storage:
      • 256GB Plextor M5S SSD
      • Graphics card(s):
      • 1GB 6650M
      • Operating System:
      • Windows 7 64 bit

    Re: Modding an Antec 300

    That's awesome man, I don't think I ordered self-etching primer but I can do a little sanding myself. But will it really be necessary? It's unpainted steel with matt black going on top. Also, cheers for heads up I was planning on going outside anyway and leaving it in the cellar

  5. #4
    Senior Member Pob255's Avatar
    Join Date
    Apr 2007
    Location
    The land of Brum
    Posts
    10,143
    Thanks
    608
    Thanked
    1,226 times in 1,123 posts
    • Pob255's system
      • Motherboard:
      • Asus M5A99X EVO
      • CPU:
      • FX8350 & CM Hyper 212+
      • Memory:
      • 4 x 2gb Corsair Vengence 1600mhz cas9
      • Storage:
      • 512gb samsung SSD +1tb Samsung HDD
      • Graphics card(s):
      • EGVA GTX970
      • PSU:
      • Seasonic GX 650W
      • Case:
      • HAF 912+
      • Operating System:
      • W7 Pro
      • Monitor(s):
      • iiyama XB3270QS-B1 32" IPS 1440p

    Re: Modding an Antec 300

    The antec 300 insides are not unpainted steel, it's electro plated zinc at the least, probably has a grey paint layer over that or some other form of sealer.
    I would advise sanding it down to help the paint stick, otherwise it will chip and flake off very easily.
    Granted this is the insides so it doesn't really have to be super high quality finish, however it really will not take long to do, you don't have to knock it back to bare metal, just break up the outter surface a bit so the primer can bond well.

  6. #5
    Pre-Cambrian nibbler's Avatar
    Join Date
    Aug 2009
    Location
    London
    Posts
    3,668
    Thanks
    913
    Thanked
    266 times in 216 posts
    • nibbler's system
      • CPU:
      • i5-2410m
      • Memory:
      • 6GB ddr3 1333mhz
      • Storage:
      • 256GB Plextor M5S SSD
      • Graphics card(s):
      • 1GB 6650M
      • Operating System:
      • Windows 7 64 bit

    Re: Modding an Antec 300

    So wet and dry or very fine paper?

  7. #6
    Senior Member Pob255's Avatar
    Join Date
    Apr 2007
    Location
    The land of Brum
    Posts
    10,143
    Thanks
    608
    Thanked
    1,226 times in 1,123 posts
    • Pob255's system
      • Motherboard:
      • Asus M5A99X EVO
      • CPU:
      • FX8350 & CM Hyper 212+
      • Memory:
      • 4 x 2gb Corsair Vengence 1600mhz cas9
      • Storage:
      • 512gb samsung SSD +1tb Samsung HDD
      • Graphics card(s):
      • EGVA GTX970
      • PSU:
      • Seasonic GX 650W
      • Case:
      • HAF 912+
      • Operating System:
      • W7 Pro
      • Monitor(s):
      • iiyama XB3270QS-B1 32" IPS 1440p

    Re: Modding an Antec 300

    I've got a feeling Wet&Dry is actually a brand name.
    The stuff is correctly called Resin bonded Silicon Carbide abrasive paper, but everyone calls it wet'n'dry paper or Silicon Carbide paper.
    It doesn't have to be 600 grit, that's just a good middle range size (the size will be listed on the back of the paper, a number, sometimes with the letter P in front, eg P600 = 600 grit) 300 to 600, I'd not go any rougher than 300 or smoother than 600 (maybe 800 if I couldn't get 600), going smoother than 600 means the paper is going to gum up with paint/zinc very fast.
    Normally grey in colour with a blue or baege backing


    You want wet/dry paper as apposed to basic sand paper, as the resin bonding makes it more robust, normal yellow or red sand paper will strip fairly quickly so you'll go through more of it and you'll have lots of loose sand to clear away as well as dust.

  8. #7
    I'm Very Important
    Join Date
    Jul 2009
    Posts
    2,955
    Thanks
    322
    Thanked
    360 times in 318 posts
    • Domestic_Ginger's system
      • Motherboard:
      • Gigabyte GA-MA770-UD3
      • CPU:
      • Phenom II X2 550
      • Memory:
      • 4GB DDR2
      • Storage:
      • F3 500gb
      • Graphics card(s):
      • 5850
      • PSU:
      • Corsair 550vx
      • Case:
      • NZXT beta evo
      • Operating System:
      • W7
      • Monitor(s):
      • G2222HDL

    Re: Modding an Antec 300

    Bit bored at work, that electro plated zinc got me thinking that maybe with a black electrolyte you could recoat the interior. Black electrolyte in solution in bathtub, car battery, case and....

    OK maybe not a good idea. Tried having a quick google/giggle and the home electrolysis is all about hair removal.

    Anyone tried it; not the offensive hair removal (am tempted to give my nipples a go) but coating metal surfaces?

  9. Received thanks from:

    nibbler (15-12-2009)

  10. #8
    Pre-Cambrian nibbler's Avatar
    Join Date
    Aug 2009
    Location
    London
    Posts
    3,668
    Thanks
    913
    Thanked
    266 times in 216 posts
    • nibbler's system
      • CPU:
      • i5-2410m
      • Memory:
      • 6GB ddr3 1333mhz
      • Storage:
      • 256GB Plextor M5S SSD
      • Graphics card(s):
      • 1GB 6650M
      • Operating System:
      • Windows 7 64 bit

    Re: Modding an Antec 300

    Well I would be willing to give it a quick once over but realistically how would it do without that much sanding? If it feels smooth are we good?

  11. #9
    Senior Member Pob255's Avatar
    Join Date
    Apr 2007
    Location
    The land of Brum
    Posts
    10,143
    Thanks
    608
    Thanked
    1,226 times in 1,123 posts
    • Pob255's system
      • Motherboard:
      • Asus M5A99X EVO
      • CPU:
      • FX8350 & CM Hyper 212+
      • Memory:
      • 4 x 2gb Corsair Vengence 1600mhz cas9
      • Storage:
      • 512gb samsung SSD +1tb Samsung HDD
      • Graphics card(s):
      • EGVA GTX970
      • PSU:
      • Seasonic GX 650W
      • Case:
      • HAF 912+
      • Operating System:
      • W7 Pro
      • Monitor(s):
      • iiyama XB3270QS-B1 32" IPS 1440p

    Re: Modding an Antec 300

    It's not so much an issue of getting it smooth, as it probably will be pritty smooth already, it's more roughing/breaking up the current surface so the paint you put on will stick to the surface better.

    Depending on the primer, you'll probably not need to sand that as most primers actually dry to a semi-porus state to allow outter coats of paint to stick to it.

    I does just need a quick once over, if you where painting the outsides of the case you'd want to do a more thourgher job of it as that will get bashed about more and is more likely to get damaged.

  12. #10
    Senior Member
    Join Date
    Nov 2006
    Posts
    453
    Thanks
    27
    Thanked
    47 times in 44 posts
    • mac124's system
      • Motherboard:
      • MSI P55 GD65
      • CPU:
      • Intel i5 750 @ 4Ghz
      • Memory:
      • 8GB Mushkin Redline 2133
      • Storage:
      • 40Gb Mushkin SSD + 500GB F3
      • Graphics card(s):
      • Gigabyte GTX580.
      • PSU:
      • Evo Blue 650
      • Case:
      • Akasa Infiniti
      • Operating System:
      • Windows 7 64
      • Monitor(s):
      • 24" Samsung
      • Internet:
      • 1Mb thanks to living in the sticks.

    Re: Modding an Antec 300

    basically you sand it to remove any impurities etc that will cause the paint to react / bubble etc and to give it a slightly rough surface to key it or to make the paint "stick" as Spork said.

    Persoanlly i would imagine a quick going over on the drive cages as they aren't particularly big but its work spending a bit more time on the larger surfaces.

    A couple of hours prep could save hours in sanding it off later if you cut corners and the paint reacts. Least this is what my old man used to say when painting cars.

    "It's all in the prep"
    Hack: i5 2500~ASROCK Z68 EXTREME4 GEN3~8GB Vengance~HD4770~ ANTEC 302~CX600.
    Gamer: i7 3820 @ 4.4Ghz~MSI X79A-GD65~16GB Redline 2133~Gigabyte GTX580~TT A90~CM SILENT PRO 1000w.


  13. #11
    Pre-Cambrian nibbler's Avatar
    Join Date
    Aug 2009
    Location
    London
    Posts
    3,668
    Thanks
    913
    Thanked
    266 times in 216 posts
    • nibbler's system
      • CPU:
      • i5-2410m
      • Memory:
      • 6GB ddr3 1333mhz
      • Storage:
      • 256GB Plextor M5S SSD
      • Graphics card(s):
      • 1GB 6650M
      • Operating System:
      • Windows 7 64 bit

    Re: Modding an Antec 300

    OK cheers ill remember this stuff guys!

  14. #12
    Pre-Cambrian nibbler's Avatar
    Join Date
    Aug 2009
    Location
    London
    Posts
    3,668
    Thanks
    913
    Thanked
    266 times in 216 posts
    • nibbler's system
      • CPU:
      • i5-2410m
      • Memory:
      • 6GB ddr3 1333mhz
      • Storage:
      • 256GB Plextor M5S SSD
      • Graphics card(s):
      • 1GB 6650M
      • Operating System:
      • Windows 7 64 bit

    Re: Modding an Antec 300

    Got it today
    Feels really nice and smooth I would really be loathe to sand this down. But whatever you say
    Just felt it again feels uber smooth...

  15. #13
    Pre-Cambrian nibbler's Avatar
    Join Date
    Aug 2009
    Location
    London
    Posts
    3,668
    Thanks
    913
    Thanked
    266 times in 216 posts
    • nibbler's system
      • CPU:
      • i5-2410m
      • Memory:
      • 6GB ddr3 1333mhz
      • Storage:
      • 256GB Plextor M5S SSD
      • Graphics card(s):
      • 1GB 6650M
      • Operating System:
      • Windows 7 64 bit

    Re: Modding an Antec 300

    Update:
    I ordered those 1.5" reinforced cutting wheels and 600 grit wet and dry. Still to come too is the Matt black paint. I stripped out the case and I had a few problems with removing front panel connectors, the power and reset switch were troublesome as well as the LEDs. The LEDs are staying in but I managed to cut out the switches, I'll just have to glue them back in later :s I'll cross that bridge when I come to it. Apart from that I taped up the LED's front and rear and I removed fans as well as fan grills. A lot of people remove the mesh from the fan grill, any point in this? Photo's Below:


    K pics are 10MP and haven't been resized, I'll fix this in a sec

  16. #14
    Oh Crumbs.... Biscuit's Avatar
    Join Date
    Feb 2007
    Location
    N. Yorkshire
    Posts
    11,193
    Thanks
    1,394
    Thanked
    1,091 times in 833 posts
    • Biscuit's system
      • Motherboard:
      • MSI B450M Mortar
      • CPU:
      • AMD 2700X (Be Quiet! Dark Rock 3)
      • Memory:
      • 16GB Patriot Viper 2 @ 3466MHz
      • Storage:
      • 500GB WD Black
      • Graphics card(s):
      • Sapphire R9 290X Vapor-X
      • PSU:
      • Seasonic Focus Gold 750W
      • Case:
      • Lian Li PC-V359
      • Operating System:
      • Windows 10 x64
      • Internet:
      • BT Infinity 80/20

    Re: Modding an Antec 300

    omg that picture is as big as a house >.<

  17. #15
    Pre-Cambrian nibbler's Avatar
    Join Date
    Aug 2009
    Location
    London
    Posts
    3,668
    Thanks
    913
    Thanked
    266 times in 216 posts
    • nibbler's system
      • CPU:
      • i5-2410m
      • Memory:
      • 6GB ddr3 1333mhz
      • Storage:
      • 256GB Plextor M5S SSD
      • Graphics card(s):
      • 1GB 6650M
      • Operating System:
      • Windows 7 64 bit

    Re: Modding an Antec 300

    Ye i didnt manage to resize reuploading now, new look image shack :x

  18. #16
    Pre-Cambrian nibbler's Avatar
    Join Date
    Aug 2009
    Location
    London
    Posts
    3,668
    Thanks
    913
    Thanked
    266 times in 216 posts
    • nibbler's system
      • CPU:
      • i5-2410m
      • Memory:
      • 6GB ddr3 1333mhz
      • Storage:
      • 256GB Plextor M5S SSD
      • Graphics card(s):
      • 1GB 6650M
      • Operating System:
      • Windows 7 64 bit

    Re: Modding an Antec 300

    First up my new Dremel:


    Taped up front connectors:


    The case stripped out with holes marked for cable management that I plan to cut:


    And my new Primer:


    I'll keep this project log of sorts going in case anyone is interested, but don't expect to learn much, this is my first time

  19. Received thanks from:

    Biscuit (19-12-2009),Pob255 (19-12-2009)

Thread Information

Users Browsing this Thread

There are currently 1 users browsing this thread. (0 members and 1 guests)

Similar Threads

  1. 4890 Vapor X, Antec 300, LG W2343T
    By Phage in forum Reader Reviews
    Replies: 5
    Last Post: 09-08-2009, 03:00 PM

Posting Permissions

  • You may not post new threads
  • You may not post replies
  • You may not post attachments
  • You may not edit your posts
  •