Page 2 of 8 FirstFirst 12345 ... LastLast
Results 17 to 32 of 124

Thread: Project: Spork

  1. #17
    ɯʎɔɐɹsɐʌʍ mycarsavw's Avatar
    Join Date
    Feb 2007
    Posts
    4,945
    Thanks
    1,097
    Thanked
    653 times in 482 posts
    • mycarsavw's system
      • Motherboard:
      • P8H77-M Pro
      • CPU:
      • i5 3350P
      • Memory:
      • 16Gb
      • Storage:
      • Lots
      • Graphics card(s):
      • R9 285
      • PSU:
      • HX 620w
      • Case:
      • FD Define Mini
      • Operating System:
      • W10
      • Monitor(s):
      • BenQ G2420HDBL + GL2450HT
      • Internet:
      • Sky

    Re: Project: Spork

    Enjoying this project so far - budget builds interest me far more than chequeboo/credit card ones.

    Quote Originally Posted by Pob255 View Post
    One Issue is the keys, I thought the yellowing was just filth and hand grease, but it seems some of the keys are stained/disscoloured, not sure what to do about that.
    I cannot paint them as I'd paint over the markings so I may look into dyeing them somehow, ether red or purple or blue depends on what colours I go for with this pc
    I really don't want to pee on your bonfire but this is theoretically what you're trying to achieve.

    You'd probably find it on ebay for a lot less and it'll leave you more time to build.
    |Kata: "Read title as 'fisting'. Not sure why I clicked. Relieved, really."|
    |TAKTAK: "It was so small that mine wouldn't fit into it"|

  2. #18
    Senior Member Pob255's Avatar
    Join Date
    Apr 2007
    Location
    The land of Brum
    Posts
    10,143
    Thanks
    608
    Thanked
    1,226 times in 1,123 posts
    • Pob255's system
      • Motherboard:
      • Asus M5A99X EVO
      • CPU:
      • FX8350 & CM Hyper 212+
      • Memory:
      • 4 x 2gb Corsair Vengence 1600mhz cas9
      • Storage:
      • 512gb samsung SSD +1tb Samsung HDD
      • Graphics card(s):
      • EGVA GTX970
      • PSU:
      • Seasonic GX 650W
      • Case:
      • HAF 912+
      • Operating System:
      • W7 Pro
      • Monitor(s):
      • iiyama XB3270QS-B1 32" IPS 1440p

    Re: Project: Spork

    No it's not, my plan was a two tone keyboard, with the keys a seprate colour not an all black one
    I would of got one of the very good logitech 250 deluxe keyboards through work if that was the case
    http://www.scan.co.uk/Products/Logit...oard-PS2-Black

    my idea is the inverse of this

  3. Received thanks from:

    mycarsavw (28-07-2009)

  4. #19
    Overclocking Since 1988 nightkhaos's Avatar
    Join Date
    Apr 2009
    Location
    Sydney, AU
    Posts
    1,415
    Thanks
    93
    Thanked
    127 times in 106 posts

    Re: Project: Spork

    Quote Originally Posted by Pob255 View Post
    No it's not, my plan was a two tone keyboard, with the keys a seprate colour not an all black one
    I would of got one of the very good logitech 250 deluxe keyboards through work if that was the case
    http://www.scan.co.uk/Products/Logit...oard-PS2-Black

    my idea is the inverse of this
    That is gonna look cool. Is the base paint glossy?
    Desktop (Cy): Intel Core i7 920 D0 @ 3.6GHz, Prolimatech Megahalems, Gigabyte X58-UD5, Patriot Viper DDR3 6GiB @ 1440MHz 7-7-7-20 2T, EVGA NVIDIA GTX 295 Co-Op, Asus Xonar D2X, Hauppauge WinTV Nova TD-500, 2x WD Caviar Black 1TB in RAID 0, 4x Samsung EcoDrive 1.5TB F2s in RAID 5, Corsair HX 750W PSU, Coolermaster RC-1100 Cosmos Sport (Custom), 4x Noctua P12s, 6x Noctua S12Bs, Sony Optiarc DVD+/-RW, Windows 7 Professional Edition, Dell 2408WFP, Mirai 22" HDTV

    MacBook Pro (Voyager): Intel Core 2 Duo @ 2.6GHz, 4GiB DDR2 RAM, 200GB 7200RPM HDD, NVIDIA 8600GTM 512MB, SuperDrive, Mac OS X Snow Leopard, 15.4" Matte Display

    HTPC (Delta-Flyer): Intel Core 2 Q8200 @ 2.33GHz, Zotec GeForce 9300-ITX, 2GiB of DDR2 Corsair XMS2 RAM, KWorld PE355-2T, Samsung EcoDrive F2 1.5TB, In-Win BP655, Noctua NF-R8, LiteOn BluRay ROM Drive, Windows 7 Home Premium, 42" Sony 1080p Television

    i7 (Bloomfield) Overclocking Guide

    Quote Originally Posted by Spock
    I am not our father.

  5. #20
    ɯʎɔɐɹsɐʌʍ mycarsavw's Avatar
    Join Date
    Feb 2007
    Posts
    4,945
    Thanks
    1,097
    Thanked
    653 times in 482 posts
    • mycarsavw's system
      • Motherboard:
      • P8H77-M Pro
      • CPU:
      • i5 3350P
      • Memory:
      • 16Gb
      • Storage:
      • Lots
      • Graphics card(s):
      • R9 285
      • PSU:
      • HX 620w
      • Case:
      • FD Define Mini
      • Operating System:
      • W10
      • Monitor(s):
      • BenQ G2420HDBL + GL2450HT
      • Internet:
      • Sky

    Re: Project: Spork

    Aah, completely misunderstood what it was you were trying to achieve, I thought you were going for an all black keyboard

    In that case, spray the keys red (without worrying about masking) and add coloured overlays.


    Glow in the dark - not sure they'd work too well on red keys though.


    Pink
    |Kata: "Read title as 'fisting'. Not sure why I clicked. Relieved, really."|
    |TAKTAK: "It was so small that mine wouldn't fit into it"|

  6. Received thanks from:

    Pob255 (28-07-2009)

  7. #21
    Overclocking Since 1988 nightkhaos's Avatar
    Join Date
    Apr 2009
    Location
    Sydney, AU
    Posts
    1,415
    Thanks
    93
    Thanked
    127 times in 106 posts

    Re: Project: Spork

    Or he could be really lucky and get some cheap OLED displays, and print them onto each key. Of course, wiring up the OLEDs and then findings a way to program the all might be troublesome!

    Or maybe I'm thinking five or six years into the future. I really need to stop doing that.
    Desktop (Cy): Intel Core i7 920 D0 @ 3.6GHz, Prolimatech Megahalems, Gigabyte X58-UD5, Patriot Viper DDR3 6GiB @ 1440MHz 7-7-7-20 2T, EVGA NVIDIA GTX 295 Co-Op, Asus Xonar D2X, Hauppauge WinTV Nova TD-500, 2x WD Caviar Black 1TB in RAID 0, 4x Samsung EcoDrive 1.5TB F2s in RAID 5, Corsair HX 750W PSU, Coolermaster RC-1100 Cosmos Sport (Custom), 4x Noctua P12s, 6x Noctua S12Bs, Sony Optiarc DVD+/-RW, Windows 7 Professional Edition, Dell 2408WFP, Mirai 22" HDTV

    MacBook Pro (Voyager): Intel Core 2 Duo @ 2.6GHz, 4GiB DDR2 RAM, 200GB 7200RPM HDD, NVIDIA 8600GTM 512MB, SuperDrive, Mac OS X Snow Leopard, 15.4" Matte Display

    HTPC (Delta-Flyer): Intel Core 2 Q8200 @ 2.33GHz, Zotec GeForce 9300-ITX, 2GiB of DDR2 Corsair XMS2 RAM, KWorld PE355-2T, Samsung EcoDrive F2 1.5TB, In-Win BP655, Noctua NF-R8, LiteOn BluRay ROM Drive, Windows 7 Home Premium, 42" Sony 1080p Television

    i7 (Bloomfield) Overclocking Guide

    Quote Originally Posted by Spock
    I am not our father.

  8. #22
    Senior Member Pob255's Avatar
    Join Date
    Apr 2007
    Location
    The land of Brum
    Posts
    10,143
    Thanks
    608
    Thanked
    1,226 times in 1,123 posts
    • Pob255's system
      • Motherboard:
      • Asus M5A99X EVO
      • CPU:
      • FX8350 & CM Hyper 212+
      • Memory:
      • 4 x 2gb Corsair Vengence 1600mhz cas9
      • Storage:
      • 512gb samsung SSD +1tb Samsung HDD
      • Graphics card(s):
      • EGVA GTX970
      • PSU:
      • Seasonic GX 650W
      • Case:
      • HAF 912+
      • Operating System:
      • W7 Pro
      • Monitor(s):
      • iiyama XB3270QS-B1 32" IPS 1440p

    Re: Project: Spork

    Quote Originally Posted by mycarsavw View Post
    In that case, spray the keys red (without worrying about masking) and add coloured overlays.

    Glow in the dark - not sure they'd work too well on red keys though.

    Pink
    where from and how much? this free keyboard is starting to get expensive

    EDIT: Doh just spotted the image addresses

  9. #23
    Senior Member Pob255's Avatar
    Join Date
    Apr 2007
    Location
    The land of Brum
    Posts
    10,143
    Thanks
    608
    Thanked
    1,226 times in 1,123 posts
    • Pob255's system
      • Motherboard:
      • Asus M5A99X EVO
      • CPU:
      • FX8350 & CM Hyper 212+
      • Memory:
      • 4 x 2gb Corsair Vengence 1600mhz cas9
      • Storage:
      • 512gb samsung SSD +1tb Samsung HDD
      • Graphics card(s):
      • EGVA GTX970
      • PSU:
      • Seasonic GX 650W
      • Case:
      • HAF 912+
      • Operating System:
      • W7 Pro
      • Monitor(s):
      • iiyama XB3270QS-B1 32" IPS 1440p

    Re: Project: Spork

    My plans may be scrapped
    Now I was planning on lowering the psu and sticking a 180mm fan in the top, so I made up a template.
    However this case is only 185mm wide and it looked a bit too tight, so I went over to the Yate Loon site and grabed a copy of there technical darwing image of there 140mm fans
    I printed it out to scale, cut it out and had a play around, it looks good

    As both my new saft galsses and pop rivet gun have arrived I was just about start cutting up the back plate when I thought "What about clearence for the top fan?"
    well where I was about to cut it there wouldn't be enough space for a top fan.
    And after a bit more checking I think I may have to scrap the whole idea unless I can find someplace that will custom make a whole back plate very cheaply.
    I'm going to have to wait for the motherboard and PSU to turn up befor I can get a full idea of scale of the problem.
    Space is realy going to be tight in this case, I my end up going back to the positive pressure idea.

  10. #24
    Senior Member Pob255's Avatar
    Join Date
    Apr 2007
    Location
    The land of Brum
    Posts
    10,143
    Thanks
    608
    Thanked
    1,226 times in 1,123 posts
    • Pob255's system
      • Motherboard:
      • Asus M5A99X EVO
      • CPU:
      • FX8350 & CM Hyper 212+
      • Memory:
      • 4 x 2gb Corsair Vengence 1600mhz cas9
      • Storage:
      • 512gb samsung SSD +1tb Samsung HDD
      • Graphics card(s):
      • EGVA GTX970
      • PSU:
      • Seasonic GX 650W
      • Case:
      • HAF 912+
      • Operating System:
      • W7 Pro
      • Monitor(s):
      • iiyama XB3270QS-B1 32" IPS 1440p

    Re: Project: Spork

    Still plotting and planning, I think I can do it with just enough space left over.
    To give you an idea of what I was and am now planning

    The original idea was cut it right at the base of the psu hole as that very conveniently left enough flat metal to slot into the lip on the top panel and the central hole nicely lined up to pop rivet it back into place.
    Then I could cut out a new section of metal to go at the bottom for the psu.

    However that would only leave me approx 15mm clearence between the top of the case and the motherboard which is not enough room for a fan, standard depth is 25mm
    The new cut line gives me 30mm clearence, it does reduce the excess clearence I have at the bottom for the psu which will make fitting it more tricky but still possible.
    The issue which you can see from the image is the psu hole, I've overlayed the top panel overhang in the image and you can clearly see the gap.
    What I'm thinking is cutting a out metal plate, pop rivet it into thoes 3 holes just above the motherboard, then pop rivet the top panel into the plate.
    What I'm worried about is the strength, this case seems to have been designed by some very inscrutable oriental gentleman, it's an amazing example of how to fold a single steet of thin steel which is full of holes for maximum strength.
    I'm a little scared I'm going to make a total botch job of this and right off the case 
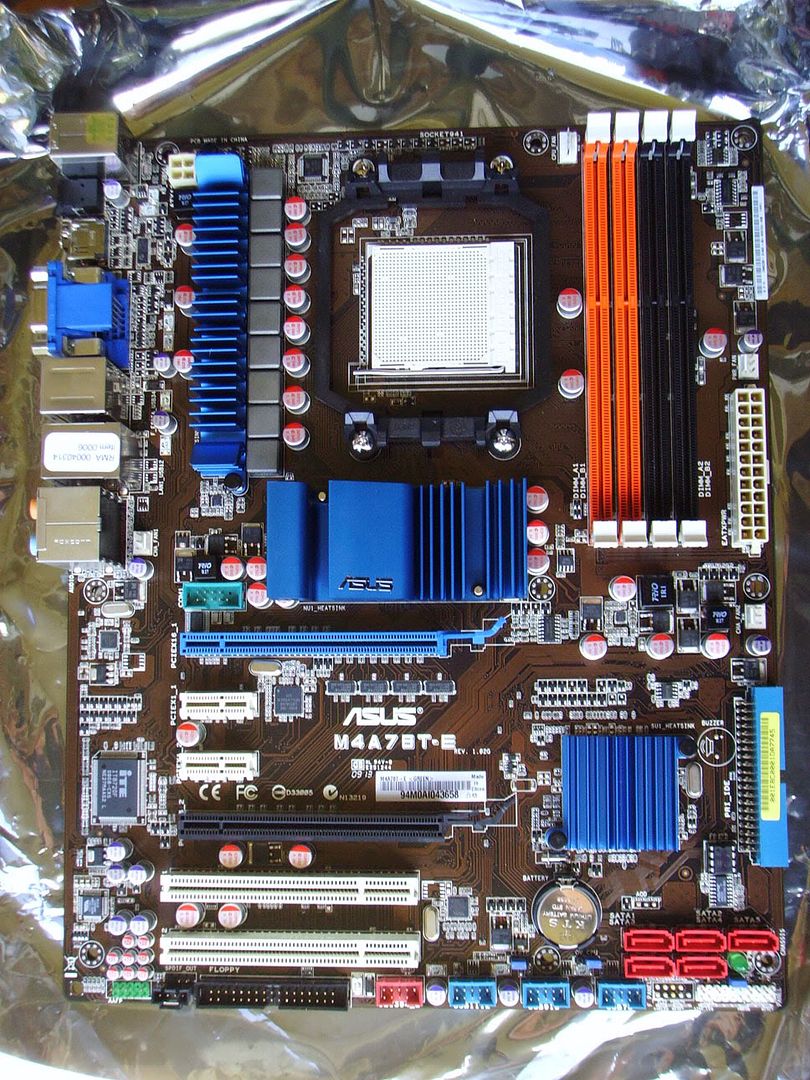
and I cannot find any form of company name on the case or box, so I'd have no one to contact to get a replacement if I do muck it up.

    The positive pressure idea is starting to look better and better as all that entails is cutting a couple of fan holes in the bottom of the case and a vent in the top panel.


    But damn it! I don't what to go the easy route, if I did I would just of told my friend he was getting an Antec 300 or if he realy wanted an alienware looking case then he would have to shell out for an alienware system.
    If only this case was just a little bigger.

    Anyone know of any 140mm x 12mm fans? or 120mm x 12mm fans with leds?
    I know the Scythe make a 100mm x 12mm fan and I think they do a 120mm version, although it's not on their website I'm getting fed up with pc components manufactors not listing all there models on their websites
    http://www.scythe-usa.com/product/ac...12_detail.html

  11. #25
    Senior Member Pob255's Avatar
    Join Date
    Apr 2007
    Location
    The land of Brum
    Posts
    10,143
    Thanks
    608
    Thanked
    1,226 times in 1,123 posts
    • Pob255's system
      • Motherboard:
      • Asus M5A99X EVO
      • CPU:
      • FX8350 & CM Hyper 212+
      • Memory:
      • 4 x 2gb Corsair Vengence 1600mhz cas9
      • Storage:
      • 512gb samsung SSD +1tb Samsung HDD
      • Graphics card(s):
      • EGVA GTX970
      • PSU:
      • Seasonic GX 650W
      • Case:
      • HAF 912+
      • Operating System:
      • W7 Pro
      • Monitor(s):
      • iiyama XB3270QS-B1 32" IPS 1440p

    Re: Project: Spork

    More Stuff! arrived today well some arrived and one I had to go collect from the post office.

    First up the motherboard


    I got this From Novatech's ebay store, novatech sell off all there grade B stock through an ebay shop

    As you can see it's missing most of it's leads and bits like the Q-connectors

    Also the sharp eyed amoungst you may have spotted something else that's wrong.


    Here's a hint the Asus M3A78-T has gold coloured heatsinks


    Yep it's not an Asus M3A78-T but is infact an

    Yep I got the newer slightly better motherboard which normally retails for around £90+ for £44 (+£7 p&p)
    Here it is


    Just need the PSU and cpu to turn up now so I can test it out, but I'm not too worried about it because, I've ordered from novatech before and they where very good and they cover there garde B ebay stuff with a 2 month warranty.
    So if there is any issue with this motherboard I should get a good customer service responce.

    The 2nd on today's deliveries was some woven wire mesh (steel, black epoxy coated)
    I would of loved to get some modders Hex mesh but that stuff costs and is not easy to get hold of in the UK
    This is what I found http://cgi.ebay.co.uk/ws/eBayISAPI.d...m=130314586460
    Now I wasn't exactly sure about this stuff, but decided to risk it, when I opened the packet and had a shock
    A plesent shock.
    What I paid for was 1 x A4 sheet what I actually got was 2 x A4 sheets and 2 x A5 sheets
    here's what an A5 sheet looks like

    I'm innitally very pleased with this mesh, it should work out very well.
    here's a couple of close ups so you can get a good idea of the hole size and weave


    Well I've been putting cutting up this pc case for long enough, now the mesh has turned up I'm not sure I can put it off any longer.

    Time to bite the bullet, back soon with good news I hope.

    EDIT: I also have to fight off the distraction of my copies of Fallout 3 and Dawn of War 2 which I finally got around to ordering and also arrived today. must resist . . .

  12. #26
    Senior Member Pob255's Avatar
    Join Date
    Apr 2007
    Location
    The land of Brum
    Posts
    10,143
    Thanks
    608
    Thanked
    1,226 times in 1,123 posts
    • Pob255's system
      • Motherboard:
      • Asus M5A99X EVO
      • CPU:
      • FX8350 & CM Hyper 212+
      • Memory:
      • 4 x 2gb Corsair Vengence 1600mhz cas9
      • Storage:
      • 512gb samsung SSD +1tb Samsung HDD
      • Graphics card(s):
      • EGVA GTX970
      • PSU:
      • Seasonic GX 650W
      • Case:
      • HAF 912+
      • Operating System:
      • W7 Pro
      • Monitor(s):
      • iiyama XB3270QS-B1 32" IPS 1440p

    Re: Project: Spork

    UPDATE: Biting the bullet

    Well I managed to not play Fallout3, although I did install it and instead I hacked up the back panel

    First things first, Safety. I got some new safety glasses and picked up a pair of safety gloves

    Ok, the gloves are actually gardening gloves, however the rubber dots over them massively improve grip, they'll not give as much protection as real safety gloves, but for me not having a rotary tool slip out of your hands is a bigger safety feature.
    These are just more to protect my hands from burs and flying sparks. I already have a cut on my thumb from just drilling out the rivets and takeing the case apart last week


    Here's my trusty rotary tool all ready to go (it was cheap from woolworths back when they existed)


    The deed has been done.

    More to follow, it's gone 10pm I've not had dinner and I need food, so you'll have to wait an hour or so for me to post the rest of what I've done.
    And find out how successful I was.
    Last edited by Pob255; 30-07-2009 at 11:41 PM. Reason: Thumbnailized the images

  13. #27
    Senior Member Pob255's Avatar
    Join Date
    Apr 2007
    Location
    The land of Brum
    Posts
    10,143
    Thanks
    608
    Thanked
    1,226 times in 1,123 posts
    • Pob255's system
      • Motherboard:
      • Asus M5A99X EVO
      • CPU:
      • FX8350 & CM Hyper 212+
      • Memory:
      • 4 x 2gb Corsair Vengence 1600mhz cas9
      • Storage:
      • 512gb samsung SSD +1tb Samsung HDD
      • Graphics card(s):
      • EGVA GTX970
      • PSU:
      • Seasonic GX 650W
      • Case:
      • HAF 912+
      • Operating System:
      • W7 Pro
      • Monitor(s):
      • iiyama XB3270QS-B1 32" IPS 1440p

    Re: Project: Spork

    UPDATE: Biting the bullet, part 2
    remember click on thumbnails for full sized image

    Ok I've cooked and eaten dinner now time to get on with the post of the next part of todays work.

    Issue 1, false economy
    I only had 2 cutting disks left for my rotary tool and know how long it's been since I last used it I though I should get some more discs.
    I looked at some reenforced cutting disks, they were £10 for a pack of 5 but I also found some basic cheap ones simular to what I have 36 of them for £2.50.
    It was a mistake, I broke one almost stright off, "ok probably my shakey hands" I thought the 2nd lasted longer but not that much longer before it went PING!
    And this was while I was just cutting off the PSU section and then trimming the two edges.
    So I got out one of my old discs to compair them, the old ones, which came with the rotary tool, have a slightly larger diameter, look stightly thicker and feel a little heavier (hard to tell on something that small)
    So I used one of the old discs and no ping this time, although I did ware it out and went back to the cheap discs, to save my last good one.
    I think I went through about 12 of these cheap discs today 
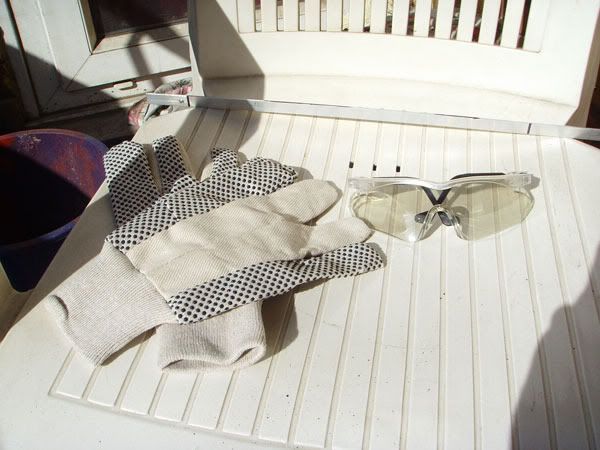
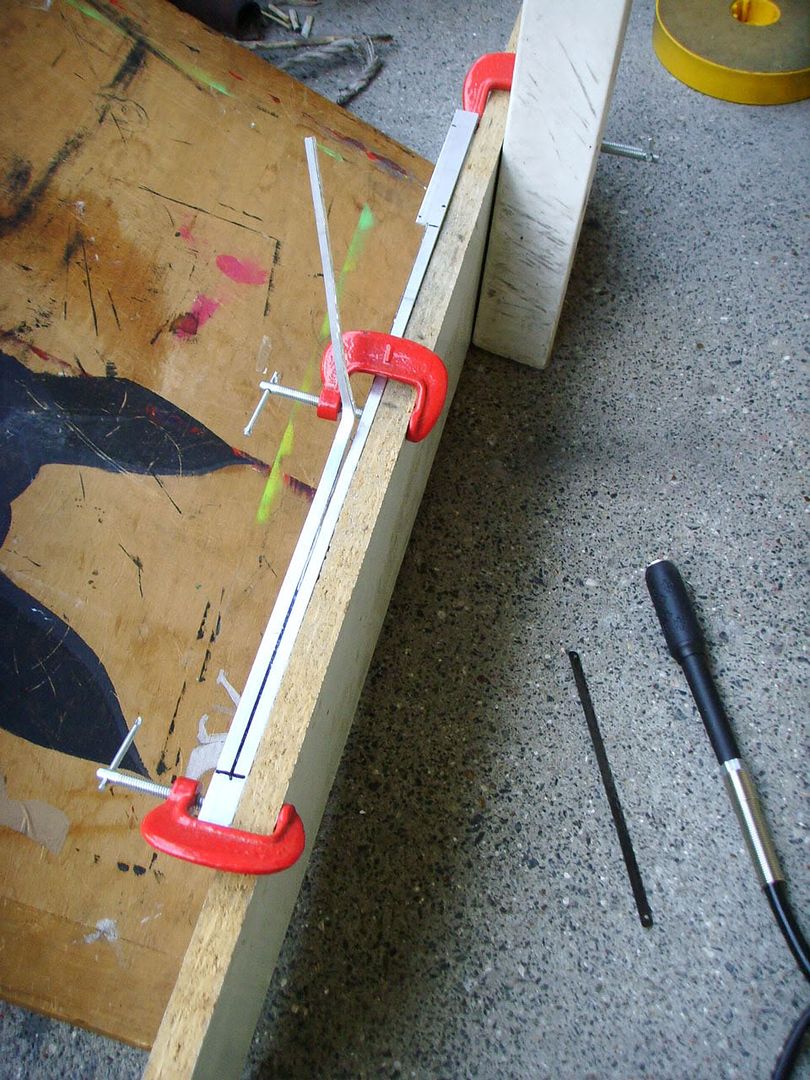
I'm going to have to get some good ones. (although not all of them went PING!)


    With the edges trimed I then trimed the bottom of the panel

    As you can see I got into some odd positions to get a good cutting angle, due inpart to only haveing 3 G-clamps and a confined work area.
    Speaking of which, I'm sorry there are no action shots of the sparks flying, there's just not enough room for two people on our balcony and space to work.

    With the back panel ready I now moved onto the motherboard tray.
    Now originally the tray extended up past the motherboard, all the way to the top panel, where it was riveted into place.
    So I needed to cut the top off of it and trim it a bit to so it doesn't interfear with the new back panel location.

    No I didn't cut the top off in that position, I forgot to do a pic of the first cut, I put the cut off section into the pic so you can see what I've removed.
    In that pic it's currently ready for the first clearence trim (see the marked area) and after that small trim cut it was ready.

    Time to do a test fit . . . 
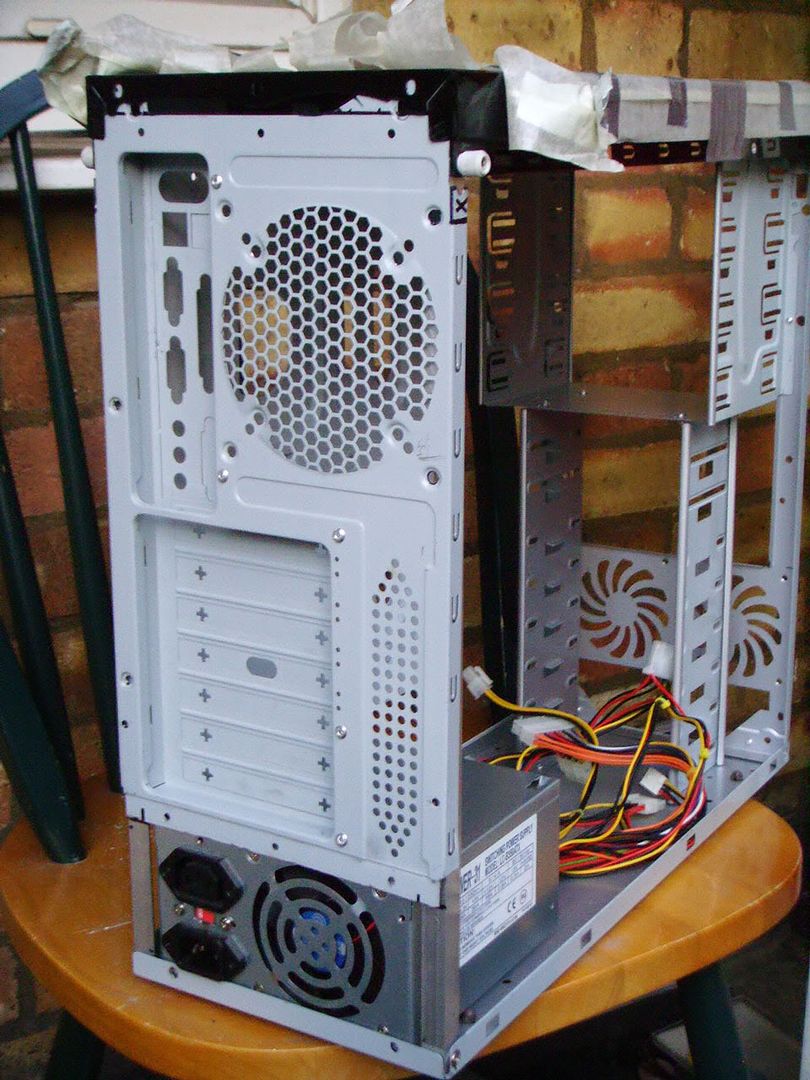
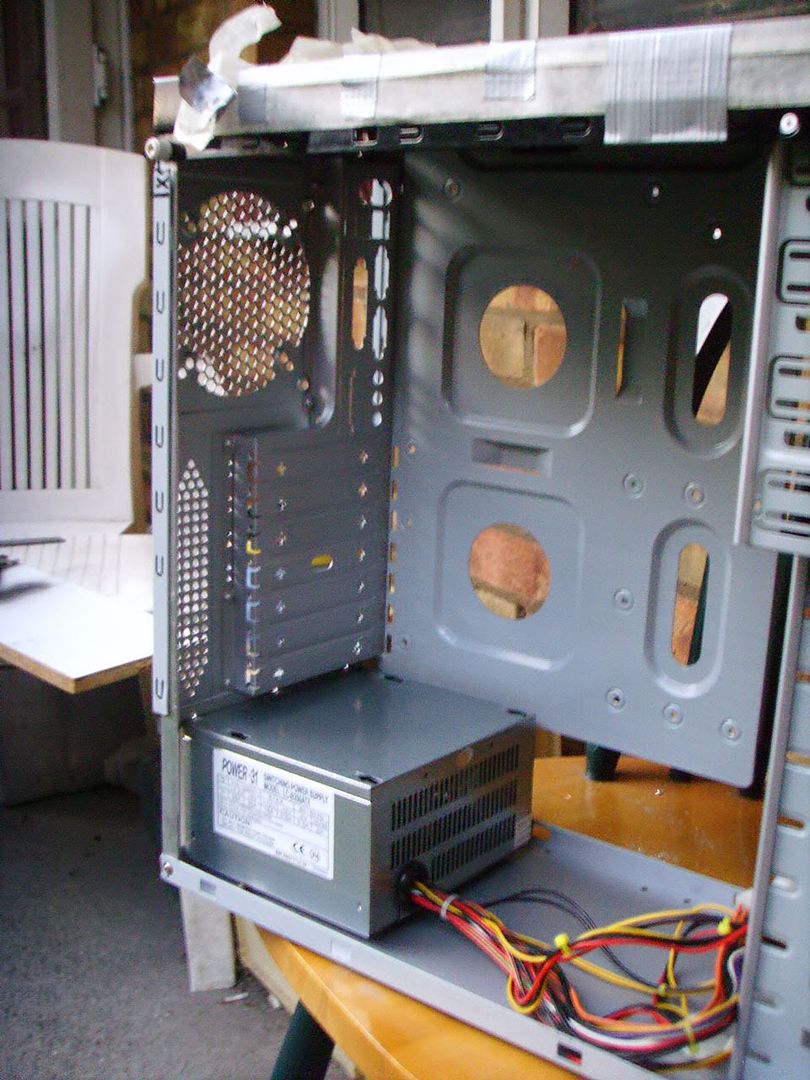
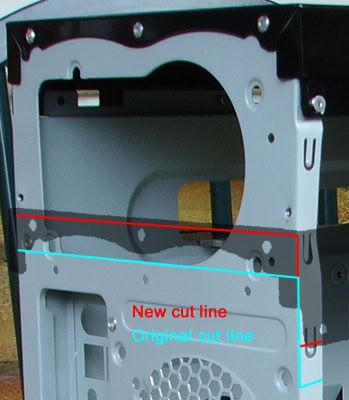
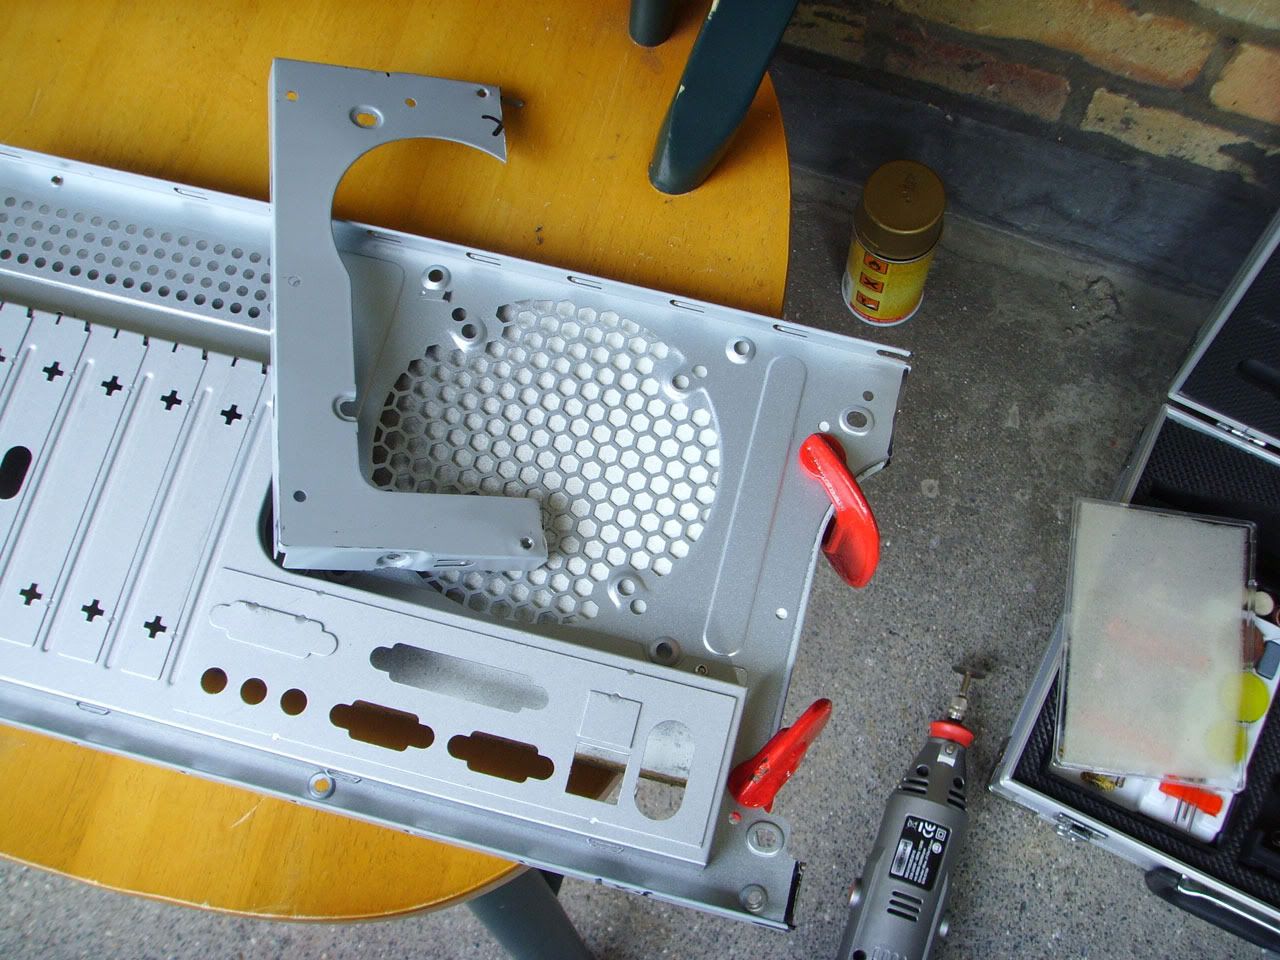
the motherboard tray is in the way of the Aluminium uprights and the depressed screw holes for the rear fan on the other upright.

    So I needed to trim the uprights.

    Now this is where it got intresting, I've not had to cut Aluminium with a rotary tool before.
    While this angle section is far thicker than the steel of the case, aluminium is far softer than steel.
    So I thought I'd try to use the flexable shaft for better control of the cut (I'm never too sure about the flexable shaft's effect on the torque)
    Now as you can see from the pic, I clamped the angle section to the chunk of chipboard (which is my workbench), then I clamped that to the chair leg to hold it upright and a wooden cutting board behind to keep it inplace.

    I started cutting and it was going well, easy to control, no skipping, also no sparks.
    As I started running my cut I noticed the disk getting smaller, now they do this normally but not at that speed and a heck of a lot of dust/particles were being produced.
    After about 4-5 cm I had to change discs, so this time I tried a far shallower cut, I got about 2/3rds the way through before the disk was too small.

    Cutting through the thick steel of my server case mod was less disk hungery than this
    Now it may just be the cheap discs, however I think it's more to do with the higher melting point of aluminium.
    You may of noticed the hacksaw blade on the ground in the pic, this was my final solution.
    I tried the hacksaw but a long cut in this way means the wide arc of the hacksaw causes the cut to curve off true.
    I also tried a steel sawtoothed disk, however the teeth are none too thick or hard or sharp, it did work but it was a lot of effort for very little cutting.
    So the simple methord was used, I finished off the cut with just a hacksaw blade in my gloved hand and a spot of elbow grease.

    Now I need to cut four U shaped holes out, two from each upright, each one is about 15-20mm wide.
    After the hassle I had with the long cut I knew I needed to get as much out with the hacksaw as possible, but you cannot make a curve that small with a hacksaw.
    A round file would of been great, however I don't have one.
    So what I did was make two cuts for the upright sections of the U, then carefully tried to drill 3 holes with my hand drill at the bottom of the U to reduce the amount I would have to remove to form a curve.

    I started out tring to shape it with a grinding bit, the bit wasn't eaten away like the discs but wasn't going anyware fast ether.
    I think the reason was the bit seems to be half covered with a thin layer of aluminium
    I decided to try to smooth out my first rough U shaped hole with the sanding durm and to my surprise it worked very well.
    What's more the tube of sandpaper on the drum was still a bit worn from the last time I'd used it.
    I put on a fresh tube of snadpaper and just used that on the remaining 3 holes, it worked a treat.
    Sorry no pic's here forgot to take any as it was now starting to get a bit late.

    However I now did a final test fitting and stuck my El-cheapo PSU in there to check the PSU clearence.

    Looking good


    Inside looks good too

    There are a couple of issues left to fix, the motherboard tray is just held in here by friction, as it doesn't go right up to the back panel, I'll need to do a little more trimming to get it to sit flush.
    I still need to figure out how to attach the motherboard tray to the top panel to give the case back some of it's rigidity and probably the case base as well.

    I also still need to do something about the hole at the top of the back panel.

    You can sort of see it in this pic.

  14. #28
    Senior Member Pob255's Avatar
    Join Date
    Apr 2007
    Location
    The land of Brum
    Posts
    10,143
    Thanks
    608
    Thanked
    1,226 times in 1,123 posts
    • Pob255's system
      • Motherboard:
      • Asus M5A99X EVO
      • CPU:
      • FX8350 & CM Hyper 212+
      • Memory:
      • 4 x 2gb Corsair Vengence 1600mhz cas9
      • Storage:
      • 512gb samsung SSD +1tb Samsung HDD
      • Graphics card(s):
      • EGVA GTX970
      • PSU:
      • Seasonic GX 650W
      • Case:
      • HAF 912+
      • Operating System:
      • W7 Pro
      • Monitor(s):
      • iiyama XB3270QS-B1 32" IPS 1440p

    Re: Project: Spork

    Well the PSU turned up today, no details as while I was looking at it the cpu turned up.


    on inspection of I noticed the word Sempron
    now the auction I won was for a "AMD ATHLON 64X2 CPU 5600 (2.8GHZ) SOCKET AM2"
    A closer inspection and I got the model number SDA3000DIO2BW

    a quick search http://www.cpu-world.com/CPUs/K8/AMD...000DIO2BW.html
    the cpu is a Sempron 64 3000+ socket 939

    I've now contacted the seller in hopes this is just an honest mistake and we can sort it out with out haveing to resort to getting a refund through ebay/paypal

    I'm not a happy bunny

  15. #29
    Senior Member Pob255's Avatar
    Join Date
    Apr 2007
    Location
    The land of Brum
    Posts
    10,143
    Thanks
    608
    Thanked
    1,226 times in 1,123 posts
    • Pob255's system
      • Motherboard:
      • Asus M5A99X EVO
      • CPU:
      • FX8350 & CM Hyper 212+
      • Memory:
      • 4 x 2gb Corsair Vengence 1600mhz cas9
      • Storage:
      • 512gb samsung SSD +1tb Samsung HDD
      • Graphics card(s):
      • EGVA GTX970
      • PSU:
      • Seasonic GX 650W
      • Case:
      • HAF 912+
      • Operating System:
      • W7 Pro
      • Monitor(s):
      • iiyama XB3270QS-B1 32" IPS 1440p

    Re: Project: Spork

    Still waiting to hear back from the seller, if nothing occures by monday then I'll start a dispute to try to get my money back.
    What's really annoying is I managed with some careful bidding and out snipeing to get win that auction at only £31 which I think is about right for a 2nd hand x2 5600+ seeing as I could get a new 5600+ for £50-60 and the new phenon II based athlon x2's which are faster still for about the same.

    If I end up getting my money back I'll probably look at getting a 4000+ for £33 or the new 240 for £45 from an e-tailer
    I was hopeing that the new cpu release and price drops on older models would mean there where more 2nd cpu's for sale and at lower prices.
    However the cpu's on fleabay are mostly over priced "buy it now" or have idiots bidding auctions up bit by bit at a £1 a go untill they cost the same as they would new


    Anyway here's the lowdown on the PSU

    What a managed to get is a seasonic SS-600HT which is a decent if mimimul frills 600watt psu, it won it for £36.50+ £7 P&P
    Two +12v rails 36amps combined


    Here it is in all it's spaghetti monster cable goodness

    The wires are thick, well twisted and zip tied too keep them together.

    Here's the 120mm fan, intact warranty sticker and you can just see the tell tail Seasonic heat sinks inside


    There are a couple of oddities/down sides, the cables and unbraided and not very long.
    It's got a fan monitor lead (which you don't seen that much any more) and strangely instead of having a 4+4pin eps motherboard connector it has two seperate eps leads, a 4pin and a 8pin.
    Also the two graphics card connectors and both on a single lead.


    cables are:
    20+4pin motherboard lead
    4pin eps motherboard lead
    8pin eps motherboard lead
    2x 6pin graphics card connectors on one lead
    3pin fan connector lead (monitor only)
    3x 4pin molex connectors on one lead
    3x 4pin molex & 1 floppy drive connectors on one lead

    Forgot to measure the cable lengths, it's just the motherboard leads that are rather short.
    If I'd left this case's layout as it originally was they would not of been an issue

    I think I may get some cable braiding and have a go at it, just to make it look pritty also may get some motherboard cable extentions.

    We've got guests comming for the weekend so I've had the tidy everything away from the living room floor, so no more work on the case untill monday.

    EDIT: I've received an apologetic reply from the seller, who said it was a mix up and the correct one will be sent by 1st class mail tomorrow, so I'm back on track if a little delayed.
    I did want to get everything tested this weekend.

  16. #30
    Senior Member Pob255's Avatar
    Join Date
    Apr 2007
    Location
    The land of Brum
    Posts
    10,143
    Thanks
    608
    Thanked
    1,226 times in 1,123 posts
    • Pob255's system
      • Motherboard:
      • Asus M5A99X EVO
      • CPU:
      • FX8350 & CM Hyper 212+
      • Memory:
      • 4 x 2gb Corsair Vengence 1600mhz cas9
      • Storage:
      • 512gb samsung SSD +1tb Samsung HDD
      • Graphics card(s):
      • EGVA GTX970
      • PSU:
      • Seasonic GX 650W
      • Case:
      • HAF 912+
      • Operating System:
      • W7 Pro
      • Monitor(s):
      • iiyama XB3270QS-B1 32" IPS 1440p

    Re: Project: Spork

    Update: Key colour

    As I got the Rit dye and I'm still waiting on other bits to arrive, I decided to give the keyboard keys a dye.

    I've got an old sauce pan which has been designated for dyeing, as a way to hold the keys I got a cheap deep fryer basket.

    Here it is all ready to go.


    I brought the water up to a simmer, then turned it down, added half the dye and stired it well.
    (we have a pair of old wooden chopsticks only used for dyeing)

    I lowered the basket full of keys in and all seemed to be going well.


    And this is where I it all up.
    I wasn't paying it enough attention decided just to leave it rather than check on it every 20 seconds or so which I should of done.
    I honestly didn't think the dye would work that fast.

    Here's the final resault

    The colour is great, just what I was after, the deformed keys were not.
    I'm not 100% sure what went wrong, it was ether the water was too hot or I left it in too long or both.

    Live and learn, it's not 100% over yet, as I know I can grab another of the same keyboards from work, so I can give it another shot.
    And if all else fails I'll just have to buy one.

    I'm going to have a look around see if I've got any other old keybaords kicking about I can experiment on.

  17. Received thanks from:

    samcross (09-08-2009)

  18. #31
    Overclocking Since 1988 nightkhaos's Avatar
    Join Date
    Apr 2009
    Location
    Sydney, AU
    Posts
    1,415
    Thanks
    93
    Thanked
    127 times in 106 posts

    Re: Project: Spork

    Damn! That sucks man... if I had a spare keyboard I would send it to you, but my only unused keyboard is a bluetooth one, so probably not much use. I have a standard black keyboard from Trust, but that is used as my BIOS modifier keyboard (the G15 doesn't activate until Windows has started).
    Desktop (Cy): Intel Core i7 920 D0 @ 3.6GHz, Prolimatech Megahalems, Gigabyte X58-UD5, Patriot Viper DDR3 6GiB @ 1440MHz 7-7-7-20 2T, EVGA NVIDIA GTX 295 Co-Op, Asus Xonar D2X, Hauppauge WinTV Nova TD-500, 2x WD Caviar Black 1TB in RAID 0, 4x Samsung EcoDrive 1.5TB F2s in RAID 5, Corsair HX 750W PSU, Coolermaster RC-1100 Cosmos Sport (Custom), 4x Noctua P12s, 6x Noctua S12Bs, Sony Optiarc DVD+/-RW, Windows 7 Professional Edition, Dell 2408WFP, Mirai 22" HDTV

    MacBook Pro (Voyager): Intel Core 2 Duo @ 2.6GHz, 4GiB DDR2 RAM, 200GB 7200RPM HDD, NVIDIA 8600GTM 512MB, SuperDrive, Mac OS X Snow Leopard, 15.4" Matte Display

    HTPC (Delta-Flyer): Intel Core 2 Q8200 @ 2.33GHz, Zotec GeForce 9300-ITX, 2GiB of DDR2 Corsair XMS2 RAM, KWorld PE355-2T, Samsung EcoDrive F2 1.5TB, In-Win BP655, Noctua NF-R8, LiteOn BluRay ROM Drive, Windows 7 Home Premium, 42" Sony 1080p Television

    i7 (Bloomfield) Overclocking Guide

    Quote Originally Posted by Spock
    I am not our father.

  19. #32
    Senior Member Pob255's Avatar
    Join Date
    Apr 2007
    Location
    The land of Brum
    Posts
    10,143
    Thanks
    608
    Thanked
    1,226 times in 1,123 posts
    • Pob255's system
      • Motherboard:
      • Asus M5A99X EVO
      • CPU:
      • FX8350 & CM Hyper 212+
      • Memory:
      • 4 x 2gb Corsair Vengence 1600mhz cas9
      • Storage:
      • 512gb samsung SSD +1tb Samsung HDD
      • Graphics card(s):
      • EGVA GTX970
      • PSU:
      • Seasonic GX 650W
      • Case:
      • HAF 912+
      • Operating System:
      • W7 Pro
      • Monitor(s):
      • iiyama XB3270QS-B1 32" IPS 1440p

    Re: Project: Spork

    Thanks nightkhaos, looks like I may need one.

    I found I did indeed have a spare beige keyboard kicking about (that I seem to remember was a little dodgy)
    So I reheated the dye, this time I took it off the heat before lowering in the keys.
    Result, keys not deformed, but took very little colour and patchy as well.

    So again reheated the dye, lowered in the keys and kept a hawk like watch over them.
    Result, keys started to deform, so I got them out, they have taken little colour and the main areas of deformation is the connectors, so I doubt they'll go back into the keyoard now.

    Now if you look back at the first dyeing image I posted, you'll notice some blue connectors on the back of some of the keys.
    After a closer inspection these blue connectors did dye well and didn't deform, so I expect it's something to do with the plastic and/or processes used to make the keys that is the issue preventing my from dyeing them.

    Back to the drawing board.

Thread Information

Users Browsing this Thread

There are currently 1 users browsing this thread. (0 members and 1 guests)

Similar Threads

  1. help needed building a c++ project
    By kasavien in forum Software
    Replies: 5
    Last Post: 08-11-2006, 10:18 AM
  2. Project Mac Cube
    By Gordy in forum Chassis and Mods
    Replies: 23
    Last Post: 15-08-2005, 08:28 PM
  3. Project hack-it-up
    By Dihi Doctor in forum Chassis and Mods
    Replies: 2
    Last Post: 28-07-2005, 09:57 AM
  4. Project name suggestions?
    By atomicjeep in forum General Discussion
    Replies: 5
    Last Post: 22-02-2005, 07:57 PM
  5. Project Silicon.... Being Remade
    By Gordy in forum Chassis and Mods
    Replies: 93
    Last Post: 06-06-2004, 11:07 PM

Posting Permissions

  • You may not post new threads
  • You may not post replies
  • You may not post attachments
  • You may not edit your posts
  •